Some crochet projects are beautiful for a season, while others have the timeless charm of something that could be passed down through generations. The Vintage Rose Afghan is one of those special designs.
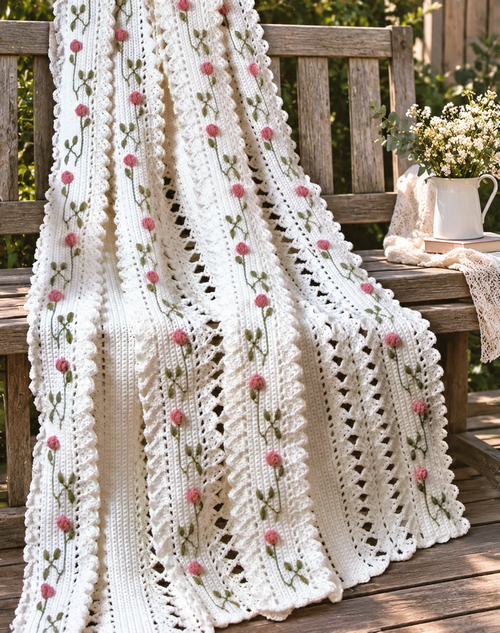
Featuring delicate rosebuds, embroidered stems and leaves, softly textured panels, and elegant lace sections, this floral afghan has the look of a cherished handmade heirloom. Its romantic design combines traditional crochet with simple embroidery to create a blanket that feels both classic and beautifully detailed.
The original color combination of white, rose pink, and green gives the afghan a soft vintage appearance, but there is plenty of room to make it your own. Choose colors that complement your home décor, or create a personalized version as a meaningful handmade gift.
Drape it over a sofa, place it at the end of a bed, or give it as a wedding or anniversary present. Wherever it is displayed, the Vintage Rose Afghan adds warmth, texture, and old-fashioned charm.
Vintage Rose Afghan Free Crochet Pattern
A Beautiful Combination of Crochet and Embroidery
One of the most appealing features of this afghan is the way several needlework techniques work together.
The main sections are crocheted in long strips using straightforward stitches. Raised rosebuds are then added to selected panels to give the flowers a dimensional effect. Green stems and leaves are embroidered directly onto the completed crochet fabric, creating a delicate botanical design.
Between the wider panels are narrow lace strips. These openwork sections provide a light and airy contrast to the solid crochet panels and help the floral details stand out.
Although the finished blanket looks intricate, the design is divided into individual sections, making it easier to work on one part at a time.
Pattern Overview
The Vintage Rose Afghan is made from three main types of strips:
- 4 decorative Strip A panels featuring rosebuds, stems, and leaves
- 3 solid Strip B panels
- 6 narrow lace strips placed between the wider panels
Each solid panel is approximately 5½ inches wide, while each lace strip measures approximately 2¾ inches wide.
Using the listed gauge and panel arrangement, the completed afghan measures approximately 55 inches wide by 66 inches long. Keep in mind that the final size can vary depending on your yarn, hook, and individual crochet tension.
Another useful feature of this pattern is the join-as-you-go construction. Instead of crocheting every strip separately and sewing everything together at the end, the lace strips are joined directly to the neighboring panels as you work. This creates a decorative connection while also reducing some of the finishing work.
Skill Level
Intermediate
The individual crochet stitches used throughout the pattern are fairly familiar, but the project does require patience and attention to detail.
The long foundation chains, lace edging, dimensional rosebuds, embroidery, and join-as-you-go technique all add some complexity. A confident beginner who is comfortable following written crochet instructions may also enjoy this project as an opportunity to learn several new techniques.
Materials Needed
For the traditional color combination, you will need:
- Worsted-weight yarn, White: approximately 59 oz (3,335 yards)
- Worsted-weight yarn, Green: approximately 2½ oz (140 yards)
- Worsted-weight yarn, Rose: approximately 1 oz (55 yards)
- Size H/8 (5 mm) crochet hook
- Yarn needle
- Stitch markers
- Scissors
- Fiberfill, optional, if you want fuller rosebuds
The white yarn makes up most of the blanket, including the background and lace sections. Rose-colored yarn is used for the raised flowers, while green yarn is used to embroider the stems and leaves.
Gauge
Make a 4-inch (10 cm) square gauge swatch.
Chain 15.
Row 1: Sc in the second ch from hook and in each ch across — 14 sc.
Rows 2–16: Ch 1, turn; sc in each sc across.
Fasten off.
Always check your gauge before beginning the full project. Matching the gauge will help you achieve a finished afghan closer to the stated dimensions.
Stitch Guide
Treble Crochet (tr)
YO twice, insert hook into the indicated stitch or space, YO and pull up a loop — 4 loops are now on the hook. (YO and draw through 2 loops on hook) 3 times.
Strip A — Make 4
Using White, ch 233.
Row 1
Hdc in the fifth ch from hook. The four skipped chains count as the first hdc plus ch-1 throughout the pattern.
(Ch 1, skip next ch, hdc in next ch) across.
You should have 116 hdc and 115 ch-1 spaces.
Row 2 — Right Side
Ch 1, turn. Sc in each hdc and in each ch-1 space across — 231 sc.
Tip: Tie a short piece of yarn around the second sc made to mark Row 2 as the right side and identify the bottom edge.
Row 3
Ch 1, turn; sc in each sc across.
Row 4
Ch 1, turn; sc in the first 36 sc. Place a marker around the post of the last sc made to indicate the first rosebud placement.
Sc in the next 38 sc, place a marker around the post of the last sc made for rosebud placement.
Repeat from * across to the last 5 sc, then sc in the final 5 sc.
Rows 5–7
Ch 1, turn; sc in each sc across.
Row 8
Ch 1, turn; sc in the first 17 sc. Place a marker around the post of the last sc made for rosebud placement.
Sc in the next 38 sc, place a marker around the post of the last sc made for rosebud placement.
Repeat from * 4 more times, then sc in the final 24 sc.
Rows 9–11
Ch 1, turn; sc in each sc across.
Row 12
Ch 3, turn; skip the next sc, hdc in the next sc.
(Ch 1, skip next sc, hdc in next sc) across.
Do not fasten off.
You should have 115 spaces.
Edging
Round 1
Ch 3, which counts as the first dc. Do not turn.
Work (2 dc, ch 1, dc, ch 1, 2 tr) around the post of the last hdc made.
Working along the ends of the rows, skip the next 3 rows, slip st in the next row, skip the following row, then work (2 dc, ch 1, 2 dc) in the next row.
Skip the next row, slip st in the next row, skip the following 2 rows, then work (2 tr, ch 1, dc, ch 1, 2 dc) in the corner space.
Place a marker in the last dc made to indicate the joining position.
Work (3 dc, hdc) in the same space.
Slip st in the next space.
(2 dc, ch 1, 2 dc) in the next space, slip st in the next space.
Repeat from * across to the last space.
Work (hdc, 5 dc, ch 1, dc, ch 1, 2 tr) in the last space.
Skip the next 2 rows, slip st in the next row, skip the following row, and work (2 dc, ch 1, 2 dc) in the next row.
Skip the next row, slip st in the next row, skip the next 3 rows, then repeat the section between the asterisks once.
Finish with (hdc, 2 dc) in the last space.
Join with a slip st to the first dc and fasten off.
There should be 122 ch-1 spaces.
First Side
With the right side facing, join White with a slip st in the marked dc at the end of the strip. Remove the marker.
Ch 1, skip the next dc, then work (dc, ch 3, dc) in the next dc.
Ch 2, skip the next 2 sts, slip st in the next slip st, ch 2.
(Dc, ch 3, dc) in the next ch-1 space, ch 2, skip the next 2 sts, slip st in the next slip st, ch 2.
Repeat from * across to the next corner group.
Skip the next 2 sts, work (dc, ch 3, dc) in the next dc, ch 1, skip the next dc, then slip st in the next dc.
Leave the remaining stitches unworked and fasten off.
You should have 58 ch-3 spaces.
Repeat the same process for the Second Side.
Finishing the Rosebuds
Rosebud
Place the strip with the right side and bottom edge facing you.
Join Rose with a slip st around the post of any marked sc.
Ch 4, then work 4 tr around the post of the same sc.
Drop the loop from the hook.
Insert the hook into the top of the beginning ch-4, skip the next 2 sc on the same row as the marked sc, and insert the hook into the next sc.
Pick up the dropped loop and pull it through all loops on the hook.
Fasten off and remove the marker.
Repeat for the remaining 11 rosebuds.
These small raised flowers are what give the afghan its signature three-dimensional floral detail.
Adding the Stems and Leaves
Thread a yarn needle with one strand of Green.
With the right side facing and beginning at the top of the strip, use the chart and finished photo as a guide for positioning the stems and leaves.
Stems
Use backstitch to create the stems.
Bring the needle up at point 1. Go down at point 2 and bring it back up at point 3.
For the next stitch, go down at point 1 and bring the needle up at point 4.
Continue working in the same manner to create the curved stems.
Leaves
Use satin stitch for the leaves.
Bring the needle up at point 1 and down at point 2.
Continue in the same manner, making 5 stitches for each leaf.
Take your time with the embroidery, as neat stitches will give the floral design a more polished appearance.
Strip B — Make 3
Using White, ch 233.
Row 1
Hdc in the fifth ch from hook.
(Ch 1, skip next ch, hdc in next ch) across.
You should have 116 hdc and 115 ch-1 spaces.
Row 2 — Right Side
Ch 1, turn; sc in each hdc and each ch-1 space across — 231 sc.
Mark the second sc made to identify the right side and bottom edge.
Rows 3–11
Ch 1, turn; sc in each sc across.
Row 12
Ch 3, turn; skip the next sc, hdc in the next sc.
(Ch 1, skip next sc, hdc in next sc) across.
Do not fasten off.
You should have 115 spaces.
Edging
Work the edging exactly as described for Strip A.
Lace Strips — Make 6
Using White, ch 233.
Foundation Row
Hdc in the fifth ch from hook.
(Ch 1, skip next ch, hdc in next ch) across.
You should have 116 hdc and 115 ch-1 spaces.
Round 1 — Right Side
Ch 4, which counts as the first tr. Turn.
Work (3 dc, hdc) in the first ch-1 space.
Slip st in the next ch-1 space.
Work (2 dc, ch 1, 2 dc) in the next space.
Slip st in the next space.
Repeat this pattern across to the final space.
In the last space, work:
[hdc, 3 dc, tr, (ch 1, tr) 3 times, 3 dc, hdc]
Place a marker in the last space to indicate the joining position.
Join with a slip st to the first tr.
Do not fasten off.
Joining the Strips
The afghan uses a join-as-you-go technique, which means the lace strips are attached directly to the neighboring Strip A and Strip B panels rather than being sewn together afterward.
Use the placement diagram as a guide. Each lace strip is crocheted to one Strip A and one Strip B, keeping the bottom edges aligned at the same end.
First Side — Joining Row
Ch 1, skip the next dc, dc in the next dc, ch 1.
Hold the lace strip and the Strip A or Strip B with their wrong sides together.
Slip st in the second ch of the corresponding ch-3 on the adjacent strip.
Ch 1, dc in the same dc on the lace strip, ch 2, skip the next 2 sts, slip st in the next slip st, ch 2.
Dc in the next ch-1 space, ch 1, slip st in the second ch of the corresponding ch-3 on the adjacent strip, ch 1.
Dc in the same space on the lace strip, ch 2, skip the next 2 sts, slip st in the next slip st, ch 2.
Repeat this joining sequence across to the next corner group.
Skip the next 2 sts, dc in the next dc, ch 1, slip st in the second ch of the corresponding ch-3 on the adjacent strip, ch 1.
Dc in the same stitch on the lace strip, ch 1, skip the next dc, slip st in the next tr.
Leave the remaining stitches unworked and fasten off.
Second Side — Joining Row
With the right side facing, skip the next 3 ch-1 spaces from the last slip st made.
Join White with a slip st in the next tr.
Work the same joining sequence as for the First Side.
The original design is credited to Mary Ann Brooks.
Final Thoughts
The Vintage Rose Afghan is much more than a cozy handmade blanket. It is a beautiful example of how traditional crochet and embroidery can be combined to create something that feels truly special.
The long strips divide the project into manageable sections, while the rosebuds, embroidered foliage, and lace panels provide plenty of variety along the way. The result is an elegant floral afghan with a distinctly vintage character.
Because of its romantic design, this blanket would make a thoughtful wedding gift, anniversary present, baby-room accent, or family keepsake. You can also change the yarn colors to create a version that perfectly matches your own style and décor.
If you enjoy crochet projects that combine texture, floral details, and traditional needlework, the Vintage Rose Afghan is a wonderful project to add to your collection.
The complete free instructions include the individual panels, floral embellishments, edging, embroidery, and join-as-you-go method. The original pattern is credited to Mary Ann Brooks.