How to Crochet the Beautiful 3D Shell Stitch
Welcome to Crochet Easy! If you’re looking for a crochet stitch that combines beautiful texture with an elegant design, the 3D Shell Stitch is a wonderful choice. Its raised, layered shells create a rich, dimensional look that adds charm to almost any crochet project.
Whether you’re just starting your crochet journey or have years of experience, this stitch is easy to learn and incredibly versatile. It’s perfect for creating cozy baby blankets, stylish scarves, elegant shawls, cushion covers, and many other handmade accessories.
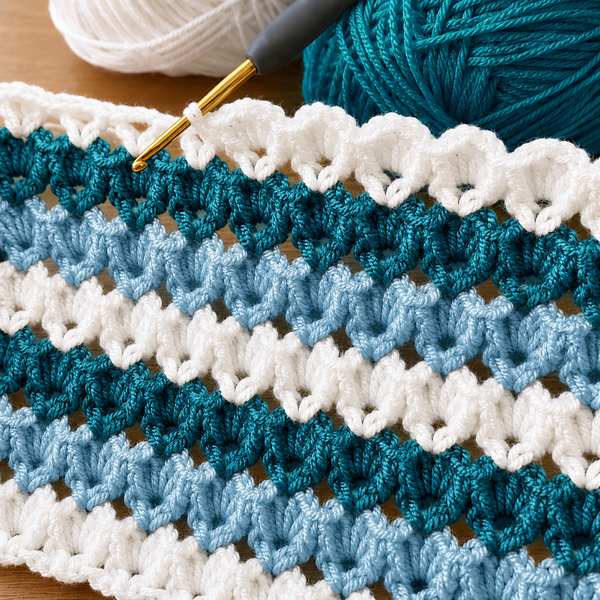
3D Shell Stitch Free Pattern
The 3D Shell Stitch stands out because of its eye-catching texture and layered appearance. The combination of shell stitches and front post stitches creates a fabric with impressive depth while remaining soft and flexible.
This stitch is ideal whenever you want your project to have extra visual interest without being overly complicated.
Crochet Abbreviations
The following abbreviations are used throughout this pattern:
- CH – Chain
- DC – Double Crochet
- RPT – Repeat
- SL ST – Slip Stitch
- ST – Stitch
- FPDC – Front Post Double Crochet
- FPDC2TOG – Front Post Double Crochet Two Together
- SHELL – 3 DC, CH 1, 3 DC
- V-ST – DC, CH 2, DC
- PREV – Previous
Materials You’ll Need
Before getting started, gather the following supplies:
- Yarn of your choice (medium or worsted-weight yarn provides excellent stitch definition)
- A crochet hook that matches your yarn
- Scissors
- Tapestry needle for weaving in the ends
3D Shell Stitch Pattern
Foundation Chain
Chain 37, or any multiple of 4 + 1 to create your desired project width.
Row 1
- Work a DC into the sixth chain from the hook.
- Chain 2, then work another DC into the same chain to create your first V-ST.
- Skip the next three chains.
- Work a V-ST (DC, CH 2, DC) into the next chain.
- Repeat Steps 3 and 4 across the row.
- Skip the last two chains and work one DC into the final chain.
- Chain 3 and turn.
Row 2
- Work one FPDC around the first DC of the first V-ST from the previous row.
- In the next V-ST space, work one SHELL (3 DC, CH 1, 3 DC).
- Work one FPDC2TOG around the last DC of the current V-ST and the first DC of the following V-ST.
- Repeat the Shell and FPDC2TOG sequence across the row.
- After the final Shell, work one FPDC around the last DC of the final V-ST.
- Finish with one DC in the top of the turning chain.
- Chain 3 and turn.
Row 3
- Work one V-ST into the CH-1 space of each Shell across the row.
- Finish with one DC in the turning chain.
- Chain 3 and turn.
Continue the Pattern
Repeat Rows 2 and 3 until your project reaches the desired length.
For different finishing edges:
- End with Row 2 for a decorative scalloped edge.
- End with Row 3 for a cleaner, straighter finish.
Helpful Tips
Maintain Even Tension
Consistent tension helps each shell keep its shape and ensures the overall pattern looks neat and uniform.
Choose the Right Yarn
Smooth cotton or quality acrylic yarns highlight the texture of this stitch beautifully. Avoid overly fuzzy yarns if you want the shell definition to stand out.
Customize the Width
You can make this pattern as wide or as narrow as you’d like by starting with any foundation chain that is a multiple of 4 plus 1.
Project Ideas
The 3D Shell Stitch is suitable for many crochet projects, including:
- Baby blankets
- Throw blankets
- Shawls
- Scarves
- Cushion covers
- Table runners
- Bags
- Home décor accessories
Its elegant texture gives even simple projects a professional, handmade appearance.
Final Thoughts
The 3D Shell Stitch is a beautiful textured pattern that combines elegance with simplicity. Once you’ve mastered the two repeating rows, you’ll discover how relaxing and enjoyable this stitch can be.
If you’re trying it for the first time, make a small practice swatch before beginning a larger project. It’s a great way to become comfortable with the stitch repeat and build confidence.
We hope this tutorial inspires your next crochet creation. Enjoy experimenting with different yarn colors and fibers to make this versatile stitch uniquely your own.
Happy crocheting!
Video Tutorial
Watch the complete video tutorial below to follow each step of the 3D Shell Stitch and crochet along at your own pace.
If you have any questions or would like to share your finished project, feel free to leave a comment. We’d love to see what you create!