Crochet Flower Bracelet Pattern 🌸
The Crochet Flower Bracelet Pattern is a beautiful and elegant accessory that combines handmade charm with delicate style. Crochet jewelry has become increasingly popular because it allows crafters to create unique, wearable pieces filled with personality and creativity.
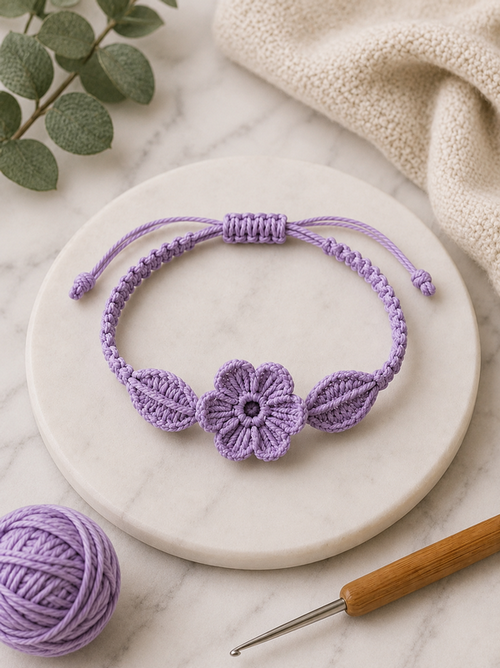
This bracelet features a decorative crochet band, a soft floral centerpiece, delicate leaves, and an adjustable sliding clasp for a comfortable fit. Whether you are making it for yourself, as a gift, or for your handmade shop, this project is both enjoyable and rewarding.
Crochet Flower Bracelet
Crochet the Bracelet Band
The bracelet band is worked in rows using double crochet stitches and decorative chain spaces.
Foundation Chain
Begin by making a foundation chain long enough to fit comfortably around your wrist, leaving extra length for the adjustable closure.
A good starting point is around 45–55 chains, depending on your wrist size and the thickness of your thread.
Row 1
Work 1 double crochet (dc) into the fourth chain from the hook.
Continue placing 1 dc into each chain across the row.
To create decorative openings, work the following pattern at even intervals:
- ch 2
- skip 2 stitches
- dc in the next stitch
Repeat this decorative spacing evenly across the bracelet band.
Finish the row with regular dc stitches.
Turn your work.
Row 2
Chain 3.
Work dc stitches across the row.
Whenever you reach a chain space from the previous row, work:
- 2 dc
- ch 2
- 2 dc
This creates the decorative openings shown in the design.
Continue across the row, then fasten off neatly and weave in the yarn tail.
Crochet the Center Flower 🌼
The flower is made separately using an adjustable ring and rounded petals.
Start the Flower Center
Create an adjustable ring.
Round 1
Chain 3 (counts as the first dc).
Work 15 more dc into the ring.
Join with a slip stitch (sl st) to the top of the beginning chain and pull the ring tight.
You should now have a neat circular flower center.
Round 2
Chain 1.
Create small chain loops around the circle:
- ch 3
- sl st into the next stitch
Repeat around the entire circle.
These loops form the base for the petals.
Join with a sl st.
Round 3 — Petals
Work each petal into one chain loop.
Inside each loop, work:
- sc
- hdc
- 5 dc
- hdc
- sc
Repeat in every loop around the flower.
This creates soft, rounded petals similar to the design shown in the pattern.
Join with a sl st after the final petal.
Fasten off, leaving a long tail for sewing.
Crochet the Leaves 🍃
Make 2 leaves.
Leaf Foundation
Chain approximately 10 stitches.
Row 1 Around the Chain
Starting in the second chain from the hook, work:
- sc in next stitch
- hdc in next stitch
- dc in next 4 stitches
- hdc in next stitch
- sc in next stitch
At the tip of the leaf:
- ch 2
- pivot to work along the opposite side of the foundation chain
Now mirror the stitches:
- sc
- hdc
- dc across the center
- hdc
- sc
Join with a sl st.
Shape the Leaf
To create a pointed leaf shape:
- work sc2tog near both ends
- maintain dc stitches in the center
Fasten off and leave long tails for sewing.
Attach the Flower and Leaves
Position the flower in the center of the bracelet band.
Place one leaf on each side of the flower.
Using a yarn needle, carefully sew the flower and leaves securely onto the bracelet.
Take your time to keep the stitches neat and nearly invisible from the front.
Make the Adjustable Sliding Clasp 🔄
This adjustable clasp allows the bracelet to tighten and loosen easily.
Prepare the Bracelet Ends
Leave long yarn cords at both ends of the bracelet.
Cross the two cords over one another.
Create the Sliding Section
Using a separate piece of yarn, wrap around both cords together.
Work several tight stitches around the cords using either:
- sc stitches
or - repeated sl st wraps
Continue until the clasp section measures approximately 1 inch long.
Fasten securely.
Finish the Cord Ends
At each cord end:
- tie a small knot
or - crochet a tiny bead shape using sc stitches
This prevents the cords from slipping out of the clasp.
Final Finishing
Carefully weave in all loose ends using a yarn needle.
If desired, lightly block the bracelet:
- gently dampen the piece
- shape the flower and leaves
- allow it to dry flat
Free Donwload Flower Bracelet Pattern PDF
Helpful Tips 💡
- Cotton thread provides better stitch definition.
- Keep your flower stitches relaxed so the petals open beautifully.
- If the bracelet curls, lightly steam block it.
- Metallic or pearl thread can create a more jewelry-like appearance.
- Add tiny beads to the flower center for extra elegance.
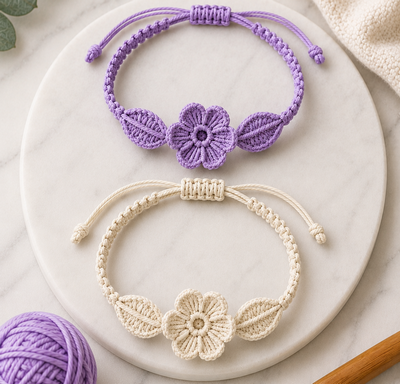
Customization Ideas
You can personalize this bracelet in many creative ways:
- Make multiple flowers
- Add beads to the petals
- Use ombré thread
- Create matching earrings
- Turn the motif into an anklet or choker
Common Mistakes and Fixes
Flower Curling
If the flower curls, your stitches may be too tight. Try using a slightly larger hook.
Uneven Leaves
Count stitches carefully on both sides of the foundation chain to keep the leaf symmetrical.
Loose Clasp
Wrap additional stitches around the cords to make the sliding clasp tighter.
Bracelet Too Short
Simply add more chains to the foundation before starting Row 1.
Conclusion 🌸
This crochet flower bracelet is delicate, feminine, and surprisingly simple once you work through each section step by step. The combination of textured petals, elegant leaves, and an adjustable clasp creates a polished handmade accessory that is both stylish and comfortable to wear.
Whether you make it for yourself, as a thoughtful gift, or to sell at craft markets, this charming bracelet is sure to become a favorite project for crochet lovers.