Vintage Wedding Ring Motif Squares Pattern
The Vintage Wedding Ring Motif Squares pattern is a timeless treasure that exudes elegance and charm, making it a delightful addition to your crochet repertoire. Perfect for creating blankets, table runners, decorative pillows, or even a special handmade gift, this intricate motif evokes the beauty of classic craftsmanship while offering versatility for modern projects.
This design, inspired by the delicate symbolism of wedding rings, celebrates tradition with artistry. Each square features detailed popcorn stitches and precise joining techniques, coming together to form a mesmerizing crochet masterpiece. Whether you’re crafting a meaningful keepsake for a loved one or adding a vintage touch to your home, this pattern is sure to captivate.
Crochet Terms You’ll Need to Know:
- Ch = Chain
- Dc = Double Crochet
- Slst = Slip Stitch
- Ea = Each
- Rnd = Round
- Pop = Popcorn Stitch
- Beg = Beginning
- Sp = Space
- Sk = Skip
- St(s) = Stitch(es)
- Dc2tog/Dc3tog = Double Crochet Together (2 or 3 stitches as specified)
- FO = Fasten Off
Note: Instructions in brackets [ ] should be worked as a single unit into the designated stitch.
Pattern Details:
- Hook Size: This pattern works best with a 2.5 mm or 2.75 mm hook (sizes B or C), which helps achieve the tight tension characteristic of vintage crochet designs.
- Tension: Maintaining tight tension is key for replicating the original look. If your stitches tend to be loose, you may want to use a smaller hook or adjust your crochet style.
Vintage Wedding Ring Motif Pattern
Follow these step-by-step instructions to create the stunning squares:
Rnd 1:
Ch 6. Dc into the 6th chain from the hook, then ch 2. Repeat (dc, ch 2) six more times. Join with a slst to the original ch 6, creating a circle with 8 “spokes” (seven dc and a ch 3).
Rnd 2:
Ch 3. Work a 4dc popcorn stitch (4dc pop) into the first ch 2 space. Ch 3, then work a 5dc pop into the next ch 2 space. Repeat (5dc pop, ch 3) six times, ending with a slst to the 3rd ch of the beginning ch 3. Then slst into the top of the popcorn stitch and into the next stitch.
Rnd 3:
Ch 3. Dc into the next 2 stitches, then ch 3. [5dc pop, ch 3, 5dc pop] into the ch 3 space, then ch 3 and skip the popcorn stitch. Dc into the next 3 stitches. Ch 3 and repeat this sequence twice, ending with a slst to the 3rd ch of the beginning ch 3.
Rnd 4:
Ch 3. Dc into the base of the ch 3, dc into the next stitch, and work 2dc into the next stitch. Ch 3. Skip the next ch 3 space. [5dc pop, ch 5, 5dc pop] in the next ch 3 space, ch 3, and skip the next ch 3 space. Work 2dc into the next stitch, dc into the next stitch, and 2dc into the following stitch. Ch 3 and repeat the sequence twice. Finish with a slst to the beginning ch 3.
Rnd 5:
Ch 3. Dc into the base of the ch 3, dc into the next stitch, then ch 1 and skip the next stitch. Dc into the next stitch, then work 2dc into the following stitch. Ch 3. Skip the next ch 3 space. [5dc pop, ch 3, 5dc pop, ch 3, 5dc pop] into the ch 5 space, then ch 3 and skip the next ch 3 space. Work 2dc into the next stitch, dc into the next stitch, ch 1 and skip the next stitch, dc into the following stitch, and 2dc into the next. Ch 3 and repeat the sequence twice, finishing with a slst to the beginning ch 3.
Rnd 6:
Ch 3. Dc into the base of the ch 3 and into each of the next 2 stitches, then ch 1 and skip the next stitch. Dc into the following 2 stitches and work 2dc into the next. Ch 3. Skip the next ch 3 space. [5dc pop, ch 3, 5dc pop] into the next ch 3 space. Ch 3. [5dc pop, ch 3, 5dc pop] into the next ch 3 space. Repeat this sequence twice, ending with a slst to the beginning ch 3.
Rnd 7:
Ch 3. Dc2tog, ch 3, and work a dc3tog, then ch 3 and work another dc3tog. Skip the next ch 3 space. [5dc pop, ch 3, 5dc pop] into the next ch 3 space and repeat this step three more times. Slst to the beginning dc2tog and FO.
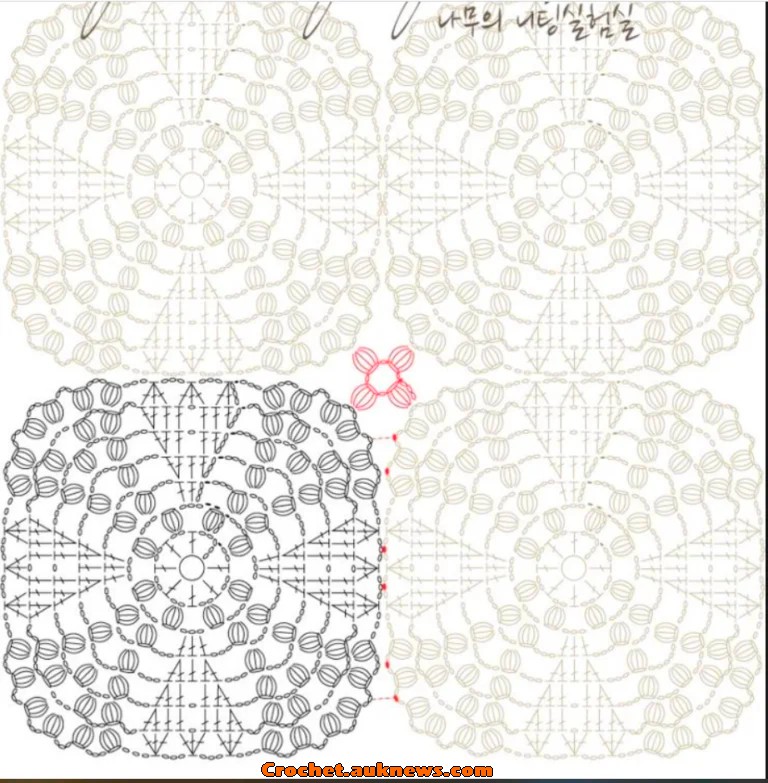
Joining Squares
To assemble your squares into a larger piece, use the following method:
- Attach your yarn to the center ch 3 space of one square. Ch 3, then work a 4dc pop and ch 1.
- Move to the center ch 3 space of the second square and work a 5dc pop followed by ch 1.
- Repeat these steps, alternating between squares, until all are joined.
Download Free Pattern PDF
Tips for a Professional Finish
- Tension Matters: Make sure to maintain tight stitches throughout to achieve the polished, vintage look. If you crochet loosely, consider using a smaller hook.
- Blocking: Once the motifs are joined, block the finished piece to ensure it lays flat with clean, even stitches. Blocking enhances the overall appearance and structure of the project.
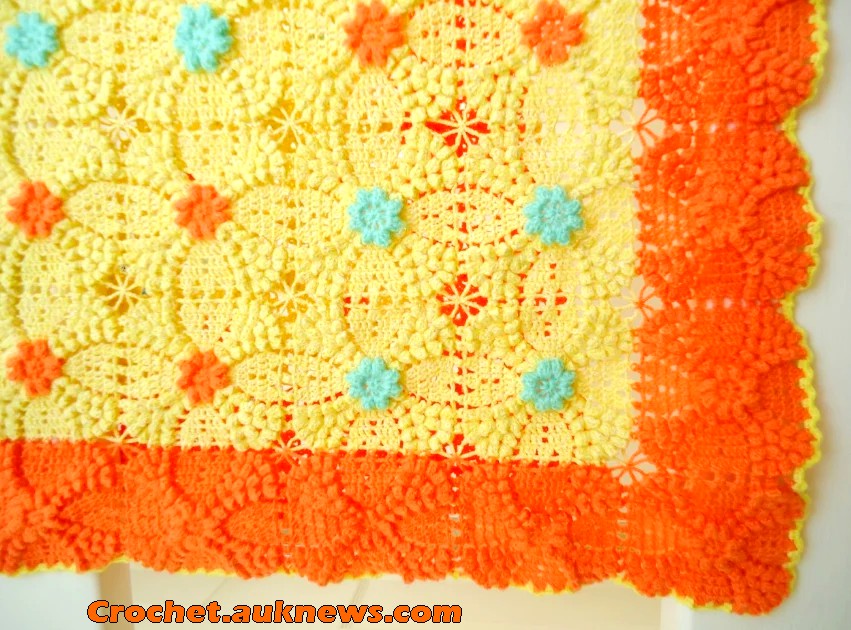
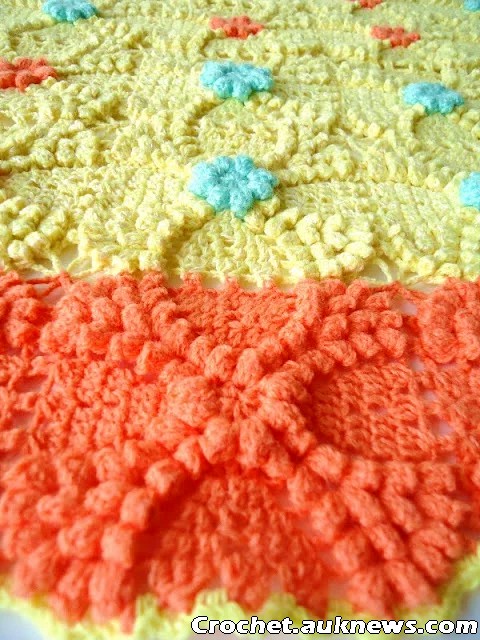
- Color Choices: While traditional vintage designs often use soft, muted tones, you can inject your personal style with bold, vibrant colors or delicate pastels for a modern twist.
The Vintage Wedding Ring Motif Squares Pattern is a stunning way to combine traditional crochet techniques with modern creativity. Whether you’re crafting a gift that will be treasured for years or elevating your home’s decor, this pattern is sure to impress with its intricate, timeless design. Happy crocheting!