Hello, crochet lovers!
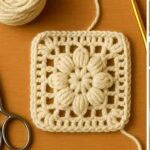
Today, I’m thrilled to walk you through a simple yet stunning crochet square pattern that’s perfect for any project—think cozy blankets, vibrant cushions, elegant scarves, or even bags. This square begins with a classic magic ring and grows outward using repetitive stitches that form a beautiful, layered effect.
Whether you’re a beginner looking for your next project or an experienced crafter adding to your pattern collection, this design is a great choice. Let’s jump right in!
🧶 Materials Needed
-
Yarn: Choose two colors—one for the center and one for contrast to make the layers pop. Any medium (worsted) weight yarn works great.
-
Hook: Use a hook size recommended for your yarn (commonly 5.0 mm/H-8 for worsted weight).
-
Scissors & Tapestry Needle: For trimming and weaving in ends.
📝 Abbreviations Used
-
ch – Chain
-
sc – Single Crochet
-
trdc – Treble Double Crochet
-
sl st – Slip Stitch
🪄 Step-by-Step Instructions
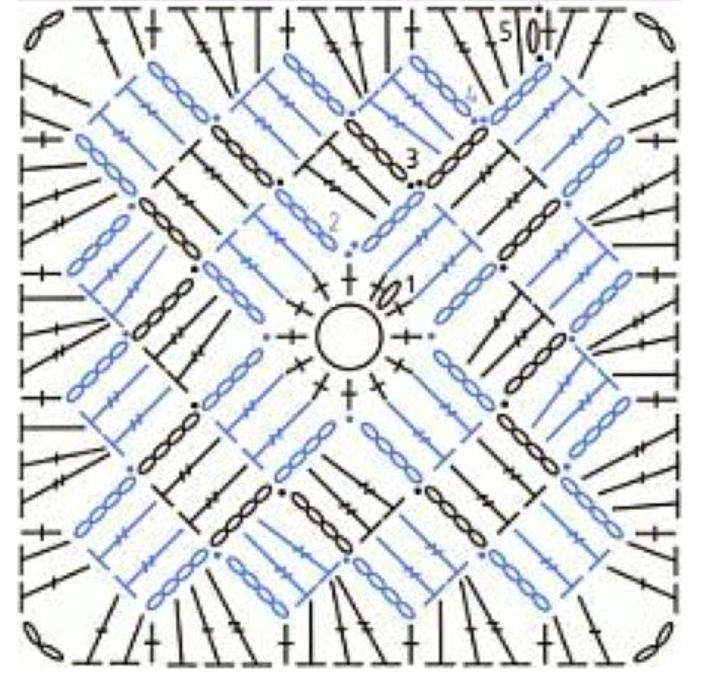
1. Start with a Magic Ring
The magic ring is a neat way to begin, giving your square a tight and tidy center.
-
Create a magic ring by wrapping the yarn into a loop, leaving a small tail.
-
Insert your hook into the loop, yarn over, pull through, and secure it with one chain (ch 1).
2. First Round: Form the Base
-
Ch 1, then work 12 single crochets (sc) into the ring.
-
Pull the yarn tail to close the ring tightly.
-
Join with a slip stitch (sl st) into the first sc to close the round.
3. Second Round: Forming Petals
This round adds height and creates a petal-like structure.
-
Ch 4 (counts as the first trdc).
-
Work 2 trdc into the same stitch.
-
Ch 4, then sl st into the next stitch.
-
Repeat: (3 trdc in the next stitch, ch 4, sl st in the following stitch) all the way around.
You’ll end up with four beautiful clusters, spaced with open chains—your petal foundation is now set.
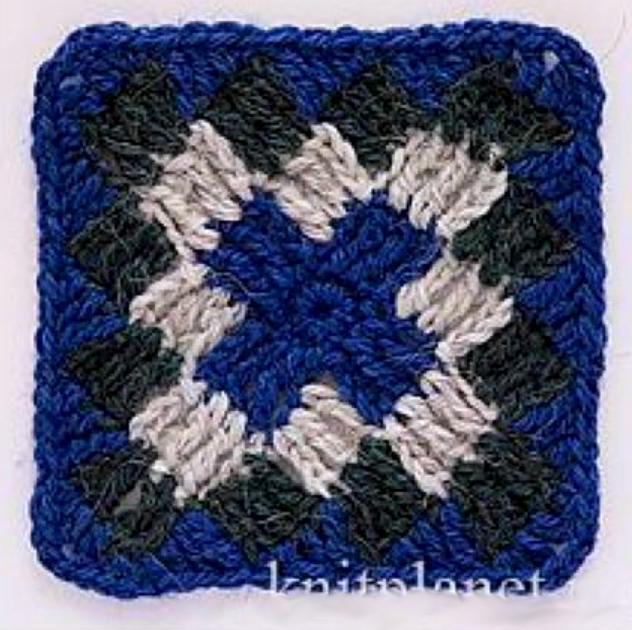
4. Change Color
Now’s the time to introduce a contrasting color for a layered look.
-
Fasten off your first color.
-
Join your new yarn with a sl st in any space between petals.
5. Third Round: Expanding the Square
This round builds on the second to form the beginnings of a square.
-
Ch 4, then work 2 trdc into the same space.
-
Ch 4, then sl st into the next chain space.
-
Ch 4, 2 trdc in the next space, then sl st into the following stitch.
-
Repeat around the square.
As you go, you’ll see the shape shift into a lovely framed square with petal-like texture.
6. Add More Rounds (Optional)
To enlarge the square:
-
Repeat the pattern from the third round.
-
Keep working in your contrast color—or switch colors again for a striped effect.
-
Each new round adds dimension, depth, and visual interest.
✨ Final Tips
-
Smooth Color Changes: Always finish the last stitch of a round with the new color to make transitions clean.
-
Blocking: Lightly steam or pin your finished square to even out edges and enhance shape—especially helpful if joining multiple squares.
-
Customization: Play with color placement or add decorative stitches to make the design your own.
💡 Creative Ideas for Your Crochet Square
-
Stitch multiple squares together for a blanket, pillow, or shawl.
-
Use cotton yarn and smaller hooks for coasters or dishcloths.
-
Mix yarn textures—like velvet and cotton—for extra flair!
We hope you love making this Wonderful Crochet Square as much as we loved sharing it! Feel free to tag your creations or leave a comment with your tips and color combos. Until next time—happy crocheting! 🧵💕