
Are you ready to take your crochet skills to the next level? The Puff Ripple Stitch is a beautiful and eye-catching pattern that combines rich texture with gentle movement. Its soft waves and raised puff details create a design that’s both elegant and cozy—perfect for blankets, scarves, shawls, and even garments.
If you love stitches that look impressive but are still fun to work, this one is for you. Follow the written instructions below to create this stunning textured pattern.
Materials
-
5 mm crochet hook
-
Medium-weight yarn (recommended for best results, but you can use any yarn you prefer)
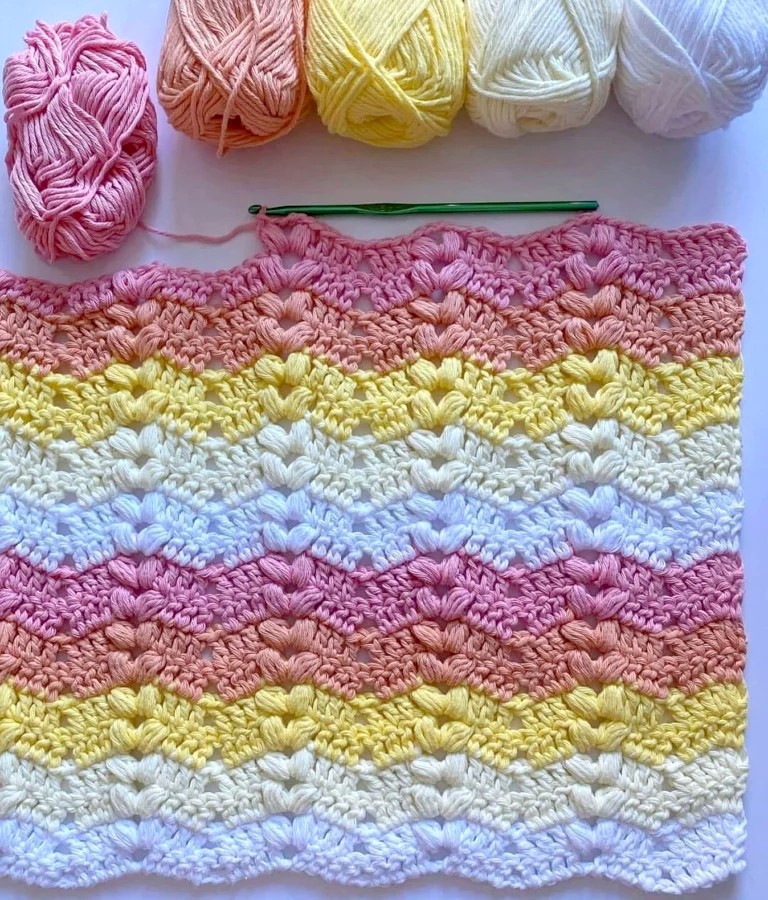
The Puff Ripple Stitch
Stitches & Abbreviations (US Terms)
-
Ch – Chain
-
DC – Double Crochet
-
Puff St (Puff Stitch) –
-
Yarn over, insert hook into the indicated stitch. Yarn over and pull up a loop (3 loops on hook).
-
Yarn over, insert hook into the same stitch, pull up a loop (5 loops on hook).
-
Yarn over, insert hook into the same stitch, pull up a loop (7 loops on hook).
-
Yarn over, insert hook into the same stitch, pull up a loop (9 loops on hook).
-
Yarn over and pull through all 9 loops on hook.
-
Important Notes
-
This pattern uses US crochet terminology.
-
The stitch is worked in rows, starting from the bottom and working upward. Turn your work at the end of each row.
-
The Ch 1 at the beginning of each row does not count as a stitch.
-
Instructions between asterisks (*) indicate the section to repeat.
-
When you see ** at the end of a row, it refers to the final part of a partial repeat.
-
Read through each row carefully before beginning.
-
Foundation Chain: Chain a multiple of 10, then add 3 extra chains.
Written Instructions
Row 1 (R1)
-
Chain your desired width using the multiples noted above.
-
Work 1 DC in the 4th chain from the hook.
-
1 DC in each of the next 3 chains.
-
Skip the next 2 chains, 1 DC in each of the next 4 chains, Ch 2, 1 DC in each of the next 4 chains.
-
Repeat from * to * across until 6 chains remain.
-
Skip the next 2 chains, 1 DC in each of the next 2 chains, 2 DC in the next chain, 1 DC in the last chain. Turn.
Row 2 (R2)
-
Ch 1, 1 DC in the first DC.
-
2 DC in the next DC, 1 DC in each of the next 2 DC.
-
Skip the next 2 DC, 1 DC in each of the next 3 DC.
-
In the next Ch-2 space, work: (Puff St, Ch 2, Puff St, Ch 1).
-
1 DC in each of the next 3 DC.
-
Repeat from * to * across until 6 stitches remain.
-
Skip the next 2 DC, 1 DC in each of the next 2 DC, 2 DC in the next DC, 1 DC in the top of the turning chain. Turn.
Row 3 (R3)
-
Ch 1, 1 DC in the first stitch.
-
2 DC in the next stitch, 1 DC in each of the next 2 stitches.
-
Skip the next 2 stitches, 1 DC in each of the next 3 stitches.
-
In the next Ch-2 space, work: (Puff St, Ch 2, Puff St, Ch 1).
-
1 DC in each of the next 3 stitches.
-
Repeat from * to * across until 6 stitches remain.
-
Skip the next 2 stitches, 1 DC in each of the next 2 stitches, 2 DC in the next stitch, 1 DC in the last stitch. Turn.
Repeat
Repeat Row 3 until your project reaches your desired length.
Finishing
When your piece is complete, fasten off and carefully weave in all loose ends for a neat and professional finish.
Tutorial Video
This video from channel: Marifu6a
The Puff Ripple Stitch beautifully blends classic ripple shaping with modern textured puffs, creating a fabric that is both elegant and full of character. Give it a try and enjoy watching the waves and texture come to life with every row.
Happy crocheting! 🧶


