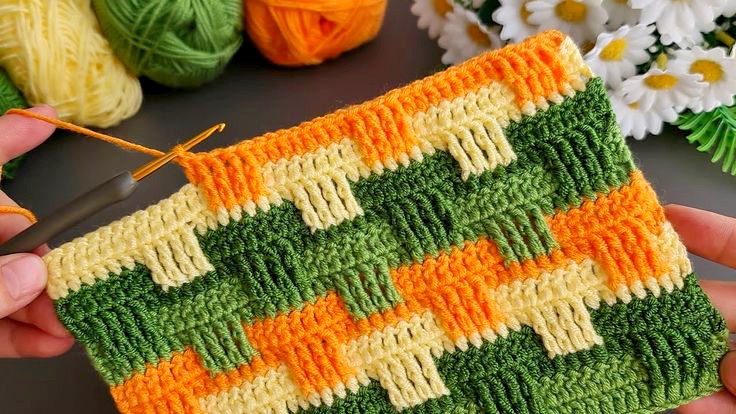
The T Stitch is a striking crochet technique that creates a beautifully textured, geometric design resembling a series of “T” shapes throughout your fabric. This eye-catching stitch is perfect for adding character to blankets, scarves, and throw pillows. In this guide, we’ll walk you through each step of creating the T Stitch, from basic setup to mastering the elongated front post stitches that make it truly unique.
Skill Level: Intermediate
This stitch pattern involves front post stitches and double treble crochets, which may require a bit of practice if you’re newer to textured crochet. But with patience and guidance, it’s very manageable.
T Stitch Crochet Free Pattern
Materials
-
Crochet hook: Size L (8.0 mm)
-
Yarn: Worsted weight yarn of your choice
Step-by-Step Instructions
Foundation Chain
Start by chaining 34 (or any multiple of 12 + 10).
Row 1: Foundation Row (Double Crochet)
-
Skip the first 3 chains (this counts as your first double crochet).
-
Double crochet in the 4th chain from the hook.
-
Continue working 1 double crochet in each chain across the row.
Tip: Your row should have 2 stitches at each end, with alternating groups of 4 and 2 double crochets in between. Using stitch markers or pins can help you keep track of these groups.
Row 2: Basic Double Crochet Row
-
Chain 3 (counts as the first double crochet), turn.
-
Work 1 double crochet in each stitch across.
Row 3: T Stitch Formation – Front Post Double Treble Crochets (FPDTr)
-
Chain 3 and turn (counts as your first double crochet).
-
Double crochet in the next stitch.
Now for the T shape:
-
Yarn over 3 times (for a double treble).
-
Insert your hook around the post of the stitch two rows below (not the previous row).
-
Yarn over and pull up a loop.
-
Yarn over and pull through 2 loops at a time until only one loop remains.
-
Repeat this for the next 3 stitches to make a group of 4 FPDTr stitches.
-
Skip the 4 stitches directly behind the front post stitches you just made.
-
Make 1 double crochet in each of the next 8 stitches.
Repeat this sequence across the row: 4 FPDTr stitches (around posts 2 rows below), skip 4 behind, then 8 double crochets.
-
End the row with 2 double crochets in the last two stitches.
Row 4: Double Crochet Row
-
Chain 3, turn.
-
Work 1 double crochet in each stitch across.
Row 5: Alternating the T Shapes
-
Chain 3 and turn (counts as the first double crochet).
-
Double crochet in the next 7 stitches.
Now begin the next FPDTr section:
-
Work 4 FPDTr stitches around the second group of T stitches from two rows below.
-
Skip the 4 stitches directly behind.
-
Double crochet in the next 8 stitches.
-
Repeat this sequence of front post stitches and regular double crochets across the row.
-
End with 8 double crochets to maintain symmetry.
Row 6: Double Crochet Row
-
Chain 3, turn.
-
Work 1 double crochet in each stitch across.
Repeat the Pattern
To continue forming the T Stitch pattern, repeat Rows 3–6 as many times as desired. As you work, the signature “T” design will begin to emerge more clearly.
Video Tutorial
Final Thoughts
The T Stitch is a bold and sophisticated addition to your crochet repertoire. While it may take a little practice to master the front post double treble stitch, the results are absolutely worth the effort. Whether you’re making a cozy blanket or a stylish pillow cover, this texture-rich design will make your project stand out.
Grab your favorite yarn and hook, and let your creativity shine!
Have You Tried the T Stitch?
We’d love to see your work! Share your photos or tips in the comments below. Let’s inspire each other with beautiful crochet creations.