Welcome Back to Crochet Made Easy!
I’m so excited to share today’s project—a stunning striped crochet blanket that’s perfect for adding a vibrant touch to any space. Featuring a gorgeous combination of pinks and whites, this design is both cheerful and elegant. Whether you’re making it for yourself or as a thoughtful handmade gift, this blanket is a joy to crochet and a delight to use. Let’s get started!
Materials You’ll Need
-
Yarn Colours:
-
Medium Pink
-
White
-
Shocking Pink
-
Heather
-
Light Pink
-
-
Hook: A crochet hook suitable for your chosen yarn weight
-
Scissors
-
Yarn Needle: For weaving in ends
Abbreviations (US Terms)
-
CH – Chain
-
SS – Slip Stitch
-
SC – Single Crochet
-
DC – Double Crochet
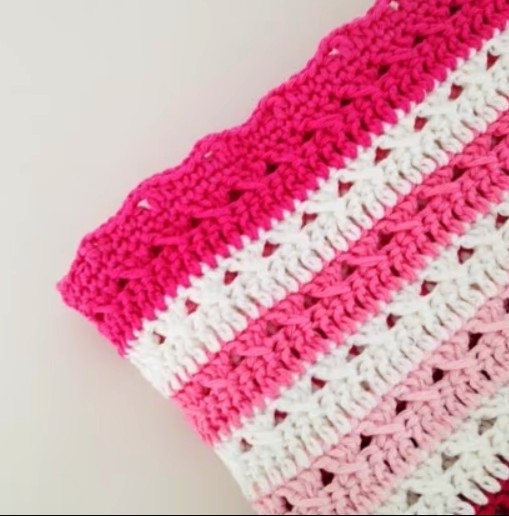
Striped Blanket Pattern
Starting Chain & Foundation Row
-
Using Medium Pink, chain 91 + 3 (to count as the first DC).
-
Work 1 DC into the 4th chain from the hook, then DC in each chain across. You should now have 92 DC in total. Turn your work.
Row 1 (Pattern Row in Medium Pink)
-
Chain 3 (counts as the first DC).
-
Skip the next stitch, work 2 DC, then go back and DC into the skipped stitch.
-
Repeat from * to * across the row.
-
When only one DC remains (the chain 3 from the previous row), work 1 DC into the top of this chain, changing colour while completing the stitch. Turn.
Continuing the Colour Sequence
Repeat the following steps, changing colour at the end of each pattern row as indicated:
Row 2 (White)
-
Chain 3, work 91 DC across. Turn.
-
Chain 3, follow the same pattern as Row 1, then switch to the next colour.
Row 3 (Shocking Pink)
-
Chain 3, work 91 DC across. Turn.
-
Chain 3, follow the same pattern as Row 1, then switch to the next colour.
Row 4 (White)
-
Chain 3, work 91 DC across. Turn.
-
Chain 3, follow the same pattern as Row 1, then switch to the next colour.
Row 5 (Heather)
-
Chain 3, work 91 DC across. Turn.
-
Chain 3, follow the same pattern as Row 1, then switch to the next colour.
Row 6 (White)
-
Chain 3, work 91 DC across. Turn.
-
Chain 3, follow the same pattern as Row 1, then switch to the next colour.
Row 7 (Light Pink)
-
Chain 3, work 91 DC across. Turn.
-
Chain 3, follow the same pattern as Row 1, then switch to the next colour.
Row 8 (White)
-
Chain 3, work 91 DC across. Turn.
-
Chain 3, follow the same pattern as Row 1, then switch to the next colour.
Repeating the Colour Pattern
Continue this sequence until your blanket reaches the desired length. For reference, my finished blanket has 27 rows, with the final row worked in Shocking Pink before moving on to the edging.
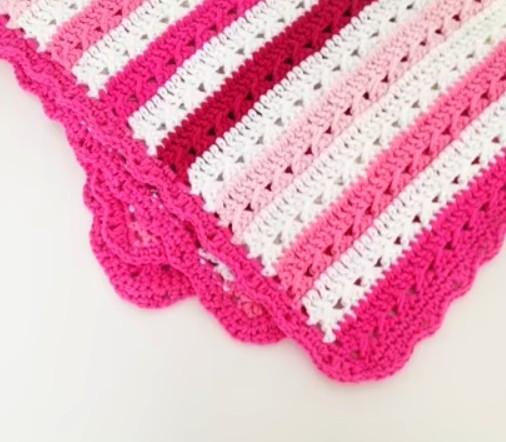
Adding the Edging
After completing your last row, do not fasten off. Instead, change to your edging colour (Shocking Pink in this case) and follow these steps:
Step 1: Single Crochet Border
-
Work 2 SC into each DC along the first side of the blanket (108 SC in total).
-
At the corner, CH 1 and SC in each stitch along the bottom edge (92 SC).
-
CH 1, work 2 SC into each DC along the second side (108 SC).
-
CH 1, work SC in each stitch across the top (92 SC).
-
CH 1 to complete the round.
Step 2: Decorative Edge
-
Work 1 SC, 1 HDC, CH 1, 1 DC, CH 1, 1 HDC, 1 SC.
-
Repeat this pattern along the entire border, adjusting where necessary at the corners.
-
When you reach the final stitches, work 2 SC, 1 slip stitch, and fasten off.
Finishing Touches
-
Weave in all loose ends with a yarn needle.
-
Block your blanket if necessary to ensure it lays flat and retains its shape.
Dear crochet lovers,
Do you enjoy browsing social media for beautiful crochet patterns and creative inspiration? 🧶✨
Check out our Facebook page, where we share stunning designs, fresh ideas, and endless crochet inspiration! Whether you’re a beginner or an expert, you’ll find something to spark your creativity. 💖
🌿 Visit us here: Crochet Made Easy
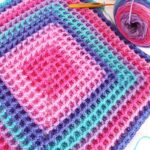
See also: Square Crochet Blanket | Patterns Stitchs
See also: Chevron stitch in crochet
See also: Crochet Flower Brooch Free Pattern
Congratulations!
You’ve just completed a beautifully striped crochet blanket, perfect for adding warmth and colour to any room. Whether you made it for yourself or as a thoughtful handmade gift, this piece is sure to be cherished.
I’d love to see your finished projects! Share your photos, questions, or thoughts in the comments below.
Until next time—happy crocheting, and keep those hooks moving! 🧶✨