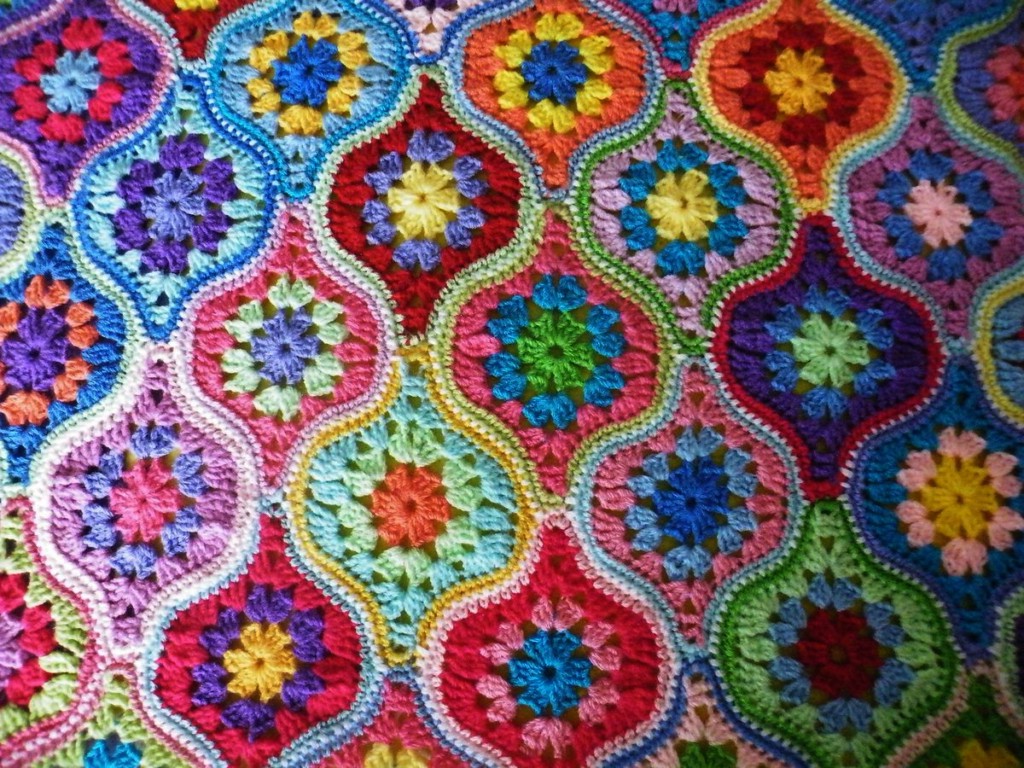
If you’re looking for a crochet project that blends charm, structure, and a hint of magic, the Mystical Lantern Granny Pattern is the perfect pick. This eye-catching motif reimagines the traditional granny square, creating a delicate, lantern-like shape that looks beautiful in everything from cozy throws to stylish home décor and wearable accessories.
What sets this pattern apart is its graceful balance of texture and symmetry. Each round adds soft, petal-like curves and intricate edges, making it ideal for standout blankets, elegant table runners, or whimsical hanging lantern garlands. Whether you’re sprucing up your space or crafting a heartfelt handmade gift, this design is sure to wow.
Best of all, it’s beginner-friendly! Once you get into the flow, the pattern has a calming rhythm that makes it a joy to stitch. It uses simple stitches like double crochet and chain spaces, with optional picots for extra flair. You’ll be amazed how these easy techniques come together to form such a beautiful motif.
Mystical Lantern Granny Pattern
Materials Needed
-
Yarn of your choice (any color or weight that suits your project)
-
Crochet hook appropriate for your yarn
-
Scissors
-
Yarn needle (for weaving in ends)
Abbreviations
-
ch – chain
-
sc – single crochet
-
dc – double crochet
-
tr – treble crochet
-
picot – decorative loop (usually made with ch 2, then sl st in the first ch)
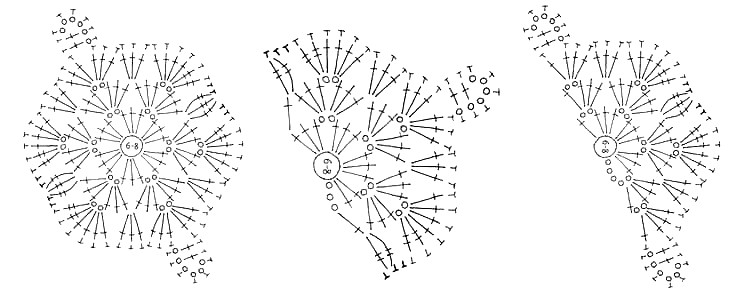
Instructions
Round 1: The Center
-
Begin with a magic ring.
-
Inside the ring, work 8 dc.
-
Pull the ring tight to close.
-
Join with ch 1 and close the round with a slip stitch.
Round 2: Shaping the Petals
-
In each dc space from Round 1, work: 3 dc, ch 2, 3 dc.
-
You’ll create 8 petal-like fan shapes.
-
Join with a sc at the beginning of the first petal, then ch 1 to turn.
Round 3: Expanding the Fans
-
In the ch-2 space of each fan, work: (3 dc, ch 1, 3 dc).
-
Add ch 1 between each fan group for spacing.
-
Finish with a sc in the first dc, then slip stitch to close the round.
Round 4: Adding Picots
-
Ch 3 to begin.
-
Between the fans, work 1 dc into each ch space.
-
At the top of each fan: (3 dc, ch 2, 3 dc).
-
Join with a slip stitch.
Round 5: Building Structure
-
Start with ch 3.
-
Work 1 dc in each stitch across.
-
In each ch-2 space from the fans, work: (3 dc, ch 2, 3 dc).
-
Close the round with a slip stitch.
Round 6: Adding Detail
-
Ch 3 to start.
-
Work 1 dc in each stitch, continuing the pattern.
-
In the fan centers, replace the ch-2 with a picot for a decorative touch.
-
Join with a slip stitch.
Round 7: Final Border
-
Begin with chains, then work alternating dc and picots around the edge for a delicate, lacy finish.
-
On each fan peak: dc, then picot (ch 2, sl st into first ch).
-
Finish off and weave in all ends.
Tips for Success
-
Use stitch markers to keep track of your rounds.
-
Your yarn tension will affect the final size and shape—stay consistent!
-
Customize the number of rounds or border style depending on your project: lantern bunting, coaster, doily, or full-sized blanket.
Video Tutorial:
The Mystical Lantern Granny Square is more than just a pretty pattern—it’s a truly versatile motif that adds a touch of elegance to any project. From cozy throws and wall hangings to boho-chic cushion covers and festive garlands, this design gives you endless ways to showcase your creativity. So grab your hook, pick your colors, and let the magic begin!