Welcome, devoted artisan, to yet another enthralling foray into the enchanting world of crochet mastery! Today, we delve into the intricate art of mitered granny squares—a mesmerizing technique that fuses geometric precision with the timeless charm of crochet. If you seek to refine your craft and infuse your projects with an air of sophistication, you are in for an unparalleled creative expedition.
The mitered granny square pattern, an exquisite and alluring marvel, possesses the ability to transform any handmade piece into a work of striking elegance. Whether you aspire to craft a luxurious afghan, a cozy bedspread, or an ornamental centerpiece, this technique introduces an enthralling depth to your compositions.
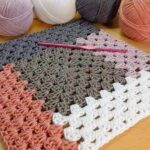
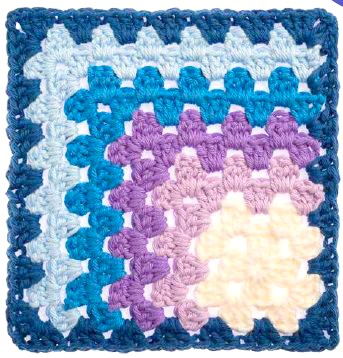
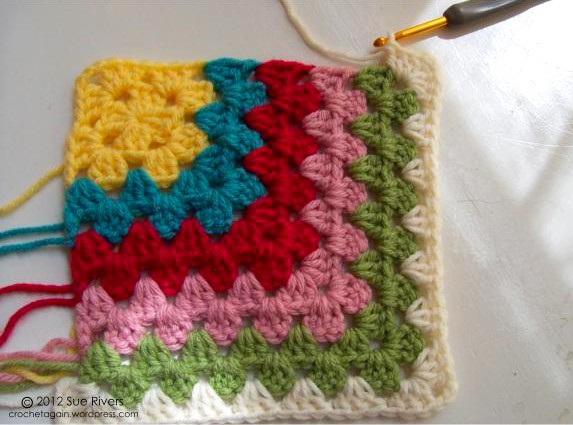
A recent conversation with my dear friend Wendy unraveled an intriguing revelation—this pattern seemingly exudes a three-dimensional illusion. Initially intimidated by its complexity, she was pleasantly astonished to discover its relative simplicity. The interplay of hues plays a pivotal role in its optical allure, with darker tones seamlessly transitioning into lighter shades, thereby creating an enthralling perception of depth.
While countless variations of crochet squares abound, the mitered granny square distinguishes itself with an idiosyncratic allure. Its effortless construction, coupled with boundless color experimentation, offers an exhilarating canvas for artistic exploration. Opting for worsted-weight yarn and a 4.5mm (size 7) crochet hook ensures an ideal balance of structure and fluidity.
The Art of Mitered Granny Squares
Mitered granny squares introduce a contemporary edge to the classic crochet lexicon. Departing from the conventional symmetry of traditional squares, these dynamic creations exhibit a diagonal orientation, weaving a spellbinding tapestry of intersecting angles. The convergence of color theory and mathematical alignment engenders a visual harmony that is nothing short of spellbinding.
With an architectural elegance, these squares transcend mere handicraft, elevating crochet to the echelon of fiber artistry. Their hypnotic interplay of geometric form and vivid tonal gradations metamorphoses them into captivating statements of modern textile ingenuity.
Assembling Your Materials
Before embarking on this artistic voyage, gather your essentials:
- Your choice of luxurious yarn
- A suitable crochet hook (preferably 4.5mm)
- A fundamental grasp of granny square construction
Armed with these, let us embark on the meticulous process of crafting mitered granny squares, step by step.
Step-by-Step Guide
Step 1: Establishing the Base
Commence with the foundation—a classic granny square. Crochet the desired number of rounds, keeping in mind that the final dimensions of your mitered square will be dictated by this initial structure.
Step 2: Selecting the Pivot Point
Determine a corner that will serve as the nexus for your diagonal progression. This pivotal choice anchors the transformation from tradition to innovation.
Step 3: Diagonal Embellishment
Herein lies the enchantment! Abandoning conventional round-based construction, begin working diagonally across your square. This technique introduces a striking depth, enriching the composition with its dramatic shift in orientation.
Step 4: Expansion and Experimentation
Persist in your diagonal endeavor, gradually enlarging your square. Embrace chromatic variations, experimenting with intricate color transitions to unlock the full potential of this mesmerizing technique.
Final Flourishes
Upon attaining the desired dimensions, bestow your creation with a meticulously executed border. This finishing touch not only bestows refinement but also fortifies the integrity of the square.
Unleashing Creative Possibilities
Mitered granny squares unlock an expansive realm of artistic expression. From opulent blankets to avant-garde shawls, these squares infuse any project with kinetic vibrancy and sophistication.
Project Sizing Guide
A medium-sized afghan typically comprises approximately 6 x 8 squares. Each square, inclusive of the border, measures 6 1/4 inches (or 6 1/2 inches excluding the border).
Estimating Yarn Consumption
The quantity of yarn required hinges upon multiple factors—the project’s scale, yarn weight, and chosen color scheme. Therefore, precise estimations remain variable.
Essential Tools & Materials for Beginners
- Hook Size: H/8 (5mm)
- Yarn Weight: Medium/Worsted (16-20 stitches per 4 inches)
- Crochet Gauge: 3 pattern repeats = 4 inches
- Additional Accessories: Tapestry needle
Crochet Abbreviations (US Terminology)
- Ch – Chain
- Dc – Double Crochet
- MC – Magic Circle
- Sl St – Slip Stitch
- Sp – Space
- St – Stitch
- Yo – Yarn Over
Crafting the Granny Square Foundation
Round 1:
Initiate with a Magic Circle or preferred starting method. Chain 3 (counts as the first Dc), work 2 Dc into the circle, then Ch 3. Repeat {3 Dc, Ch 3} three more times, then Sl St to close.
Round 2:
Chain 3, then in each Ch-3 space, work {3 Dc, Ch 3, 3 Dc} to maintain the square’s expansion.
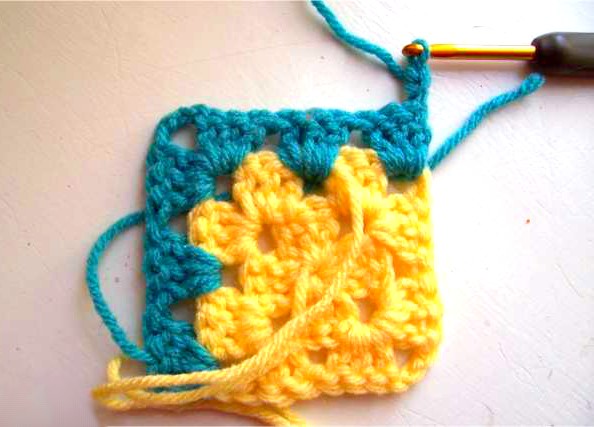
The Mitered Section
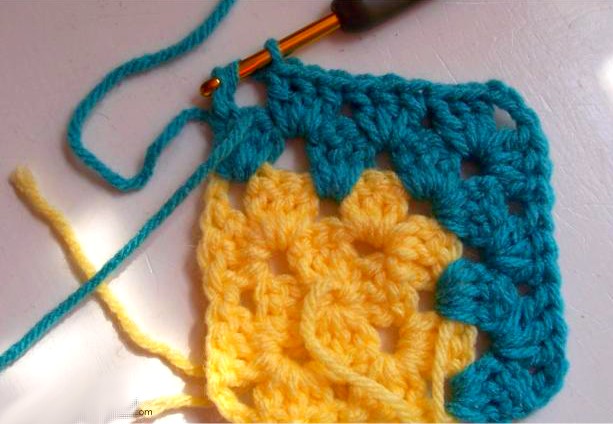
To begin, add a new colour at any corner that consists of three chains (ch3). You can attach it using a beginning double crochet (dc) or, if you prefer, a slip stitch (sl st) followed by chain 3 (ch3). The choice is yours!
In that same corner space, work 2 double crochets (2dc). Then, in the space between the two clusters of 3 double crochets (3dc) from the previous row, make another set of 3 double crochets (3dc).
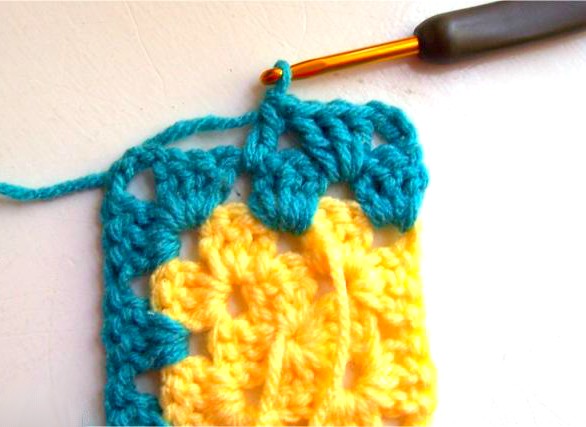
When you reach the next ch3 corner space, crochet 3 double crochets (3dc), chain 3 (ch3), and another 3 double crochets (3dc) to form the corner.
Now, continue along the edge by working 3 double crochets (3dc) in the next space between clusters. When you arrive at the next corner space, work 3 double crochets (3dc) and chain 3 (ch3).
Here’s where things shift slightly—turn your work at this point. From now on, you’ll be working in rows along two sides of the square, rather than around all four sides.
3 double crochet in the next space.
Continue working across by doing 3 double crochets (3dc), chain 3 (ch3), 3 double crochets (3dc) in the corner, and 3 double crochets (3dc) between each set until you reach the end. Double crochet (dc) in the top of the stitch on the end, and then finish off.
Turn it around and add a different color using a double crochet (dc) or a chain-3 (ch3).
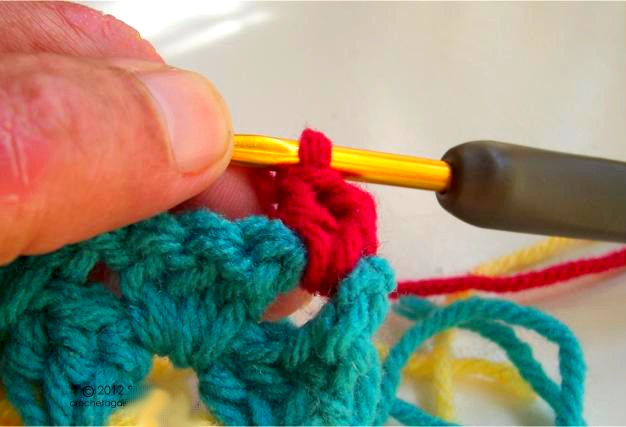
Carry on as before, along the 2 sides you did before.
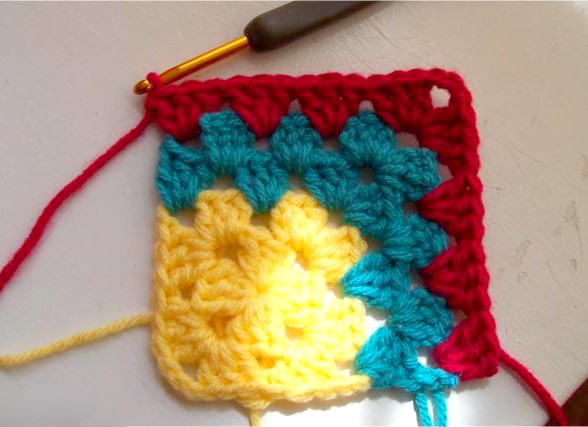
Do as many rows as you desire.

Let’s continue by adding a border. Start with the initial center square facing up (the yellow one in the picture). Attach the white yarn at the beginning of the row, just like before. Then, crochet 2 double crochets (2dc), chain 3 (ch3), and crochet 3 double crochets (3dc) to create a corner.
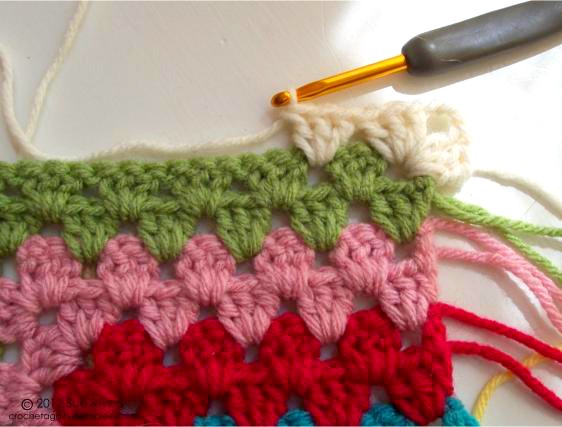
Keep going to the opposite corner, make 3 double crochets (3dc), chain 3 (ch3), and then 3 double crochets (3dc) like you usually do for a granny square corner. Move on to the next corner and repeat the process by making 3 double crochets (3dc), chaining 3 (ch3), and finishing with 3 double crochets (3dc).
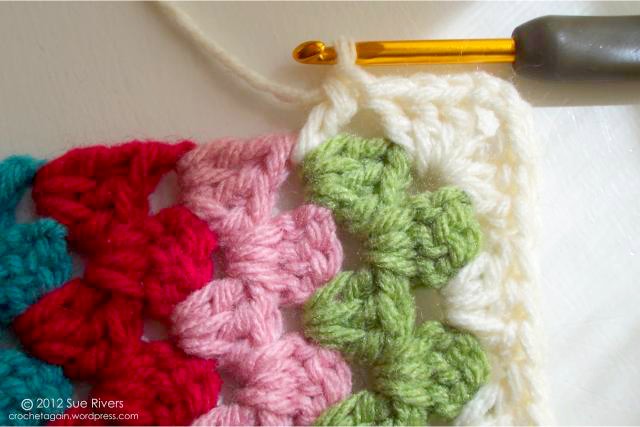
Now, make your way to the edges of the rows. Keep doing three double crochets (3dc), placing them in the same space as the lower part of the double crochets on the sides. It’s easy to spot – there’s a clear space there.
Now, let’s continue by working on the 3 double crochets (3dc) and the corners made up of 3 double crochets, chain 3, and another 3 double crochets (3dc, ch3, 3dc).

And at last, we reach the finish line, slip into the top of the first stitch, and we’re done!
To connect the squares, I recommend using the “join as you go” method. There’s a great tutorial on the Things to Make and Do blog with clear photos to guide you through the process.
Note: If you find the white borders and joining confusing, here’s a tip. For the first square, add the white border all around. For the rest, create the white border during the joining round. If you prefer preparing all squares in advance, skip the white border until you’re ready to connect them. Check out my new Join As You Go tutorial posted on 1/14/14 for more guidance.
If you prefer a smaller square, I suggest transitioning to ch2 for the corners, with ch1 placed between the 3dc groups. This arrangement aligns better with the join-as-you-go method. The resulting squares will be approximately 20 centimeters each.
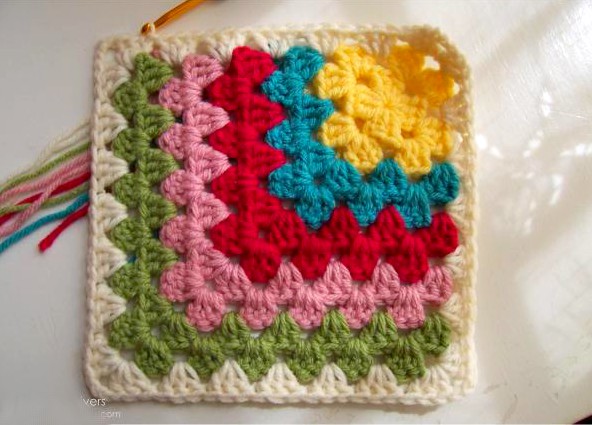
Feel free to explore your creativity by adjusting the size—adding or subtracting half turns, preferably in increments of 2 for optimal functionality. You can maintain a consistent design by arranging colors similarly in all squares, or vary them for a diverse look. Additionally, consider incorporating borders around each square, as demonstrated in the original piece—opening up a multitude of possibilities!
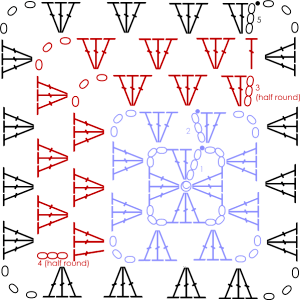
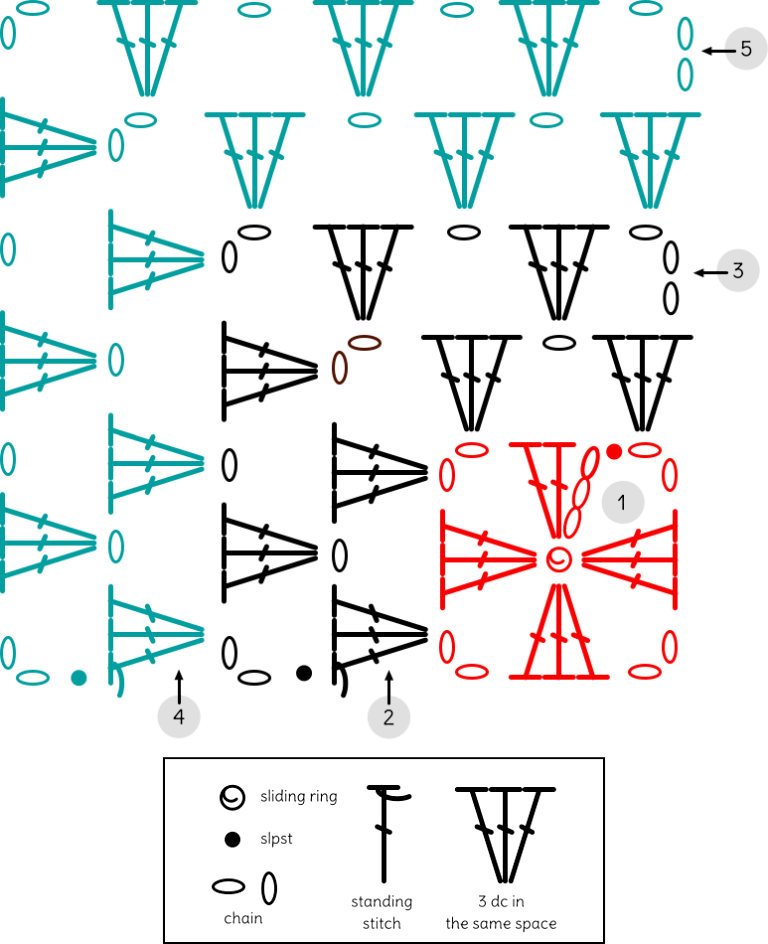
GRAPHIC
If you prefer to have a chart at hand for your learning. This graphic likely illustrates a specific design. Each round of the graph can correspond to a color change. Progress through the chart until the entire design is complete. Be prepared to use a variety of crochet stitches, such as single or double crochet, and make color changes as instructed in the graphic.
VIDEO TUTORIAL
Well, dear reader, if you are the type of person who prefers video learning… Here we have two incredible videos available for you to learn how to make your mitered granny square. But why two options? Well, here we have the bordered and borderless version of your mitered granny square, you choose the best way to do it and which one best suits your desired project.
Below is the Mitered Granny Square bordered option. The video is from the Knotting Hook Crochet YouTube channel and you can watch it here:
We also have a borderless option for your Mitered Granny Square. The tutorial video is from the Secret Yarnery YouTube channel, it is very educational and you can watch it below:
Wrap-Up and Next Steps
What did you think of this tutorial? I hope you enjoyed it and feel inspired to put your new skills to good use. Why not share it with your friends and fellow crafters? It’s always more fun to learn and create together, so spread the joy of crochet far and wide!
Thank you so much for being here with us, dear reader. It’s always a pleasure to share these moments of creativity and discovery with you. Together, we’re exploring some of the most stunning crochet patterns out there! Don’t forget to check out our blog, where you’ll find a treasure trove of other tutorials and designs to spark your imagination.
Congratulations on mastering the art of mitered granny squares! This is no small feat, and you should feel proud of adding this beautiful technique to your crochet skills. Now it’s time to take it even further. Play around with bold color combos, dream up exciting new projects, and make this pattern truly your own. Whether you’re a crochet pro or just finding your groove, mitered granny squares are a playful and versatile pattern you’ll love.
Happy crocheting, and remember—your creativity knows no limits!