Crochet Motifs: A Creative and Rewarding Project for Every Skill Level
Crochet motifs are a wonderful way to express your creativity while practicing new techniques. These small, decorative pieces are incredibly versatile—you can use them individually as table accents or stitch them together to create beautiful blankets, shawls, wall hangings, and more.
Whether you’re an experienced crocheter or just starting out, making motifs lets you play with textures, colors, and stitches in a fun and manageable way. Each finished piece is like a miniature work of art, and the process is both relaxing and rewarding.
In this guide, you’ll learn how to crochet a stunning motif from start to finish, using simple materials and easy-to-follow instructions. With just a few supplies and a bit of patience, you’ll be on your way to creating motifs you can proudly display or combine into a larger project.
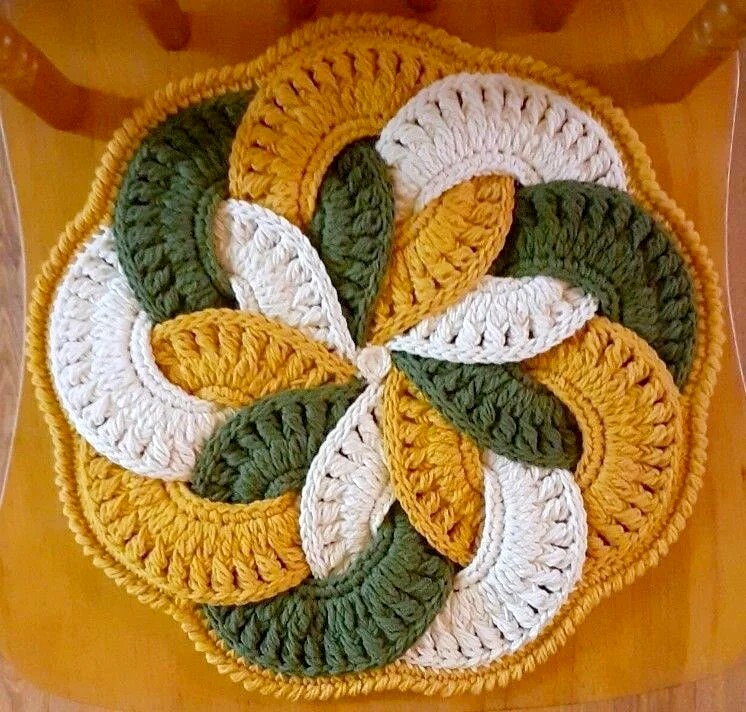
Japonese flower Crochet Motif
What You’ll Need
-
Yarn: Mercedes or any similar yarn of your choice
-
Crochet Hook: 1.75 mm (or a size appropriate for your yarn)
-
Scissors
-
Tapestry Needle: For weaving in ends
Step-by-Step Instructions
Step 1: Make the Foundation Chain
-
Start with a slip knot on your hook.
-
Chain 33 stitches.
-
Join the chain into a loop by inserting your hook into the first chain and making a slip stitch.
Step 2: Work the First Round (Single Crochet)
-
Crochet 33 single crochets (SC) around the loop, inserting your hook into each chain.
-
Join the round with a slip stitch into the first single crochet.
Step 3: Begin the Cluster Stitch Round
-
Chain 2 (this counts as your first stitch).
-
Make a double crochet (DC) into the same stitch.
-
Chain 1 to create a space.
To make a cluster stitch in the next stitch:
-
Yarn over, insert your hook, pull up a loop, and pull through two loops (leave the last loop on the hook).
-
Yarn over again, insert into the same stitch, pull up another loop, and pull through two loops.
-
Now you have three loops on the hook—yarn over and pull through all three loops.
-
Chain 1.
Repeat this cluster stitch pattern in each stitch around.
Step 4: Complete the Round
-
At the end of the round, count to make sure you have 33 clusters.
-
Join the final cluster to the top of the first stitch using a slip stitch.
Step 5: Add More Rounds (Optional)
-
Chain 2 to begin the next round.
-
Repeat the cluster stitch pattern, this time working into the chain spaces between clusters.
-
Continue for as many rounds as you like until your motif reaches the desired size.
Step 6: Make Additional Motifs
-
Repeat Steps 1–5 to create 8 motifs total.
-
Feel free to use a variety of yarn colors for a playful look, or stick with a consistent color scheme for a more uniform design.
Step 7: Join the Motifs
-
Arrange the motifs edge-to-edge.
-
Use slip stitches to join them neatly along the sides.
Step 8: Add a Border
-
With white or a contrasting yarn color, attach the yarn to any outer edge.
-
Crochet 16 single crochets (SC) along each side of the motifs.
-
Continue all the way around, keeping your stitch count even and consistent.
Step 9: Finishing Touches
-
Fasten off the yarn securely.
-
Use a tapestry needle to weave in all loose ends.
Your Finished Crochet Motif Project
Now that your motifs are complete and beautifully joined, you can display them as a table centerpiece, gift them, or incorporate them into a larger project like a blanket or shawl.
Video Tutorial:
Why Motifs Are Worth the Time
Crocheting motifs isn’t just a fun hobby—it’s also a soothing and fulfilling creative outlet. Each stitch reflects your effort and unique style, and with every motif you complete, you’ll gain confidence in your skills. Before long, you may even feel inspired to design your own patterns and take on more ambitious projects.
Happy crocheting!