Herringbone Crochet Blanket – Elegant Texture and Timeless Style
Crochet is much more than just a hobby — it’s a creative way to tell a story using yarn, color, and texture. Among the many beautiful crochet techniques available, the Herringbone Crochet Stitch truly stands out thanks to its refined, woven appearance and graceful drape.
This stitch has become increasingly popular in the crochet community because of its versatility and the stunning visual effect it creates, especially when combined with complementary colors.
Often known as “Espinha de Peixe” in Portuguese, the Herringbone stitch resembles the classic herringbone pattern found in woven fabrics, wooden flooring, and even some knitting styles. Its distinctive slanted “V” texture gives it a modern and sophisticated look while still maintaining a timeless charm.
Whether you’re a beginner ready to expand your crochet skills or an experienced maker looking for a fresh blanket project, this pattern is a wonderful choice.
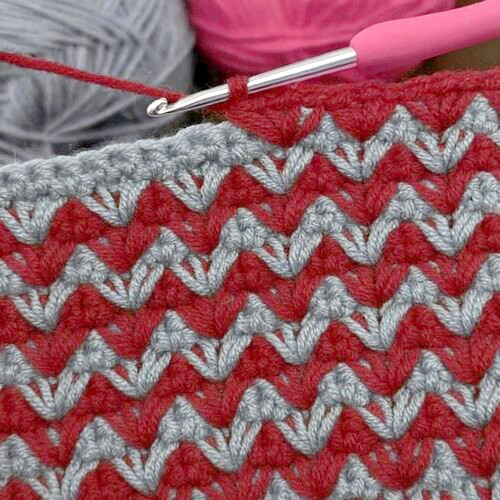
In this tutorial, we’ll learn how to create a Herringbone Crochet Blanket using a stylish color combination of marsala and cool gray, creating a cozy yet luxurious piece that will complement almost any home décor.
We’ll cover everything you need to know — from materials and measurements to detailed step-by-step instructions and helpful finishing tips.
So grab your favorite hook, choose your yarn, and let’s bring this elegant stitch to life!
Materials Needed
| Item | Details |
|---|---|
| Yarn | Medium weight yarn (Worsted / Aran – Category 4) |
| Colors | Marsala (#B03A48) and Cool Gray (#A0A0A0) |
| Hook Size | 5.5 mm (I-9) |
| Scissors | Sharp fabric scissors |
| Tapestry Needle | For weaving in ends |
| Measuring Tape | For checking blanket size |
| Stitch Markers | Optional, helpful for tracking rows |
Blanket Size & Measurements
This blanket pattern is easy to customize. You can adjust the starting chain to create different blanket sizes.
Below are some common blanket dimensions:
| Blanket Type | Size (Width × Height) |
|---|---|
| Baby Blanket | 36″ × 36″ |
| Lap Throw | 40″ × 60″ ✅ |
| Twin Size | 66″ × 90″ |
| Queen Size | 90″ × 100″ |
For the 40” × 60” lap throw used in this tutorial, you will need approximately:
-
1800 yards of yarn in total
-
900 yards Marsala
-
900 yards Gray
You can easily adjust the color balance. Use more gray for a softer, neutral look, or add more marsala if you prefer a bold and dramatic design.
Stitch Pattern: Herringbone Half Double Crochet (HbHDC)
The Herringbone stitch is created using a modified version of the half double crochet, which produces the signature slanted or braided texture.
Abbreviations
-
ch – chain
-
hbhdc – herringbone half double crochet
-
st – stitch
-
sk – skip
-
yo – yarn over
Step-by-Step Instructions
1. Foundation Chain
Using the marsala yarn, chain an even number of stitches.
For a blanket approximately 40 inches wide, chain 120 stitches.
2. Row 1
-
Yarn over and insert your hook into the third chain from the hook.
-
Yarn over and pull up a loop (3 loops on the hook).
-
Pull the first loop through the second loop.
-
Yarn over and pull through the remaining two loops.
Repeat this stitch across the entire row.
At the end of the row:
-
Chain 2
-
Turn your work
3. Row 2 and Following Rows
-
Yarn over and insert the hook into the first leg of the V (not just the top loop).
-
Pull up a loop.
-
Yarn over and draw the first loop through the second loop.
-
Yarn over and pull through the remaining two loops.
Continue across the row.
For the striped effect shown in the sample:
-
Change colors every two rows.
4. Changing Colors (Optional)
To create beautiful alternating stripes:
-
Switch colors at the end of every two rows.
-
You can either carry the unused yarn neatly along the side or fasten off and rejoin when needed.
Border and Finishing
Once your blanket reaches approximately 60 inches in length, it’s time to finish the project.
-
Fasten off your yarn.
-
Use a tapestry needle to carefully weave in all loose ends.
-
Add a simple single crochet border around the blanket using the gray yarn to create a clean and polished edge.
For a fun decorative touch, you can also add:
-
Pom-poms
-
Tassels
-
Fringe in alternating colors
Tips for Success
To achieve the best results with this stitch, keep these helpful tips in mind:
-
Maintain consistent tension to keep the edges straight.
-
Blocking is optional, but it can help define the stitch texture and smooth the fabric.
-
Choose a soft, medium-weight yarn with good structure — acrylic or acrylic-wool blends work beautifully.
-
Use stitch markers or a row counter to keep track of your progress.
Pattern Variations
If you’d like to personalize your blanket even more, try one of these creative variations:
| Variation | Description |
|---|---|
| Gradient Fade | Use ombré yarn or gradually shift between color shades |
| Monochrome | Use a single color to highlight the stitch texture |
| Contrast Border | Add a bold third color for a striking border |
Recommended Video Tutorial
If you’re new to the Herringbone stitch, watching the technique in motion can be extremely helpful. We recommend looking up the tutorial “The Herringbone Stitch | Crochet Stitches Tutorial.”
In the video, you’ll learn:
-
How to start the Herringbone stitch
-
How to maintain the pattern
-
Tips for keeping even tension
-
Techniques for smooth color changes
Combining a video tutorial with the written instructions in this guide will make the process even easier to follow.
Final Thoughts
The Herringbone Crochet Blanket is a rewarding project that combines elegance, texture, and comfort. Its distinctive stitch pattern creates a beautiful drape, making it perfect for cozy evenings, thoughtful handmade gifts, or stylish home décor.
Once you become familiar with the rhythm of the stitch, you’ll find that this blanket is surprisingly beginner-friendly and incredibly enjoyable to make.
So take your time, enjoy each stitch, and watch your blanket come to life one row at a time.