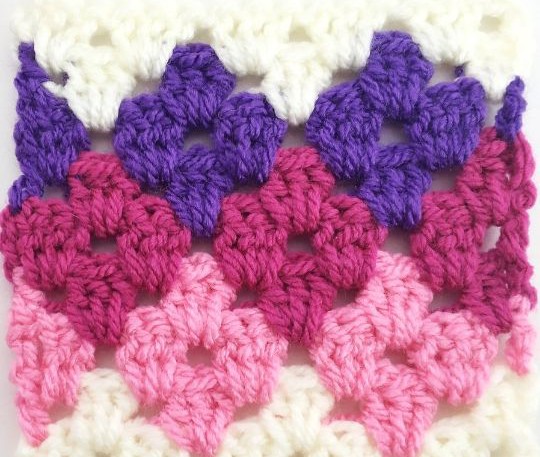
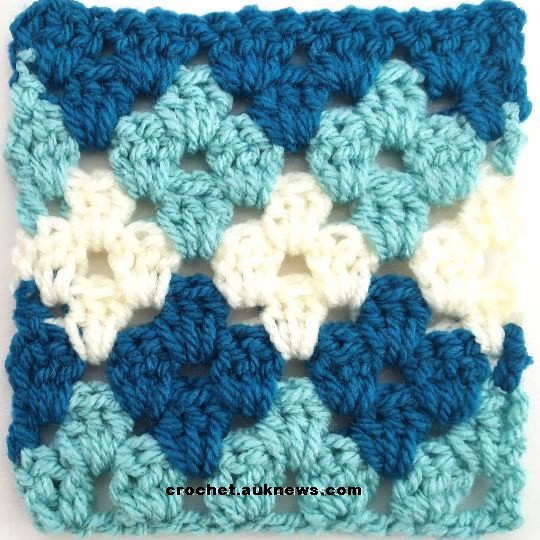
What truly sets the Diamond Granny Stitch apart is its stunning use of colorwork. Through simple, well-placed color changes made row after row, the pattern slowly reveals elegant diamond shapes that seem to appear almost magically as you crochet. The technique itself is easy to follow, making it accessible even for confident beginners, yet the finished design looks intricate and eye-catching. This beautiful combination of simplicity and visual impact makes the diamond granny stitch a wonderful choice for blankets, throws, pillows, and other decorative crochet projects where color and texture really shine.
Materials
You can use any yarn that works well with the appropriate hook size. For this tutorial, I used the following materials:
-
Hook: 5.5 mm (I/9 US, 5 UK)
-
Yarn: Aran-weight (4) yarn, such as Paintbox Yarns Simply Aran, in at least two colors. I used three colors, referred to as A, B, and C throughout the pattern.
-
Tapestry Needle
Abbreviations (US Terms)
-
Ch – Chain
-
Dc – Double crochet
-
MC – Magic circle
-
RS – Right side
-
Sk – Skip
-
Sl st – Slip stitch
-
Sp – Space
-
St – Stitch
-
Yo – Yarn over
-
WS – Wrong side
Pattern Notes
-
When the pattern says “dc 2”, work one double crochet into each of the next two stitches.
-
( … ) – Repeat the instructions within parentheses the indicated number of times.
-
[ … ] – Work all instructions within brackets into the same stitch or space.
-
[A], [B], or [C] indicate which yarn color to use.
-
Always change colors on the last yarn over of the stitch.
-
This pattern has both a right side (RS) and a wrong side (WS).
- All color changes should be made on the same side of the work, which will be the wrong side.
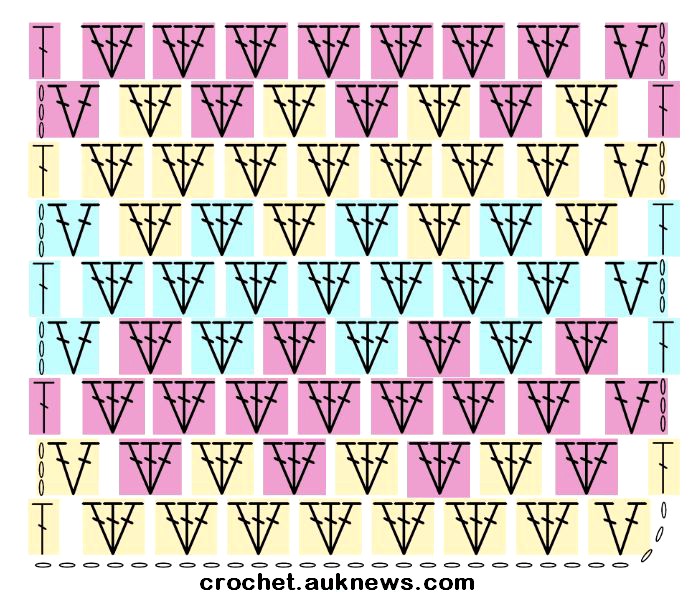
Crochet Granny Diamond Stitch – Pattern Chart
Crochet Granny Diamond Stitch – Tutorial
Foundation Chain
Using Color A, chain a multiple of 3 + 1.
For this tutorial, I chained 19 stitches.
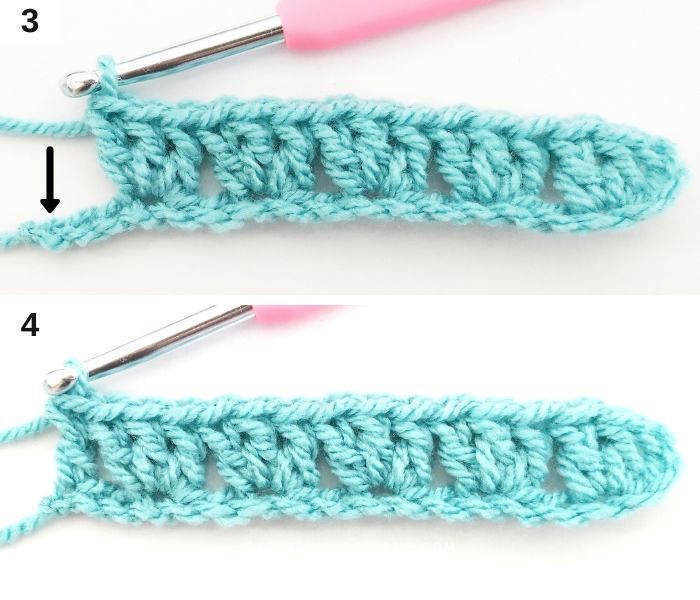
Row 1 (WS)
Using A, work [dc 2] into the fourth chain from the hook (see arrow in photo 1).
Skip 2 stitches, then work [dc 3] into the next chain.
Repeat from * until 3 stitches remain (photos 2 and 3).
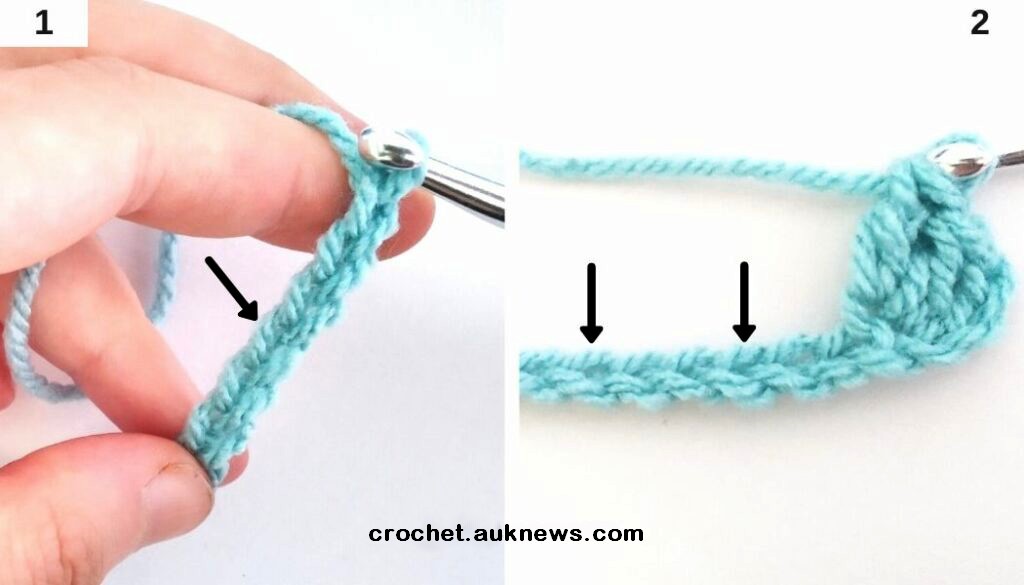
Skip 2 stitches and work dc 1 into the last chain (see arrow in photo 3).
Row 2 (RS)
With A, chain 3 (counts as a dc here and throughout), turn.
Work [dc 2] into the space between the first two stitches of the previous row (see arrow in photo 5), closing the last stitch with B (photo 6).
Do not fasten off A—carry it inside your stitches.
Using B, skip 3 stitches, crocheting over yarn A, then work [dc 3] into the space between the last skipped stitch and the next (see arrow in photo 7), closing the last stitch with A.
Using A, skip 3 stitches, crocheting over yarn B, then work [dc 3] into the next space, closing the last stitch with B.
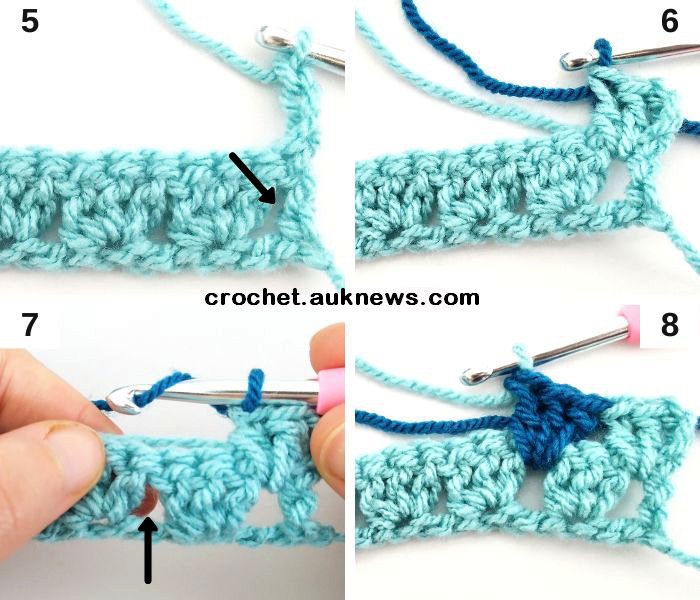
Continue alternating [dc 3] groups with A and B until 3 stitches remain (photo 9).
Skip 2 stitches and work dc 1 into the last stitch, closing it with B (photo 10).
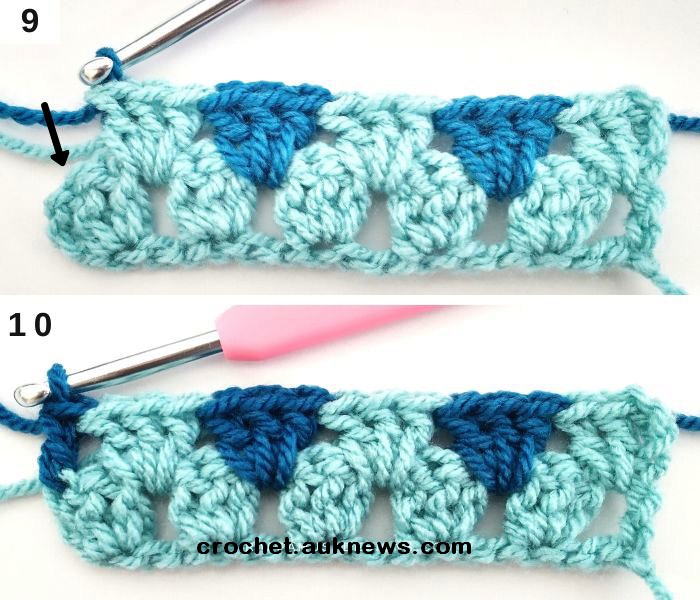
Fasten off A and continue working with B.
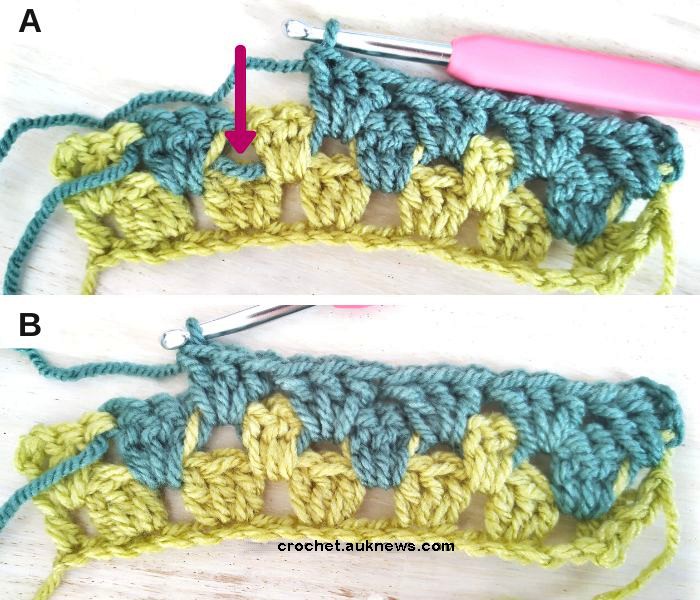
Tip: Hiding Loose Yarn Loops
After rows with color changes, you may notice small loops of the contrasting color showing on the right side of your work.
To hide these loops:
-
On rows with color changes, leave a slightly loose loop on the back (wrong side) of your work (see pink arrow in photo A).
-
On the following row worked in a single color (for example, Row 3 in B), crochet each group of three double crochets over the loose loop from the previous row.
This simple trick keeps the right side neat and clean.
Row 3
With B, chain 3, turn (photo 11).
Work [dc 2] into the space between the first two stitches.
Skip 3 stitches, work [dc 3] into the next space.
Repeat from * until 3 stitches remain. Skip 2 stitches and work dc 1, closing the stitch with C (photo 12).
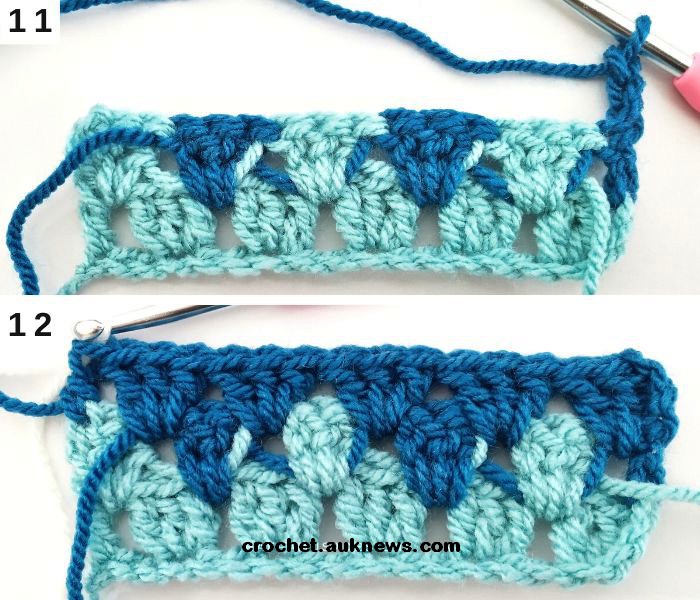
Do not fasten off B—carry it inside your stitches.
Row 4
With C, chain 3, turn.
Crocheting over yarn B, work [dc 2] into the first space (photo 13), closing the last stitch with B (photo 14).
Using B, skip 3 stitches, crocheting over yarn C, then work [dc 3] into the next space, closing the last stitch with C.
Continue alternating [dc 3] groups in C and B until 3 stitches remain.
Skip 2 stitches and work dc 1 into the last stitch, closing with C (photo 15).
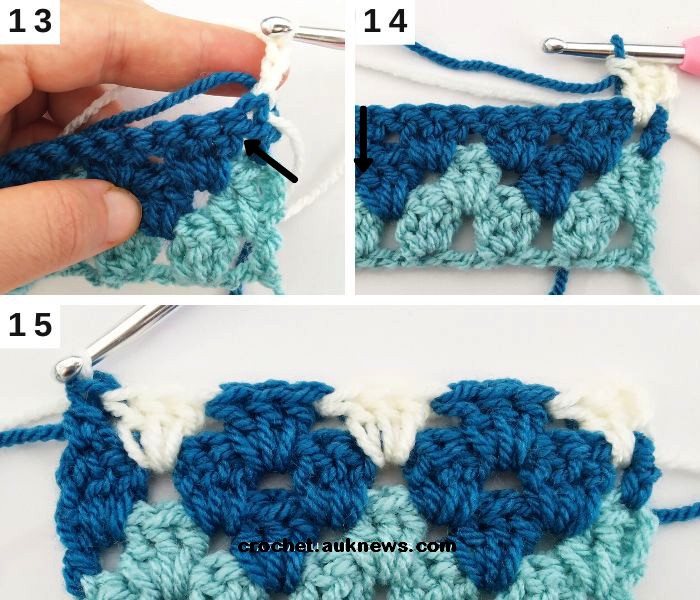
Fasten off B and continue with C.
Row 5
With C, chain 3, turn.
Work [dc 2] into the first space.
Skip 3 stitches, work [dc 3] into the next space.
Repeat from * until 3 stitches remain. Skip 2 stitches and work dc 1.
Row 6
With C, chain 3, turn.
Work [dc 2] into the first space, closing the last stitch with A.
Do not fasten off C—carry it inside your stitches.
Using A, skip 3 stitches, crocheting over yarn C, then work [dc 3] into the next space, closing the last stitch with C.
Using C, skip 3 stitches, crocheting over yarn A, then work [dc 3] into the next space, closing the last stitch with A.
Continue alternating [dc 3] groups in A and C until 3 stitches remain.
Skip 2 stitches and work dc 1 into the last stitch, closing with A.
Row 7
With A, chain 3, turn.
Work [dc 2] into the first space.
Skip 3 stitches, work [dc 3] into the next space.
Repeat from * until 3 stitches remain. Skip 2 stitches and work dc 1, closing with B.
Do not fasten off A—carry it inside your stitches.
Row 8
With B, chain 3, turn.
Work [dc 2] into the first space, closing the last stitch with A.
Do not fasten off B—carry it inside your stitches.
Using A, skip 3 stitches, crocheting over yarn B, then work [dc 3] into the next space, closing the last stitch with B.
Using B, skip 3 stitches, crocheting over yarn A, then work [dc 3] into the next space, closing the last stitch with A.
Continue alternating [dc 3] groups in A and B until 3 stitches remain.
Skip 2 stitches and work dc 1 into the last stitch, closing with B.
Fasten off A and continue with B.
Row 9
With B, chain 3, turn.
Work [dc 2] into the first space.
Skip 3 stitches, work [dc 3] into the next space.
Repeat from * until 3 stitches remain. Skip 2 stitches and work dc 1.
Download Granny Diamond Stitch Pattern PDF
Tutorial Video
This video from channel naztazia
By now, you should have a good feel for how the Granny Diamond Stitch works and how to manage the color changes smoothly.
Continue repeating the rows to grow your Granny Diamond Stitch project to the desired size.
I hope you enjoyed this crochet tutorial! Please share your Granny Diamond Stitch projects with us on Facebook—we’d love to see your creations 💛