Crochet Slippers: A Cosy Project for All Skill Levels
There’s something truly satisfying about creating something both comfortable and practical with your own two hands. Crochet slippers tick both those boxes beautifully. Whether you’re just picking up a hook for the first time or you’ve been crocheting for years, this straightforward pattern is perfect for crafting warm, stylish slippers that you’ll actually look forward to slipping on.
Handmade slippers aren’t just a treat for your feet—they also make charming, thoughtful gifts for loved ones. And the best part? You only need a few basic materials and simple stitches to whip up a pair in no time.
Customisation is part of the fun. Choose yarn colours that reflect your personality, or make several pairs in different shades for a seasonal refresh. With multiple sizing options and easy-to-follow steps, you’ll have a perfect fit every time. Plus, because they work up quickly, these slippers are ideal if you need a last-minute present that still feels personal.
So, grab your hook and let’s get started on a pair of slippers that will keep your feet warm and your crafting heart happy all year long.
What You’ll Need:
-
Worsted weight yarn
-
5mm crochet hook
-
Embroidery needle
Sizing Guide (US Women’s Sizes):
-
Small (S): 6–7
-
Medium (M): 8–9
-
Large (L): 10–11
Stitches Used:
-
SL st – Slip Stitch
-
Ch – Chain
-
Sc – Single Crochet
Gauge:
8 rows = 2 inches
8 single crochets = 2 inches
Pattern Instructions
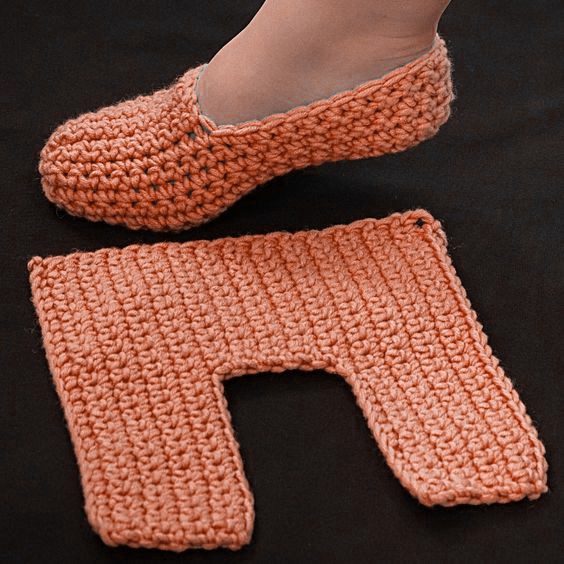
1. Slipper Base:
Begin with a long tail of yarn (approximately 12 inches).
Chain 34 (36, 38) depending on your chosen size.
Row 1:
Single crochet in the second chain from the hook, then continue to single crochet across. Turn your work. You should have 33 (35, 37) stitches.
Rows 2–26 (27, 28):
Chain 1, single crochet across each row. Turn your work after each row. Do not fasten off when you finish the last row.
2. Shaping the Toe:
Thread the embroidery needle with the 12-inch tail you left at the beginning. Weave it in and out along the short edge of your work. Pull gently but firmly to gather the stitches and close the toe.
Then, pass the needle through the starting corner again to anchor the closure. Reinforce this area with a few whip stitches.
Next, use whip stitches to join the first 7 (8, 9) stitches on each side of the slipper. Once done, fasten off.
3. Finishing the Upper:
Row 27 (28, 29):
Chain 1, single crochet across to the seam you’ve just created, then continue across the opposite edge. Leave a long tail and fasten off.
4. Closing the Heel:
Use the remaining yarn tail to whip stitch the heel closed neatly and securely.
Dear crochet lovers,
Check out our Facebook page, where we share stunning designs, fresh ideas, and endless crochet inspiration! Whether you’re a beginner or an expert, you’ll find something to spark your creativity. 💖
🌿 Visit us here: GROUP FACEBOOK
See also: Create Stunning Crochet Heart Patterns
A Few Final Thoughts
This beginner-friendly crochet slipper pattern is as practical as it is pleasing to make. With endless options for colour and texture, you can truly make them your own. Whether you’re crafting a heartfelt gift or treating yourself to a bit of handmade comfort, these slippers are bound to be a hit.