Welcome to “Crochet Made Easy,” where creativity meets everyday practicality! Today, we’re thrilled to introduce you to the delightful art of crafting sunflower coasters. These handcrafted beauties are an elegant addition to your home décor, effortlessly combining charm with functionality. Sunflower coasters not only brighten up your space but also protect your surfaces, making them the perfect blend of form and function. Plus, they’re simple to create, even for beginners, thanks to an easy-to-follow tutorial we’ll guide you through.
Whether you’re looking to add a touch of nature to your décor or simply want a quick and rewarding crochet project, sunflower coasters are just the thing. Each one is a small work of art that’s made with love, ensuring they brighten your day as much as your space.
Why Sunflowers?
There’s something undeniably captivating about sunflowers. With their sunny yellow petals and warm, earthy centers, they’ve long been a symbol of happiness, positivity, and cheer. They instantly bring a sense of warmth and joy to any setting, making them the perfect inspiration for a home décor project. Think of the sunflower’s natural charm brought into your living space—not just as decoration, but as something functional and handmade you can use daily. It’s a win-win!
The Joy of Crocheting Sunflower Coasters
Crocheting sunflower coasters is not just about making something pretty; it’s a creative and therapeutic experience. As you work through this project, you’ll get to showcase your love for crocheting while celebrating the timeless beauty of sunflowers. These coasters are quick to make, beginner-friendly, and a great way to experiment with different stitches. Perfect for adding a personal touch to your home or gifting to loved ones, they’re the kind of project that’s both practical and heartfelt.
Each coaster involves only a few rounds of crochet work. You’ll craft the flower’s center using two rounds of soft, symmetrical double crochet stitches. Then, with just two additional rounds, you’ll bring those vibrant sunflower petals to life. Such a simple process, yet the results are undeniably stunning! Imagine the satisfaction of finishing each piece and seeing it come to life in your hands.
Handmade with Love
There’s a special kind of magic in handmade creations. Each stitch holds a story of care and dedication, a quality that simply can’t be replicated by machine-made goods. Crafting sunflower coasters is a wonderful way to add that warm, personal touch to your home. Whether you set them on a coffee table, gift them to a friend, or spread them throughout your house, these coasters radiate a sense of artistry and love.
Beyond their aesthetic appeal, sunflower coasters are exceptionally practical. They safeguard your tables from scratches, moisture, and heat while enhancing the room with cheerful elegance. And because they’re handmade, you can customize colors and dimensions to suit your needs and style.
What You’ll Need to Create Your Sunflower Coasters
Before you begin crafting your stunning sunflower coasters, make sure you have these essential items on hand. Don’t worry, the materials list is simple, and most of the items are easy to find!
Materials
-
Yarn:
- Opt for DK (light worsted, 8ply) cotton blend or 100% cotton yarn. Cotton is perfect since it’s sturdy, durable, and absorbs moisture well.
- You’ll need skeins weighing 1.76 ounces (50 grams) with approximately 103 yards (95 meters).
-
Colors:
- Color A (Flower Center): Choose a skein of dark brown. One skein is enough to make up to six coasters.
- Color B (Flower Petals): Pick a vibrant gold to bring your petals to life. Don’t worry, you’ll just need a small amount of this color.
- Feel free to get creative and swap the colors for whatever works with your personal style or home décor!
-
Crochet Hook: Use a 3.75 mm hook for this project.
-
Yarn Needle: You’ll need this to weave in any loose ends for a polished finish.
-
Scissors: A good pair of scissors will help cut your yarn cleanly and effortlessly.
With these basic supplies, you’re all set to kickstart your crochet adventure and create charming coasters brimming with sunshine and warmth!
Gauge
While gauge isn’t critical for this design, it’s helpful to make sure your sunflower coasters turn out well-proportioned. If you want your coasters to match the dimensions of this pattern, check your gauge before starting. The recommended gauge is 15 double crochet stitches by 10 rows in a 4 x 4 inch (10 x 10 cm) square.
This minor check can save you hassle down the line if you prefer an exact size match for your coasters, which typically measure 5.5 inches (14 cm) from one petal tip to the other.
Abbreviations and Terms (US Standards)
To help you follow the pattern with ease, here’s a handy guide to the abbreviations used in this project. Don’t worry if some of these are new to you; once you get the hang of them, they’ll come naturally!
- MR – Magic Ring
- Ch – Chain
- sc – Single Crochet
- hdc – Half Double Crochet
- dc – Double Crochet
- hk – Hook
- sl st – Slip Stitch
- sk – Skip
- st/sts – Stitch/Stitches
- rnd – Round
- YO – Yarn Over
- BL – Back Loop
This pattern is written in US crochet terms and designed for right-handed crocheters. If you need clarification on any of these stitches or techniques, don’t hesitate to check out the beginner-friendly tutorials in our “Beginners” category! We’re here to help make the learning process easy and enjoyable.
You’re now equipped with everything you need to craft your very own sunflower coasters! Gather your materials, set aside some time to relax, and enjoy the meditative rhythm of crochet. These coasters are not only functional but also a beautiful way to bring some sunshine into your home or gift to someone special. Happy crocheting!
Crochet Sunflower Coaster – Step-by-Step Guide
Follow this simple guide to craft your very own sunflower coaster. Whether you’re a beginner or have some crochet experience, these instructions will help you create a beautiful and functional coaster. Don’t forget to have fun along the way!
Starting the Coaster
To begin, you need to create a starting loop. You can choose between a foundation ring or a magic ring, depending on your preference.
-
Foundation Ring with Color A (Brown):
- Chain 3.
- Insert the hook into the first chain stitch and connect with a slip stitch to form a circle.
-
Magic Ring with Color A (Brown):
- Create a loop around your fingers, secure it with a slip stitch, and begin crocheting into the loop.
- The magic ring gives a tight, seamless center, perfect if you prefer a more polished look without a noticeable hole.
Round 1
Using Color A (Brown):
- Detailed Instructions:
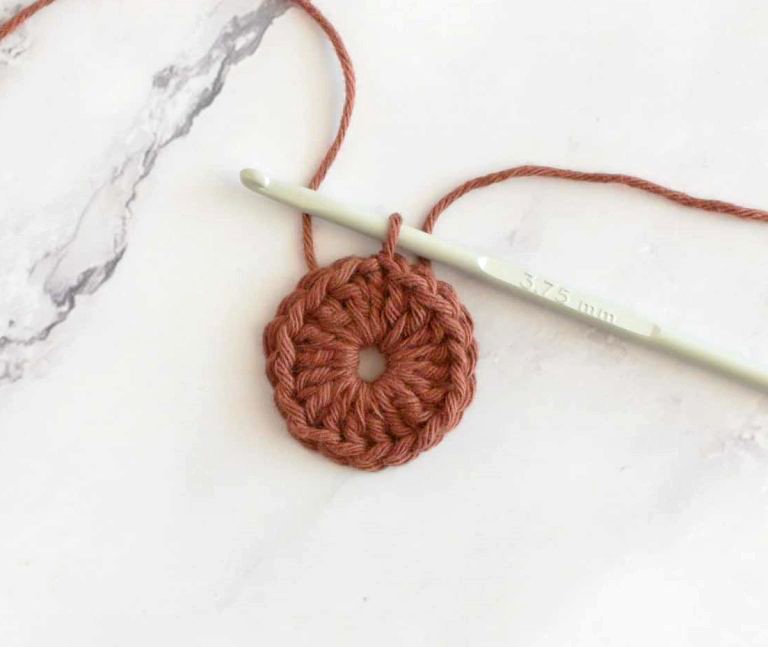
- Chain 3 (this counts as your first double crochet).
- Work 17 more double crochets into the center of the ring.
- Once you’ve completed all 18 stitches, join the round with a slip stitch into the top of the initial chain-3.
- If you’re using the magic ring, gently pull it tight to close the center.
By the end of this round, you should have 18 double crochet stitches.
- Abbreviated Version:
- Rnd 1 – Color A. Ch 3 (counts as 1 dc), work 17 dc into the ring. Join with sl st at the top of ch 3. Total = 18 dc.
Round 2
Still using Color A (Brown):
- Detailed Instructions:
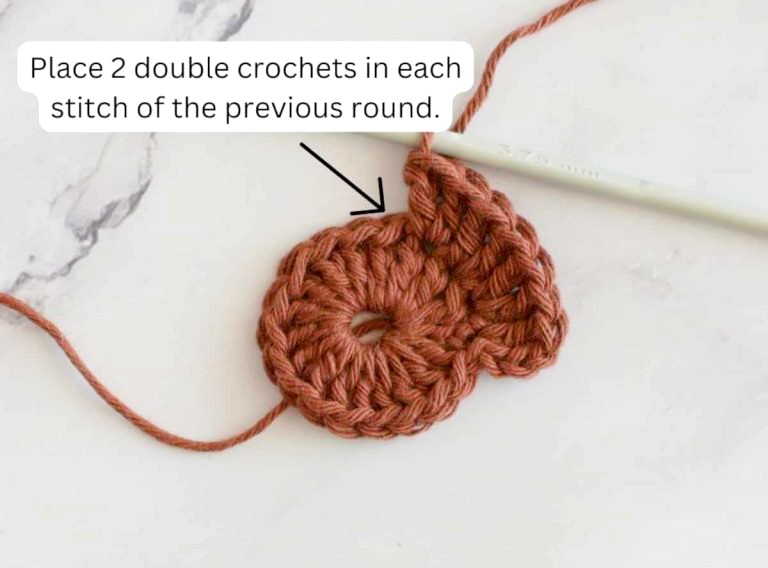
- Begin by chaining 3 (this counts as your first double crochet).
- Work 1 double crochet in the same space as the chain-3.
- Then, crochet 2 double crochets into each stitch from the previous round.
- To finish the round, join with a slip stitch into the top of the initial chain-3.
- Chain 1 and fasten off.
At the end of this round, you’ll have 36 double crochet stitches.
- Abbreviated Version:
- Rnd 2 – Color A. Ch 3 (counts as 1 dc), 1 dc in the same space as ch 3, (2 dc) into each stitch around. Join with sl st at the top of ch 3, chain 1, and fasten off. Total = 36 dc.
Round 3
Switch to Color B (Gold):
- Detailed Instructions:
- Join the gold yarn to any double crochet stitch from the previous round. Create a slip knot, place it on the hook, and make a slip stitch into the stitch.
- Chain 3 (this counts as your first double crochet). Work 1 double crochet in the same stitch as the chain-3.
- Chain 5, then work 2 double crochets into the next stitch.
- Skip two stitches, then repeat this pattern:
- 2 double crochets into the next stitch, chain 5, 2 double crochets into the next stitch.
- Repeat this sequence 8 more times.
- Finish by making a slip stitch into the top of the initial chain-3.
By the end of this round, you should have 18 sets of 2 double crochets and 9 chain-5 spaces.
- Abbreviated Version:
- Rnd 3 – Color B. Ch 3 (counts as 1 dc), 1 dc in the same space as ch 3, ch 5, (2 dc) in the next st, skip 2 sts, (2 dc) in the next st, ch 5, (2 dc) in the next st, repeat from * 8 more times, then join with sl st at the top of ch 3. Total = 18 x 2 dc sets and 9 ch-5 spaces.

Round 4
Continuing with Color B (Gold):
- Detailed Instructions:
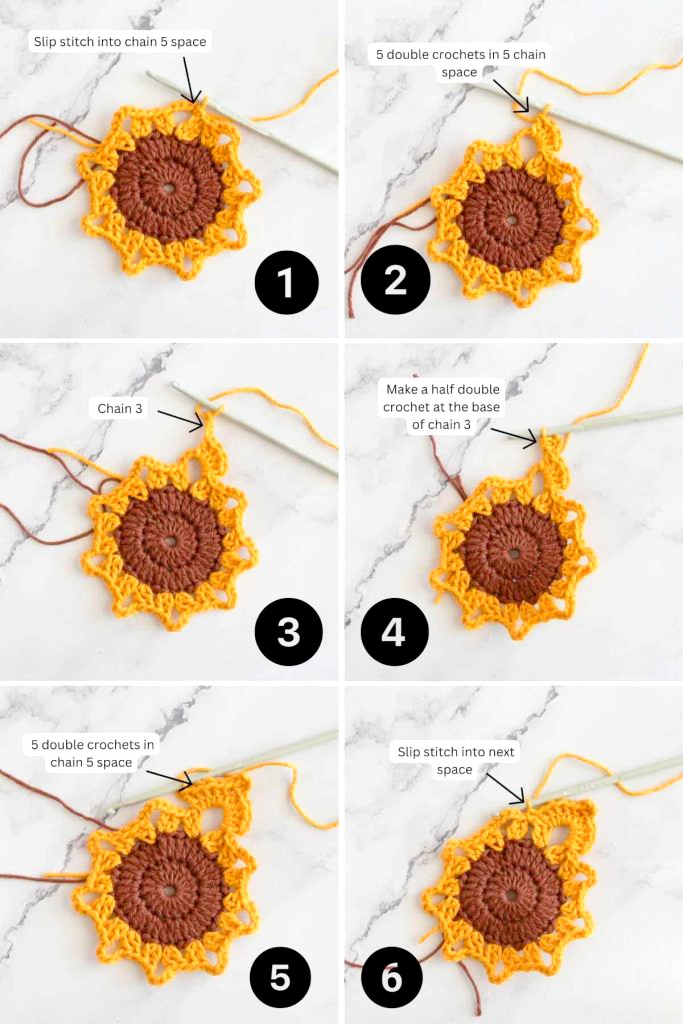
- Slip stitch into the first chain-5 space from the previous round.
- Work 5 double crochets into the chain-5 space, then chain 3.
- Create 1 half double crochet into the first chain of the chain-3.
- Work another 5 double crochets into the same chain-5 space.
- Single crochet into the next chain-5 space to anchor your work.
- Repeat this pattern across all chain-5 spaces:
- 5 double crochets, chain 3, 1 half double crochet into the first chain, 5 double crochets, single crochet into the next space.
- Once you’ve completed the final space, join with a slip stitch into the top of the first double crochet.
- Chain 1 and fasten off.
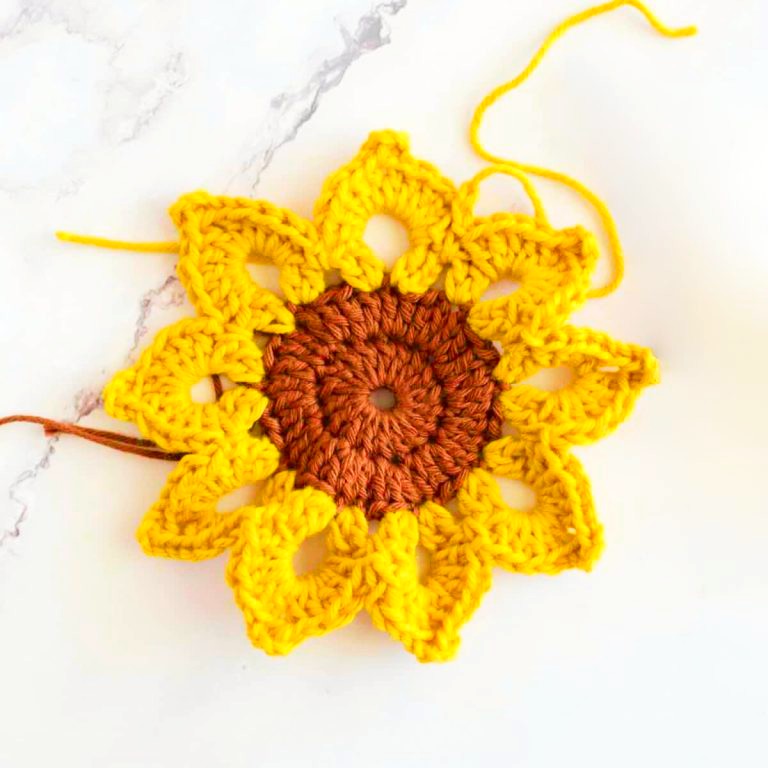
Congratulations, you’ve completed your sunflower coaster! It should now have 9 petals, each formed with 5 double crochets on either side of a chain-3 point.
- Abbreviated Version:
- Rnd 4 – Color B. Sl st into ch-5 space, 5 dc, ch 3, 1 hdc into the 1st ch of ch-3, 5 dc into the same ch-5 space, sc into the next space. Repeat * 8 more times, sl st at the top of the 1st dc, chain 1, fasten off.
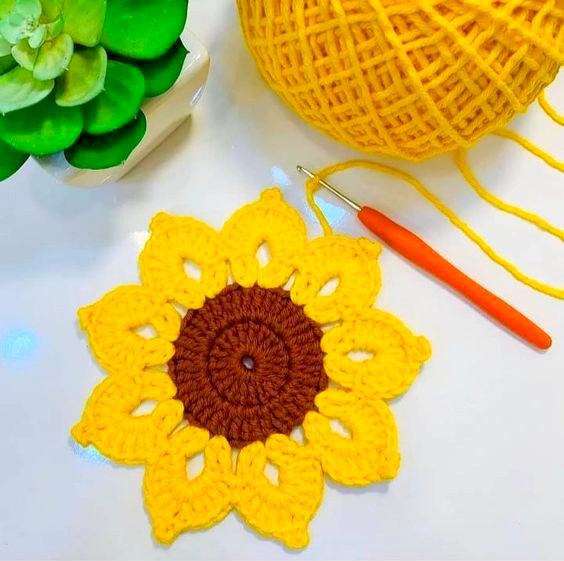
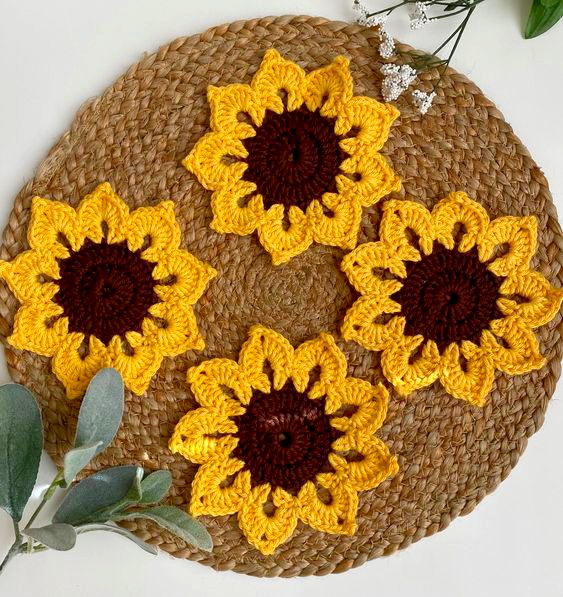
After completing all the steps, your crochet Sunflower Coaster should look like this:
Video Tutorial
Hello, dear reader! To make it easier for you to follow along and master the techniques used in this delightful pattern, we’ve included a video tutorial below. The tutorial comes from the talented creators at Butterfly Craft DIY on YouTube, who excel at guiding crafters through projects like this one. Be sure to check it out and enjoy as you learn!
Conclusion
What are your thoughts on this charming pattern? It’s absolutely stunning, isn’t it? That’s why it deserves to be shared with your friends and fellow craft lovers. Spread the joy and pass on this little treasure!
We’re so glad to have you here with us on Crochet Made Easy, our cozy little corner dedicated to bringing you creative and inspiring crochet projects. It’s always a pleasure to learn and craft alongside you. Don’t forget to explore our growing collection of crochet patterns—we update them every week with fresh ideas to keep you inspired.
Crochet sunflower coasters aren’t just functional; they’re a delightful way to express your creativity and bring a handmade touch to your home. These radiant, whimsical pieces are sure to brighten up any space. Grab your crochet hook, pick your favorite yarn colors, and start creating your own collection of sunflower beauty. Your tabletops will thank you!
Happy crocheting! 🌻