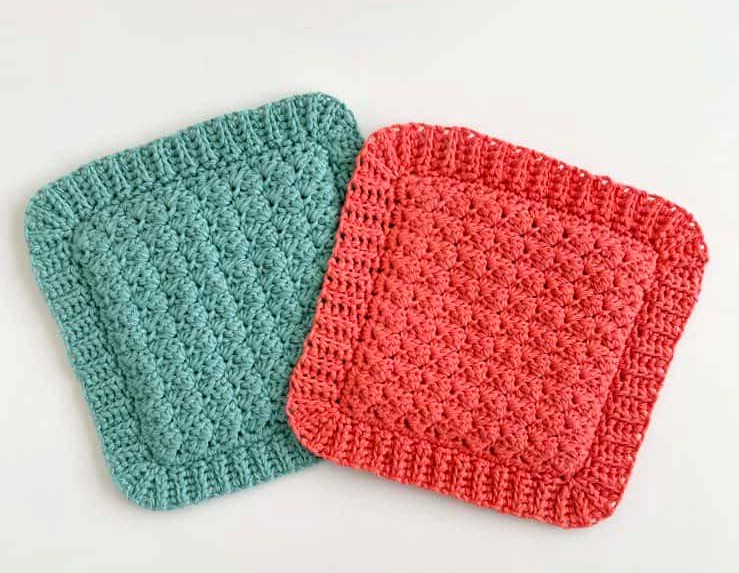
Hey there! Hannah here with a cheerful little crochet project—an easy and quick hot pad (or potholder) pattern you’ll want to whip up again and again.
Around this time of year, I always seem to know someone who’s graduating or moving into a new place. Whether it’s a college dorm, a first flat, or a new home, these hot pads make charming and practical housewarming gifts. Handmade, colourful, and endlessly useful—what’s not to love?
Yarn & Materials
I used Lily Sugar’n Cream 100% cotton yarn for this pattern. It’s a brilliant choice because it comes in so many vibrant shades. For one hot pad, you’ll need either:
-
1 Super Size skein (113g/4 oz, 184 m/200 yds),
OR -
2 regular skeins if the Super Size is unavailable.
The colour options are stunning—Tangerine and Jade Mist are my personal favourites for a bright pop in the kitchen!
You’ll also need:
-
A size H/5.00mm crochet hook
-
A size I/5.50mm crochet hook
-
Tapestry needle
-
Scissors
Size Info
-
Finished dimensions: 9 inches x 9 inches
-
Gauge: 15 stitches and 12 rows = 4 inches (in pattern stitch)
Crochet Stitches Used
Here’s a quick rundown of the stitches used in the pattern:
-
SC (Single Crochet): Insert hook, yarn over, pull up a loop, yarn over and pull through both loops.
-
HDC (Half Double Crochet): Yarn over, insert hook, yarn over, pull up a loop, yarn over, pull through all three loops.
-
DC (Double Crochet): Yarn over, insert hook, yarn over, pull up a loop, yarn over, pull through two loops twice.
-
HDSS (Half Double Slip Stitch): Yarn over, insert hook, pull up a loop, then pull directly through both loops.
-
SL ST (Slip Stitch): Insert hook, yarn over, pull up a loop and pull through the loop on your hook.
Pattern Instructions
Using the H/5.00mm hook:
Foundation: Chain 24 (or any multiple of 3, if you’d like to customise the size).
Row 1:
Start in the 2nd chain from your hook:
Work 1 HDC and 1 DC into that stitch. *Skip the next two chains. Into the third, work SC, HDC, and DC—all into the same stitch. Repeat from * across. You should have one chain left—into this final stitch, work 1 SC. Chain 1, turn.
Row 2:
Into the SC of the previous row, work 1 HDC and 1 DC. *Skip two stitches. In the next stitch, work SC, HDC, and DC. Repeat from * across. You’ll finish with two stitches left: skip one and end the row with 1 SC in the last stitch. Chain 1, turn.
Repeat Row 2 until you’ve completed 19 rows (or to your preferred length).
Fasten off, weave in the ends, and then crochet a second identical square.
Joining the Two Squares
Line up your squares with the right sides facing out. Insert your hook through one corner of both squares and pull up a loop. Chain 1.
Work a round of SC around the entire border, stitching through both squares as you go. For the corners, work 3 SC into each. I managed about 19–20 stitches per side and 21–22 across each end.
When you get back to the starting corner, slip stitch into the first stitch to close the round.
Adding the Border
Now switch to your I/5.50mm hook and continue in the same direction.
Create a decorative edge:
-
Chain 5
-
Beginning in the second chain from the hook, work 1 HDSS into each of the next 4 chains.
-
*Slip stitch into each of the next two stitches along the edge.
-
Turn and work HDSS back across the previous 4 stitches, working only in the back loops.
-
Chain 1, turn, and HDSS back down the row in the back loops again.*
Repeat from * along each side.
Corners:
When you get to a corner, only slip stitch once before turning to work the HDSS row. Repeat this up-and-down process in the corner three times. If the corner doesn’t look right—either too flat or too wavy—you can adjust by doing only two repetitions or adding a fourth, depending on the tension.
Once you return to your starting corner, finish off just as before. Tie off and use your tapestry needle to sew the corner together neatly.
Finishing Touches (Optional but Lovely!)
If you’d like to shape and neaten your finished hot pad, block it lightly:
-
Lay it flat on a towel or blocking board
-
Mist it gently with water
-
Straighten the edges with your hands
-
Pin it in place if needed, and allow it to air dry
Want a visual guide?
There’s a short video tutorial linked, which might help if you’re more of a see-it-to-make-it kind of person!
Free Download pattern/ Summer Hot Pads PDF
Thanks a million for stopping by Crochet Easy. Wishing you lots of joy (and no dropped stitches) as you crochet!
Happy hooking,