Crochet Snowman Pillow – Bobble Stitch Guide (Rewritten & Improved)
This Crochet Snowman Pillow is absolutely adorable! The snowman’s body features a soft, puffy texture created with the classic Bobble Stitch, giving the design a warm and cozy winter feel.
While the exact pattern for the pillow in the photo isn’t available, this improved step-by-step guide will walk you through making a similar pillow cover. You’ll create the background panel, crochet a textured bobble-stitch snowman appliqué, and add cute accessories like the hat, scarf, nose, and cheeks.
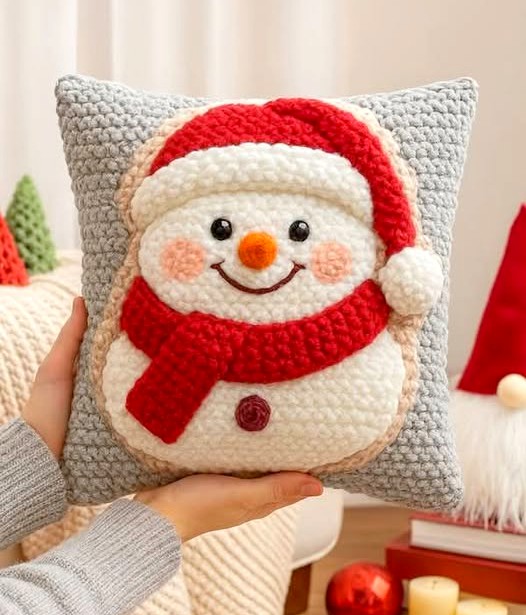
Crochet Snowman Pillow
Materials & Abbreviations (US Terms)
Materials
| Item | Details |
|---|---|
| Yarn | Worsted Weight (#4) or Bulky (#5) in: Grey/Tan (background), White (snowman), Red (scarf/hat/buttons), Orange (nose), Pink (cheeks), Black/Brown (eyes & mouth) |
| Hook | Choose a hook suitable for your yarn (e.g., 5.0 mm / H-8 or 5.5 mm / I-9) |
| Other | Pillow insert (14×14″ or 16×16″), tapestry needle, scissors, stuffing for 3D details |
Abbreviations
| Abbreviation | Meaning |
|---|---|
| ch | chain |
| st(s) | stitch(es) |
| sc | single crochet |
| hdc | half double crochet |
| dc | double crochet |
| sl st | slip stitch |
| inc | increase (2 sc in the same stitch) |
| dec | decrease (sc 2 together) |
| MR | magic ring |
| BOB | bobble stitch |
Special Stitch: Bobble Stitch (BOB)
This stitch gives the snowman its signature fluffy texture.
-
Yarn over (YO), insert hook into the stitch.
-
YO, pull up a loop (3 loops on hook).
-
YO, pull through 2 loops (2 loops on hook).
-
Repeat steps 1–3 four more times in the same stitch (6 loops on hook).
-
YO, pull through all 6 loops.
-
Chain 1 to secure the bobble (recommended).
Work the next stitch as a regular sc to help the bobble pop outward.
1. Crochet the Pillow Panels (Make 2)
You’ll make one front panel and one back panel.
-
With Grey/Tan yarn, chain a length that matches the width of your pillow insert (for a 16″ pillow, chain until it measures 16″).
-
Row 1: Sc in the second ch from hook and across. Ch 1, turn.
-
Rows 2+: Sc across, ch 1, turn.
-
Repeat until the piece forms a perfect square.
Fasten off the back panel.
Do not fasten off the front panel yet.
2. Crochet the Snowman Appliqué (Front Panel)
The snowman is made of several small pieces that you’ll later sew onto the front panel.
Snowman Body (White Yarn)
This round piece forms the base where you will later add the bobble texture.
-
Round 1: MR, ch 2 (doesn’t count), work 10–12 dc into the ring. Sl st to join.
-
Round 2: Ch 1, inc in every stitch. Sl st to join.
-
Round 3: Ch 1, sc 1, inc, repeat around. Sl st to join.
-
Continue increasing (sc 2, inc; sc 3, inc; etc.) until the circle reaches your desired size.
Leave a long tail for sewing.
Add the Bobble Texture
-
Attach White yarn to the back loop of any stitch in Round 1.
-
Work a round of bobble stitches, separating them with 1–2 sc stitches.
-
Continue working bobbles around the entire body until the whole snowman shape is textured.
Fasten off and weave in ends.
Crochet the Scarf (Red Yarn)
-
Ch 30–40 (depending on how long you want the scarf).
-
Row 1: Hdc in the 2nd ch and in each ch across.
-
Rows 2–3: Hdc across.
Leave a long tail for sewing.
Crochet the Hat (Red & White Yarn)
Hat Brim (White)
-
Ch about 20 stitches (wide enough for the snowman’s head).
-
Work 1–3 rows of sc.
Hat Top (Red)
-
Switch to Red yarn.
-
Continue working rows of sc, decreasing occasionally to give the hat its slanted, Santa-style shape.
Pompom (White)
-
MR, 6 sc.
-
Work one round of increases if needed.
-
Stuff lightly and close.
Small Details
Nose (Orange)
-
Ch 5.
-
Work: sc, hdc, dc, dc.
This creates a small carrot triangle.
Cheeks (Pink – Make 2)
-
MR, 6 sc, sl st to close.
Button (Red or Brown)
-
MR, 5 sc, sl st to close.
Face
-
Stitch the eyes and mouth directly using Black/Brown yarn and a tapestry needle.
3. Assembly & Border
Attach the Snowman
-
Center the snowman body on the front pillow panel and sew it securely using the long tail.
Add Accessories
-
Sew on the scarf, hat, pompom, nose, cheeks, and button.
-
Embroider the mouth and eyes.
Join the Panels
-
Place the front and back panels together with right sides facing outward.
-
Attach Grey/Tan yarn to a corner and sc evenly around the edges.
-
Work 3 sc in each corner for a smooth turn.
-
Before closing the last side, insert the pillow form.
-
Continue working sc until you reach your starting point.
-
Sl st to join, fasten off, and weave in the ends.