The Basics of the Crochet Heart Granny Square
A Crochet Heart Granny Square is a variation of the classic granny square, featuring a heart motif in the center. It’s perfect for blankets, cushions, table runners, bags, or even framed wall décor.
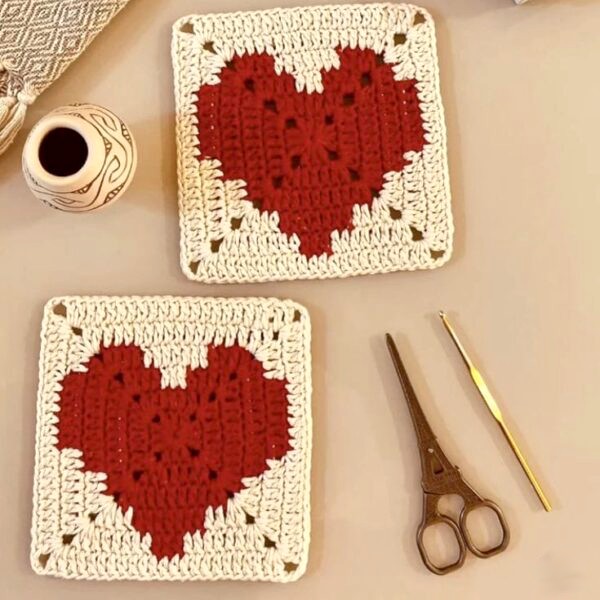
Crochet Heart Granny Square
Materials
-
Worsted weight yarn in your chosen color(s)
-
Crochet hook suitable for your yarn (typically 5.5 mm / H-8)
-
Scissors
-
Yarn needle for weaving in ends
Abbreviations
-
ch – chain
-
dc – double crochet
-
hdc – half double crochet
-
sc – single crochet
-
st – stitch

Step-by-Step Instructions
Step 1: Create the Magic Ring
Start with a magic ring.
If you prefer, chain 4 and join with a slip stitch to form a ring.
Step 2: Round 1 – The Base
-
Ch 3 (counts as your first dc).
-
Work 2 dc into the ring.
-
Ch 2.
-
Work 3 dc into the ring, ch 2.
-
Repeat from * to * two more times.
-
Join with a slip stitch to the top of the starting ch-3.
-
Gently pull the magic ring tight to close the center.
You now have the foundation for your square.
Step 3: Round 2 – Shaping the Heart
-
Ch 3 and work 1 dc in the same stitch.
-
Work 2 dc in each of the next 2 stitches.
-
Hdc in the next 3 stitches.
-
Sc in the next 3 stitches.
-
Hdc in the next 3 stitches.
-
Work 2 dc in each of the next 3 stitches.
-
Dc in the final 2 stitches.
-
Join with a slip stitch to the top of the beginning ch-3.
You should now see the heart shape forming in the center.
Step 4: Round 3 – Adding the Background Color
-
Attach your second color to any hdc stitch from Round 2.
-
Ch 1 and work 1 sc in the same stitch.
-
Sc in the next 2 stitches.
-
Work 3 sc in the next stitch (this is the center tip of the heart).
-
Sc in the next 2 stitches.
Continue working around the square as follows:
-
Sc in the next 3 stitches.
-
3 sc in the next stitch (corner).
-
Sc in the next 2 stitches.
Repeat the corner pattern two more times to form a square shape.
-
Finish by working sc in the remaining stitches.
-
Join with a slip stitch to the first sc.
-
Fasten off and weave in your ends.
Step 5: Block and Shape
Gently stretch your square into shape. Blocking is optional but highly recommended if you want crisp edges and a neat finish.
Step 6: Make More Squares
Now that you’ve completed one, make as many as your project requires! Try experimenting with different color combinations — soft pastels for baby blankets, bold contrasts for modern décor, or classic red and white for Valentine’s projects.
Step 7: Joining Your Squares (Optional)
If you’re creating a larger project like a blanket, you can join your squares using:
-
Slip stitch
-
Single crochet
-
Invisible seam
-
Or your preferred joining method
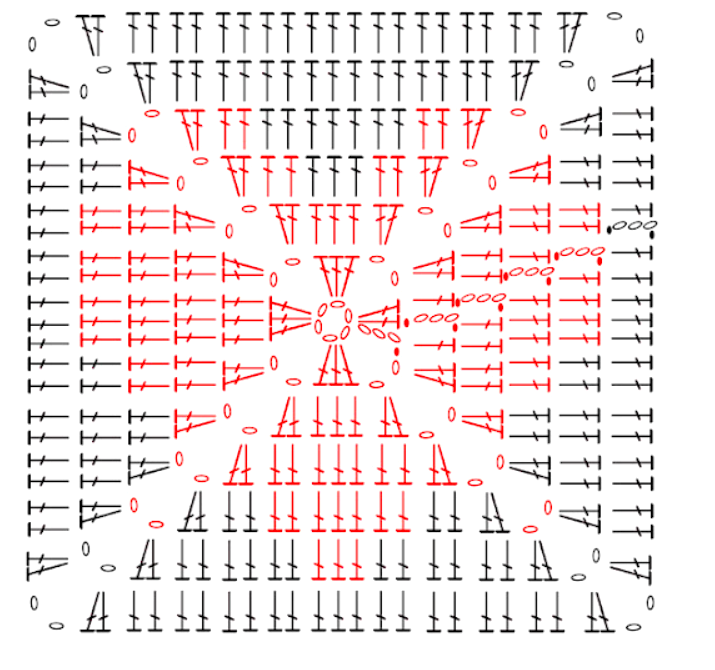
Crochet Heart Granny Square Diagram:
Creative Ideas for Your Heart Granny Squares
Once you’ve mastered the pattern, the possibilities are endless. Here are a few ideas to inspire you:
Blankets
Join multiple squares to create a heart-themed blanket. Alternate colors or stick to a coordinated palette for a cohesive look.
Pillows
Sew your heart squares onto pillow covers to create charming decorative cushions.
Table Décor
Turn your squares into coasters or combine several to make a sweet table runner.
Wall Art
Frame a single square or arrange several together for unique handmade wall décor.
Handmade Gifts
Incorporate heart squares into scarves, tote bags, baby items, or clothing for a thoughtful, personalized gift.

Video Tutorial
If you prefer learning visually, there is a helpful video tutorial available from the Kristine’s Day channel on YouTube. It’s perfect for crocheters who like to follow along step by step on screen.
Prefer a printable version? You can also access the PDF tutorial and keep it handy for offline use.
Access the PDF/ Crochet Heart Granny Square
And there you have it — your very own Crochet Heart Granny Squares! This pattern is not only enjoyable to make, but it’s also incredibly versatile. Whether you’re creating a meaningful gift or adding a loving touch to your home, these heart squares will bring warmth and charm to any project.
Happy crocheting! 💕