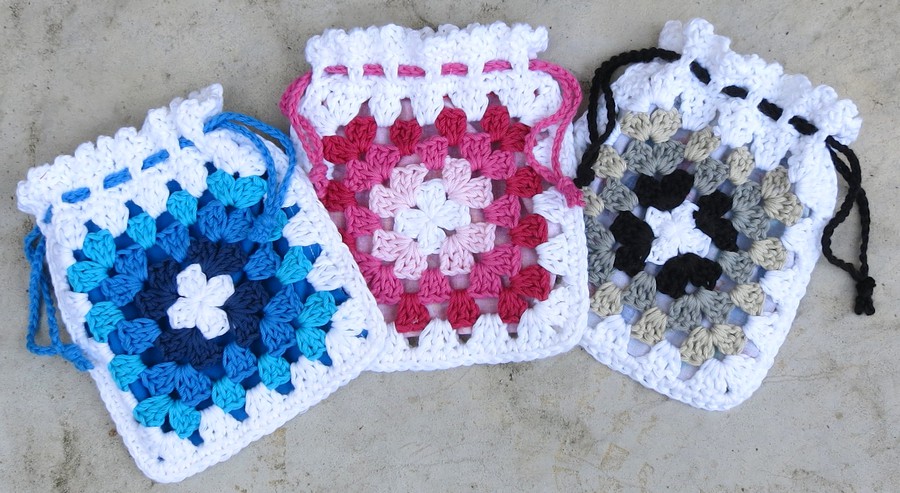
Crochet Granny Square Pouch – A Modern Twist on a Classic Favorite
If you’re a crochet enthusiast, chances are you’ve worked with the timeless Granny Square. It’s a classic motif that never goes out of style—and with a little creativity, it can be transformed into something both beautiful and functional. One of the most delightful ways to use Granny Squares is by turning them into a stylish pouch. Whether you’re new to crochet or an experienced maker, this project is both enjoyable and practical.
In this step-by-step tutorial, we’ll walk you through how to create your very own Crochet Granny Square Pouch. It’s a great way to build your skills, use up leftover yarn, and end up with a charming accessory perfect for everyday use.
Crocheting a pouch from Granny Squares isn’t just satisfying—it’s a great opportunity to practice important techniques like color changes, joining motifs, and adding finishing touches like linings and zippers. Plus, it’s the perfect size for holding makeup, small essentials, or even as a handmade gift.
Access the pattern PDF: Granny Square Pouch
What You’ll Need
Before you begin, gather the following materials:
-
Medium-weight (worsted) cotton yarn in three colors:
-
Color A: Main color
-
Color B: Accent color
-
Color C: Border/joining color
-
-
4.0mm (G-6) crochet hook
-
Yarn needle (for weaving in ends and assembling the pouch)
-
Zipper (optional, but recommended for functionality)
Cotton yarn is ideal for this project due to its durability and shape retention. Choosing the right materials ensures your pouch will look great and stand the test of time.
Stitches You’ll Use
Here are the basic crochet stitches required for this project:
-
Chain (ch) – Forms the foundation of your work
-
Slip Stitch (sl st) – Used for joining rounds or moving without height
-
Double Crochet (dc) – The main stitch used in Granny Squares for that signature open texture
If you’re already familiar with these stitches, you’re ready to go. If not, take a few minutes to practice—these are fundamental skills you’ll use in many crochet patterns.
Step-by-Step: How to Make the Granny Squares
You’ll need two identical Granny Squares—one for the front and one for the back of your pouch.
Square Instructions:
Start with Color A:
-
Magic Ring
-
Round 1: Ch 3 (counts as 1 dc), 2 dc into the ring, ch 2, (3 dc, ch 2) three more times. Join with a sl st to the top of the beginning ch-3. (12 dc, 4 ch-2 corners)
-
Round 2: Sl st into the next ch-2 space. Ch 3 (counts as 1 dc), (2 dc, ch 2, 3 dc) in the same space. Ch 1, (3 dc, ch 2, 3 dc) in the next ch-2 space. Repeat from * to * two more times. Ch 1, join with a sl st to the top of the beginning ch-3.
Switch to Color B:
-
Round 3: Sl st to the next ch-2 corner. Ch 3 (counts as 1 dc), (2 dc, ch 2, 3 dc) in the same space, ch 1, 3 dc in the next ch-1 space, ch 1, (3 dc, ch 2, 3 dc) in the next corner space. Repeat from * to * around, and join with a sl st.
Switch to Color C:
-
Round 4: Follow the same pattern, continuing to place 3 dc clusters in each side space and (3 dc, ch 2, 3 dc) in each corner. Fasten off and weave in the ends.
Repeat this process to create a second identical square.
Assembling the Pouch
Once your two Granny Squares are complete, it’s time to put them together.
-
Position the Squares: Place them with wrong sides facing each other.
-
Join the Sides: Using Color C and a yarn needle, whipstitch three sides closed, leaving the top open. Alternatively, you can use single crochet for a decorative edge.
-
Finishing Touches: Make sure all loose ends are woven in neatly, and your pouch is flat and aligned for a clean finish.
Optional: Add a Fabric Lining and Zipper
Adding a lining and zipper gives your pouch a professional finish and added durability.
-
Cut the Lining Fabric: Slightly larger than the pouch. Fold and sew the edges using a straight stitch.
-
Insert the Lining: Tuck it into the pouch and hand-stitch it to the top edge using small, neat stitches.
-
Attach the Zipper: Use matching thread and sew along the top edge to secure the zipper in place.
This step is optional but highly recommended, especially if you want your pouch to hold small items securely.
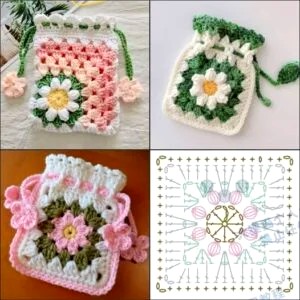
Make It Your Own: Customization Ideas
Once you’ve made one pouch, the possibilities are endless! Here are a few fun ways to personalize your design:
-
Add a Wrist Strap: Crochet a chain and attach it for a handy clutch option.
-
Decorate with Embellishments: Try adding crochet flowers, beads, or tassels.
-
Create a Patchwork Look: Use four smaller Granny Squares for the front panel.
-
Mix and Match Colors: Use bold contrasts or soft gradients—let your creativity shine!
Tutorial video
Caring for Your Granny Square Pouch
To keep your pouch looking great:
-
Hand wash in cold water with mild detergent
-
Avoid wringing or twisting
-
Lay flat to dry on a towel to retain its shape
Proper care will help preserve your handmade piece for years to come.
Final Thoughts
The Crochet Granny Square Pouch is a beautiful blend of tradition and modern practicality. It’s a quick project that’s packed with learning opportunities—perfect for gifting, selling at craft fairs, or simply enjoying yourself.
With just a few simple materials and some creative flair, you can turn classic Granny Squares into something fresh, fun, and functional. So pick up your hook, choose your favorite colors, and bring your pouch to life—one stitch at a time.