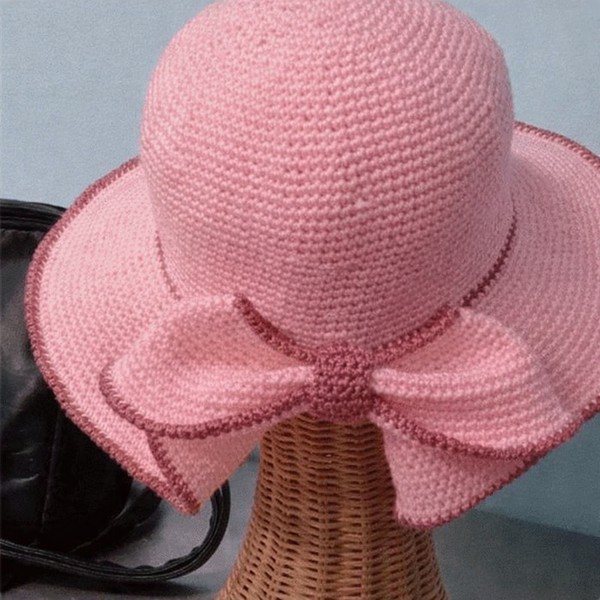
Looking for a fresh and feminine accessory to enhance your handmade summer wardrobe? This beautiful Crochet Bow Hat is the perfect project! With its elegant silhouette and eye-catching statement bow, it offers both sun protection and timeless style—making it a delightful addition to any warm-weather outfit.
Designed using simple stitches—primarily double crochets—this pattern is accessible even for adventurous beginners. Its charm lies in the carefully shaped crown, the wide and structured brim, and the stunning oversized bow that adds a graceful finishing touch.
Whether you’re heading to the beach, strolling through the market, or enjoying a sunny afternoon walk, this bow hat will elevate your summer ensemble. Let’s begin with the step-by-step instructions below!
Crochet Bow Hat Pattern
🧶 Materials Needed
- Raffia yarn, paper yarn, or any firm cotton yarn
- Crochet hook suitable for your yarn (typically 3.5 mm–4.5 mm)
- Stitch marker
- Yarn needle for sewing the bow
- Optional: Contrasting yarn for the brim and bow accent
🧢 Crown of the Hat
- Make a magic ring and work 8 double crochets (dc) into the ring.
- Increase as follows:
- Round 2: 8 increases → 16 dc
- Round 3: (1 dc, 1 inc) × 8 → 24 dc
- Round 4: (2 dc, 1 inc) × 8 → 32 dc
- Round 5: (3 dc, 1 inc) × 8 → 40 dc
- Round 6: (4 dc, 1 inc) × 8 → 48 dc
- Round 7: (5 dc, 1 inc) × 8 → 56 dc
- Round 8: (6 dc, 1 inc) × 8 → 64 dc
- Round 9: (7 dc, 1 inc) × 8 → 72 dc
- Round 10: (8 dc, 1 inc) × 8 → 80 dc
- Continue shaping:
- Work 88 dc for two rounds.
- (8 dc, 1 inc) × 8 → 96 dc.
- Increase as follows: 7 dc, 1 inc, (11 dc, 1 inc, 1 dc, 7 dc) to complete the round → 104 dc.
- Work 1 round even (104 dc).
- Repeat the increase logic → 112 dc.
- Work 1 round even (112 dc).
- (13 dc, 1 inc) × 8 → 120 dc.
- Rounds 19–20: 120 dc.
🌼 Hat Brim
- (3 dc, 1 inc) around the round.
- Work 1 round without increases.
- Crochet surface slip stitches in the outer loops to add structure.
- Work 1 round without increases.
- (4 dc, 1 inc) around.
- Work 1 round without increases.
- (5 dc, 1 inc) around.
- Work 1 round without increases.
- (6 dc, 1 inc) around.
- Work 1 round without increases.
Optional Color Accents
- Switch to a contrasting yarn such as blue.
- Crochet one round normally.
- Add a final round using black or a darker accent color for a refined finish.
Fold the bow flap down and sew the ends to the back of the hat to create a graceful, flared effect.
🎀 Crochet Bow
- Chain 22.
- Rows 2–7: Work double crochets across each row.
- Fold the piece in half, cinch the center, and sew securely to form the bow.
🎀 Bow Band
- Using blue yarn, chain 5.
- Rows 2–8: Work double crochets across.
- Wrap the band around the center of the bow and secure with stitches.
Optional: If using thinner yarn, work up to 10 rows for a thicker band.
Tutorial Video
This tutorial video from channel: Sirin’s Crochet
💡 Finishing Tips
- Gently steam or block the hat to achieve a polished shape.
- Attach the bow to the back of the brim or wherever you prefer.
- Use raffia yarn for a firm, structured look or cotton yarn for a softer finish.
- Add a ribbon or decorative edging for extra elegance.
🌷 Final Thoughts
This Crochet Bow Hat is a standout accessory you’ll be proud to wear or gift. Light, stylish, and practical, it’s the perfect project to showcase your creativity and crochet skills. Whether crafted for yourself or a loved one, this charming design is sure to turn heads all summer long.
Happy crocheting! 🧶✨