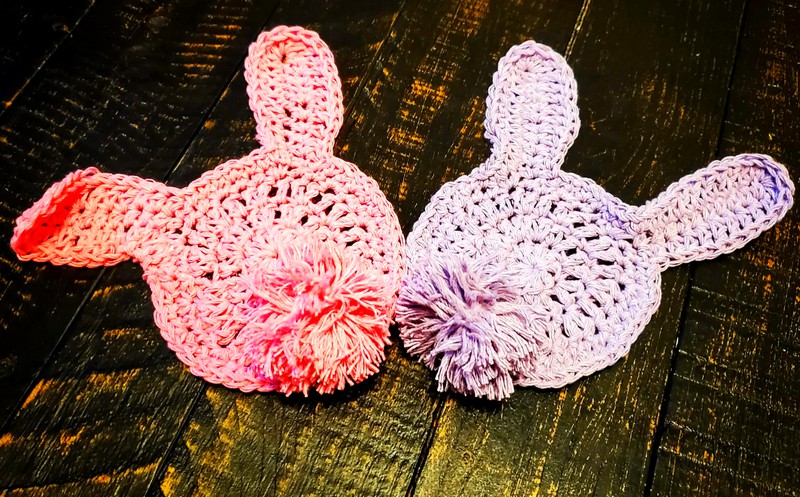
Bunny Butt Coasters – A Fun and Adorable Crochet Project!
Who can resist a fluffy bunny tail? These Bunny Butt Coasters are the perfect way to welcome spring and Easter (if you celebrate), and they’re just too cute to pass up! They work up quickly and are large enough to hold your cup, even with the fluffy pom-pom tail. Want a different look? Skip the pom-pom and sew on a face to create a front-facing Bunny Coaster or even a bunny-shaped hot pad!
Check out the easy-to-follow pattern below and get started on your next adorable crochet project!
Materials Needed
- Medium/Worsted Weight Cotton Yarn (any colour)
- Size H (5mm) Crochet Hook
- Yarn Needle
- Pom-Pom
Abbreviations
- MC – Magic Circle
- Ch – Chain
- SC – Single Crochet
- HDC – Half Double Crochet
- DC – Double Crochet
- Sl St – Slip Stitch
Bunny Butt Coasters – Written Pattern
Starting the Bunny Base
- Begin with a Magic Circle (MC).
- Ch 2 (this does not count as a DC).
Round 1:
- Work 10 DC into the MC.
- Sl St into the first DC (not the Ch).
- Ch 2 (does not count as a DC).
Round 2:
- Work 2 DC into each stitch around.
- Sl St into the first DC (not the Ch).
- Ch 2 (does not count as a DC).
Round 3:
- Work 2 DC into the first stitch, 1 DC into the next stitch, and repeat this pattern all the way around.
- Sl St into the first DC (not the Ch).
- Ch 1.
Shaping the Bunny’s Head
- SC into each of the first two stitches, then 2 SC into the next stitch.
First Ear
- Ch 11.
- HDC into the 2nd chain from the hook and each of the next 9 stitches.
Continue Working Around the Head
- SC into each of the first two stitches, then 2 SC into the next stitch (repeat this sequence twice).
Second Ear
- Ch 11.
- HDC into the 2nd chain from the hook and each of the next 9 stitches.
Continue Working Around the Head
- SC into each of the first two stitches, then 2 SC into the next stitch.
- Continue working SC, SC, 2SC around.
- Sl St to the first stitch of the round.
Round 4 – Adding Definition to the Ears
- Ch 1.
- SC into each of the first three stitches, then 2 SC into the next stitch.
Shaping the First Ear
- HDC into the first three stitches.
- DC into the next seven stitches.
- At the top of the ear (side of the HDC), work 3 DC into the same stitch.
- Working down the other side of the ear, DC into the first seven stitches.
- HDC into the last three stitches of the ear.
Continue Working Around the Head
- SC into each of the first three stitches, then 2 SC into the next stitch (repeat this sequence twice).
Shaping the Second Ear
- HDC into the first three stitches.
- DC into the next seven stitches.
- At the top of the ear, work 3 DC into the same stitch.
- Working down the other side of the ear, DC into the first seven stitches.
- HDC into the last three stitches of the ear.
Finishing the Head
- SC into each of the first three stitches, then 2 SC into the next stitch.
- Continue working SC, SC, SC, 2SC around.
- Sl St to the first stitch of the round.
Fasten Off & Weave in Ends
Adding the Fluffy Tail
- Attach a pom-pom to the bottom edge of the bunny.
- For easy washing, consider tying it in a bow so it can be removed when needed. Otherwise, simply sew or knot it securely in place.
And that’s it! Your Bunny Butt Coaster is complete and ready to bring a touch of cuteness to your home. Enjoy making a whole set in different colours!
Dear crochet lovers,
Do you enjoy browsing social media for beautiful crochet patterns and creative inspiration? 🧶✨
Check out our Facebook page, where we share stunning designs, fresh ideas, and endless crochet inspiration! Whether you’re a beginner or an expert, you’ll find something to spark your creativity. 💖
🌿 Visit us here: Crochet Made Easy
See also: Camellia Flower crochet Pattern
See also: Zig Zag Puff Stitch Crochet
See also: Willow Granny Square Pattern Free