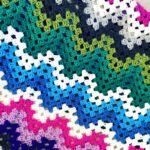
The Sunburst Granny Square is a gorgeous and textured variation of the traditional granny square. It begins with a radiant, circular centre, transitioning into a square shape. This design is ideal for a variety of crochet projects, including blankets, cushions, bags, cardigans, and more. Whether you prefer a monochrome aesthetic or a vibrant multi-coloured look, this pattern allows for plenty of creative expression.
If you are familiar with basic crochet stitches such as double crochet (DC), half double crochet (HDC), puff stitch, and slip stitch, you will find this pattern easy to follow. Even beginners who are comfortable with these stitches can successfully create these squares with a little patience and practice.
Materials Required
To create a sunburst granny square, you will need:
- Yarn: Choose any yarn weight, but a DK (double knit) or worsted-weight yarn works best. Cotton or acrylic yarns are commonly used for their durability and softness.
- Crochet Hook: Use the appropriate hook size for your yarn. For DK yarn, a 4mm hook is ideal, while worsted-weight yarn works well with a 5mm hook.
- Scissors: For trimming yarn ends.
- Tapestry Needle: To weave in ends neatly.
- Stitch Marker (optional): Helps keep track of the beginning of rounds, especially for beginners.
Abbreviations (US Terms)
- CH – Chain
- SS – Slip Stitch
- DC – Double Crochet
- HDC – Half Double Crochet
- PS – Puff Stitch
- SP – Space
- ST – Stitch
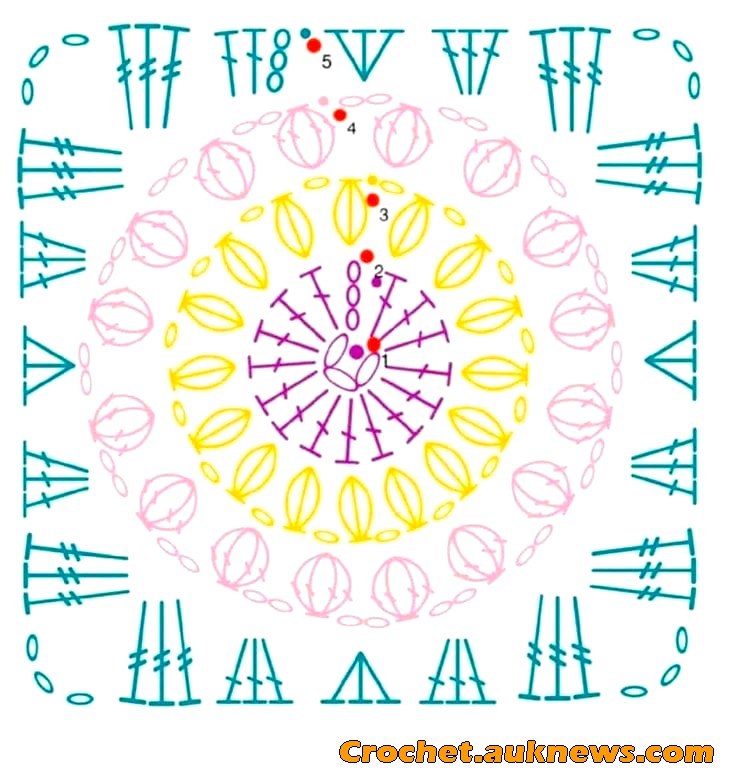
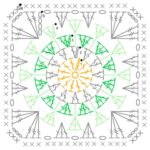
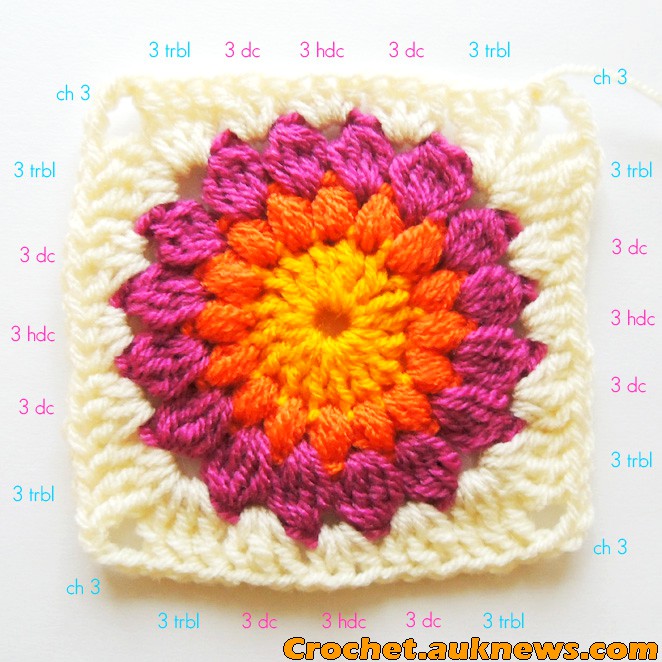
Sunburst Granny Square Pattern Diagram
Step-by-Step Sunburst Granny Square Pattern
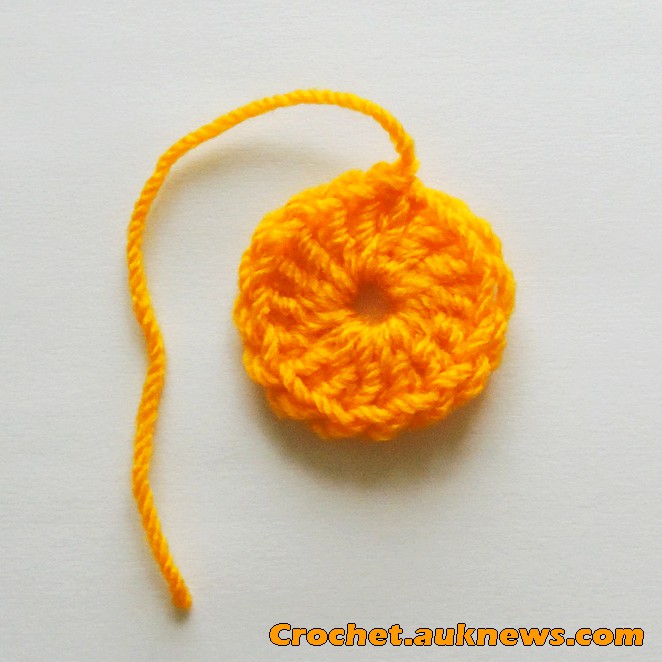
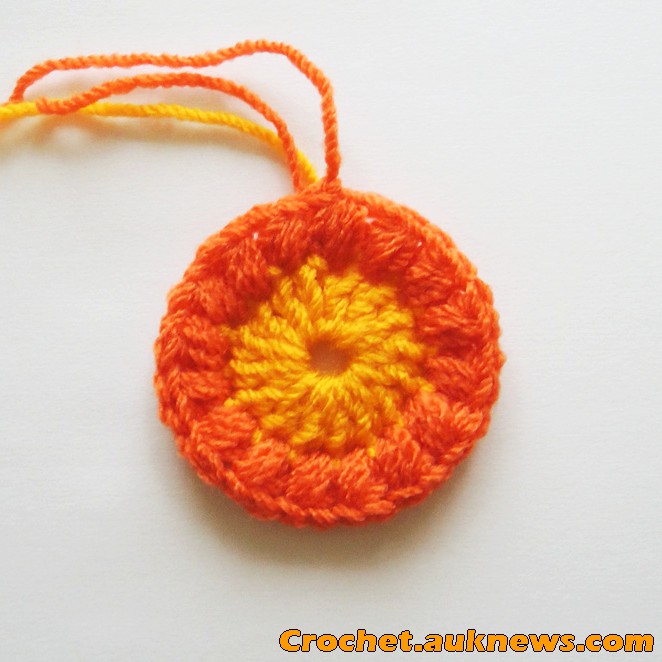
Round 1: Creating the Centre Circle
- Start with a magic ring (or alternatively, chain 4 and slip stitch into the first chain to form a loop).
- Chain 3 (counts as first DC).
- Work 15 double crochets (DC) into the ring. You should now have 16 DC in total, including the initial chain 3.
- Slip stitch (SS) into the top of the first DC to join the round.
At this point, your work should resemble a small, neat circle. If the centre hole appears too large, you can gently pull the tail of your magic ring to tighten it.
Round 2: Adding Puff Stitches for Texture
- Chain 2 (this does not count as a stitch).
- In the same stitch, create a puff stitch (PS):
- Yarn over, insert hook into the stitch, pull up a loop (3 loops on hook).
- Yarn over again, insert hook into the same stitch, pull up a loop (5 loops on hook).
- Yarn over once more, insert hook into the same stitch, pull up another loop (7 loops on hook).
- Yarn over and pull through all 7 loops.
- Chain 1 to close the puff stitch.
- Repeat this puff stitch + chain 1 in each stitch around the circle. You should now have 16 puff stitches in total.
- Slip stitch into the first puff stitch to close the round.
This round creates a beautifully textured layer, adding depth to your square.
Round 3: Half Double Crochet (HDC) Round
- Chain 2 (does not count as a stitch).
- Work 2 HDC in each chain-1 space between the puff stitches from the previous round.
- Continue around the circle until you have 32 HDC stitches.
- Slip stitch into the first HDC to join the round.
At this stage, your work should still have a circular shape, but it is now larger and fuller.
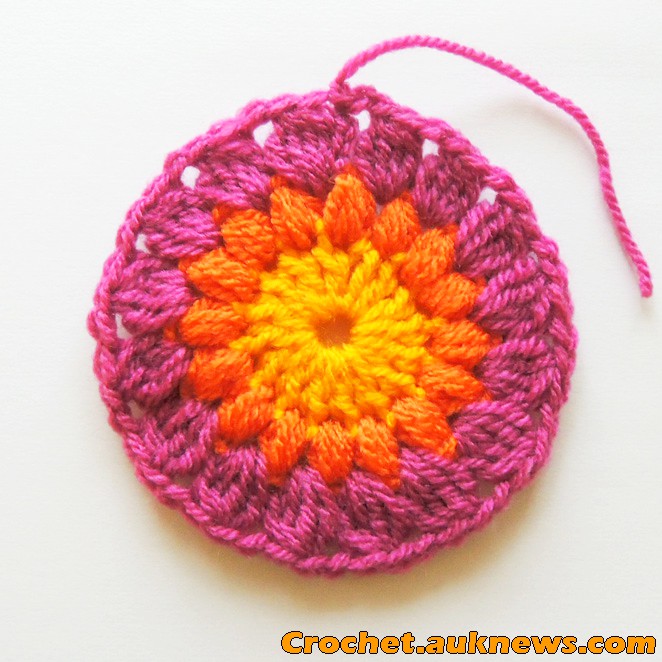
Round 4: Transforming the Circle into a Square
To shape the circle into a square, we need to create corners.
- Chain 3 (counts as first DC).
- In the same stitch, work 2 more DC (this forms the first corner).
- Chain 2, then work 3 DC in the next stitch (completing the first corner).
- Work 1 DC in each of the next 7 stitches.
- Create the second corner:
- 3 DC in the next stitch, chain 2, 3 DC in the same stitch.
- Work 1 DC in each of the next 7 stitches.
- Create the third corner:
- 3 DC, chain 2, 3 DC in the next stitch.
- Work 1 DC in each of the next 7 stitches.
- Create the fourth corner:
- 3 DC, chain 2, 3 DC in the next stitch.
- Slip stitch into the first DC to close the round.
At this point, the once-circular motif should have transformed into a well-defined square shape. If your square appears slightly curved, blocking (lightly dampening and pinning it to shape) will help.
Access the PDF/ Pattern Download PDF Free
Finishing Touches
- Fasten off by cutting the yarn and pulling the tail through the last stitch.
- Weave in the loose ends using a tapestry needle, ensuring they are hidden within the stitches.
- If the square appears slightly uneven, gently block your work by dampening it and pinning it into shape on a flat surface.
Customisation Ideas
Colour Variations
- Use a different colour for each round to create a vibrant, eye-catching design.
- Stick to two or three complementary colours for a balanced and elegant look.
- Try a single-colour approach for a classic, timeless piece.
Different Uses for Sunburst Granny Squares
- Blankets – Stitch multiple squares together for a cosy throw.
- Cushions – Sew four or more squares together to form a cushion cover.
- Bags – Create a trendy tote bag by joining squares.
- Clothing – Use these squares in cardigans, vests, or ponchos for a stylish, handmade touch.
- Table Runners & Placemats – Arrange squares in a row for home décor.
Tips for Beginners
- Tension Matters: Maintain an even tension to keep the stitches uniform. If your square curls up, try using a slightly larger hook.
- Practice the Puff Stitch: If you’re new to this technique, practising it separately can help before incorporating it into the pattern.
- Count Your Stitches: Keeping track of your stitch count helps prevent mistakes and ensures a perfect square.
Final Thoughts
The Sunburst Granny Square is a fun and versatile crochet motif that brings a beautiful texture and elegance to any project. Whether used on its own or joined with others, it adds a charming handmade touch to your creations.
Would you like guidance on how to join multiple squares or adjust the pattern for different project sizes?
Video Tutorial
Dear crocheter friend, if you learn faster by watching this pattern on video, we recommend the tutorial from the Blossom Crochet channel.
Dear crochet lovers,
Do you enjoy browsing social media for beautiful crochet patterns and creative inspiration? 🧶✨
Check out our Facebook page, where we share stunning designs, fresh ideas, and endless crochet inspiration! Whether you’re a beginner or an expert, you’ll find something to spark your creativity. 💖
🌿 Visit us here: Crochet Made Easy