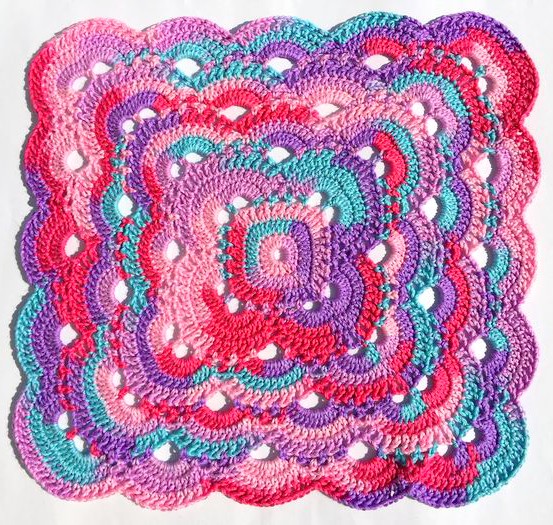
The Enchanting Beauty of the Virus Crochet Blanket
Welcome, dear reader, to Crochet Made Easy Here—a cozy corner where creativity and craft come together. We are so excited to share today a pattern that has captured the hearts of crafters everywhere. Meet the stunning Virus Crochet Blanket, a design that’s as mesmerizing as it is meaningful.
This unique pattern didn’t start out as a blanket. It originally came from a shawl design but has since evolved into a versatile favorite. Today, makers use it to create everything from blankets and throws to scarves and even clothing. Its curious name, “virus,” might raise some eyebrows, especially in light of recent world events. But don’t worry! It’s named not for anything negative but for how it spread like wildfire through the crochet community—purely for its charm and creativity.
What Makes the Virus Crochet Blanket Special?
The Virus Crochet Blanket stands out for its distinct construction and mesmerizing ripple effect. It begins humbly, with a small motif at the center, then elegantly expands outward in a geometric flow. The resulting pattern resembles ripples, almost like the image of a virus under a microscope. This stunning effect is achieved through a combination of crochet techniques, including chains, double crochets, and clusters, creating a textured, intricately layered design.
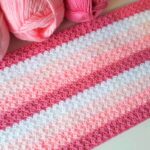
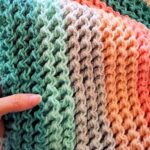
One of the most wonderful aspects of this pattern is its adaptability. Whether you’re crocheting a throw for your living room, a cozy baby blanket, or even a statement scarf, the Virus design can be adjusted to suit your project. You simply repeat rounds to make it larger or keep it small for a more compact item. On top of that, choosing colors adds yet another layer of creativity. You can go with soft gradients for a serene vibe or use bold contrasts for something striking and dramatic—the options are endless.
A Therapeutic Craft for Uncertain Times
While the Virus Crochet Blanket is undoubtedly beautiful, there’s more to this pattern than meets the eye. For many crocheters, the act of making it is just as meaningful as the finished product. The repetitive stitching involved in crochet has a soothing quality, offering a calming escape from daily stresses. It’s meditative, grounding, and a wonderful way to focus on something tangible when facing life’s unpredictability.
Not only is the process therapeutic, but the symbolism of the pattern itself is deeply inspiring. Think about how quickly a virus spreads—that same idea can represent the spread of positive things, too. Kindness, hope, resilience, and creativity—they’re all contagious in the best way. Since each stitch in this blanket is made by hand, it becomes a physical expression of those values for many creators.
Crafting Beauty and Connection
At its heart, the Virus Crochet Blanket is more than just a cozy item; it’s a testament to the power of creativity. Each blanket is unique, reflecting its maker’s choices, personality, and care. And in times of challenge or uncertainty, such projects remind us of the small joys we can bring into the world. While a single crochet hook and a ball of yarn may seem simple, they have the ability to create something both beautiful and lasting.
If you haven’t yet tried this pattern, we encourage you to give it a go. Grab some of your favorite yarn, find a cozy spot, and lose yourself in the rhythm of creating. Whether you make it for yourself, a loved one, or even as an act of generosity for someone in need, your Virus Crochet Blanket will carry within it meaning and love. Happy crocheting!
Virus Crochet Blanket Pattern
This step-by-step pattern will guide you to create a stunning Virus Crochet Blanket. It’s a versatile and elegant design that can be made in any size. Whether you’re brand new to crocheting or an experienced crafter, this guide breaks it down so anyone can follow. Grab your materials and let’s get started!
Materials
- Yarn: Choose your favorite colors (most people use two contrasting colors, but it’s up to you).
- Hook: G (4.25mm).
Abbreviations (Using US Terms)
- Ch – Chain
- DC – Double Crochet
- SL – Slip Stitch
- SC – Single Crochet
- * – Repeat From
Pattern Notes
- Each row’s first corner will be finished at the end of the row.
- A chain 3 (Ch 3) always counts as the first Double Crochet (DC).
- The blanket grows through four repeating rows, which form the iconic “Virus” design.
Instructions
Getting Started
- Create a slip knot, leaving a 2-3 inch tail of yarn.
- Chain 6, then join the chain into a ring with a Slip Stitch (SL).
Row 1 (Center Circle)
- Ch 3 (counts as the first DC).
- Work 19 DCs into the ring.
- SL into the top of the beginning Ch 3. (You should have a total of 20 stitches in this row.)
Row 2 (Doubling)
- Ch 3 (counts as the first DC).
- DC in the same stitch where you joined.
- Work 2 DCs in each stitch all the way around. You should now have 40 stitches.
- Join with a SL into the top of the first Ch 3.
Row 3 (Adding Chain Spaces)
- Ch 4 (counts as 1 DC and a Ch 1 space).
- DC into the next stitch.
- Ch 1, DC into the next stitch.
- Repeat from * to * around the row. You’ll have 40 DCs and 40 Ch-1 spaces.
- Join with a SL into the 3rd chain of your starting Ch 4.
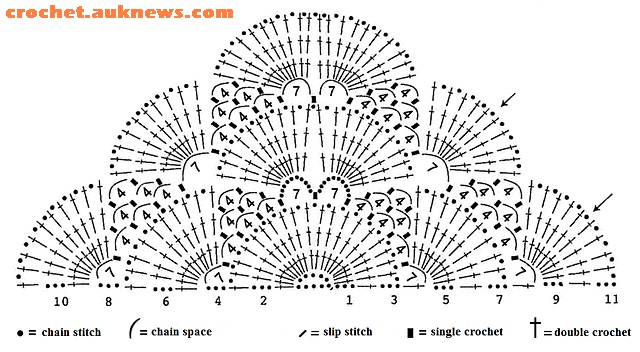
Row 4 (Loops Begin)
This row sets the foundation for the iconic Virus Crochet wave pattern. Pay attention to the corners and spacing.
- Ch 5, SC into the second chain from the hook. (This creates the first big loop.)
- Ch 3, skip 1 chain, SC in the next stitch.
- Repeat this 2 more times to form a total of 3 small loops.
- Work a big loop by chaining 5, skipping one stitch, and SC in the next stitch. Then create 1 more big loop.
- Continue with 3 small loops, followed by 2 big loops. Repeat this pattern around until you have a large loop at each corner and smaller loops filling the spaces between.
- Finish the row by working a Ch 5, SC into the same space as the starting loop, then join with a SL.
Row 5 (Filling Loops)
- Ch 3, work 9 DCs into the first big loop.
- SC into the next small loop, then Ch 3. SC into the following small loop, Ch 3. SC into the last small loop, then work 10 DCs into the next big loop.
- Repeat from * to * until you’ve filled all big loops with 10 DCs each and worked SCs and chains into the small loops.
- At the corner big loops, work a total of 20 DCs – 10 in the first big loop and 10 in the next.
- Finish with 10 DCs into the last big loop and join with a SL.
Row 6 (Building Out the Edges)
- Ch 3, DC into the next 9 DCs (1 DC per stitch).
- SC into the chain space, Ch 3, then SC into the same chain space. (This creates a small loop on top of the small loops from Row 4.)
- DC into the next 20 stitches, SC into the next chain space, Ch 3, SC into the same chain space.
- Repeat all the way around. At the corners, continue to work the growing DC panels. End with a SL into the top of the starting Ch 3.
Row 7 (Adding Ch-1 Spaces)
- Ch 4 (counts as 1 DC and Ch 1).
- DC into the next stitch, then Ch 1. Repeat for all 10 stitches in the current panel (10 DCs, 9 Ch-1 spaces).
- At the corners, skip the Ch-3 space and work DC, Ch 1 into the next 20 stitches. Repeat this same sequence until you’ve completed all 4 edges.
- Finally, join with a SL at the top of the beginning Ch 4.
Row 8 (Repeat the Loops)
Using the same technique as Row 4, recreate the mix of small and big loops. Remember, each corner should always include 2 big loops connected by SCs, and the spaces between corners are filled with small loops.
- Start with a Ch 5 and SC to form the first big loop.
- Ch 3, skip 1 chain, SC in the next. Form 3 small loops, followed by 2 big loops.
- Repeat this all the way around.
Row 9 (Repeat Filling Loops)
Repeat the steps from Row 5, filling the big loops with sets of 10 DCs. Work SCs and chains into the small loops as before.
Row 10 (Repeat Building Edges)
Repeat the steps from Row 6, expanding the DC panels and Ch-3 loops.
Row 11 (Repeat Adding Ch-1 Spaces)
Follow the instructions from Row 7 to add more Ch-1 spaces.
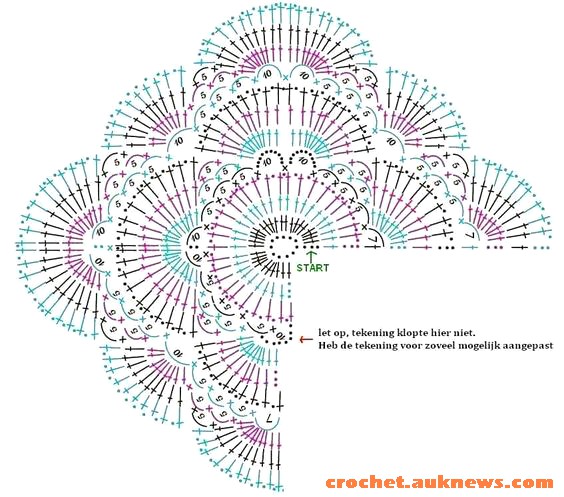
The Repeat Rule
From this point on, simply follow these repeating rows:
- Row 4 (Loops): Establish small and big loops.
- Row 5 (Filling Loops): Fill the big loops with DCs, SCs, and chains.
- Row 6 (Building Edges): Expand DC panels and add small loops at chain spaces.
- Row 7 (Ch-1 Spaces): Add DCs and Ch-1 spaces to keep the panels growing.
Continue repeating these rows to make the blanket as large as you like. The design is both intricate and rhythmic, giving it that mesmerizing “Virus Crochet” look.
Enjoy your crocheting, and don’t forget to play around with colors to make it truly your own! Happy stitching!
Access the PDF/ Virus Crochet Blanket Pattern Download PDF Free
Virus Crochet Blanket Pattern – VIDEO TUTORIAL
Dear crochet lovers,
Do you enjoy browsing social media for beautiful crochet patterns and creative inspiration? 🧶✨
Check out our Facebook page, where we share stunning designs, fresh ideas, and endless crochet inspiration! Whether you’re a beginner or an expert, you’ll find something to spark your creativity. 💖
🌿 Visit us here: Crochet Made Easy