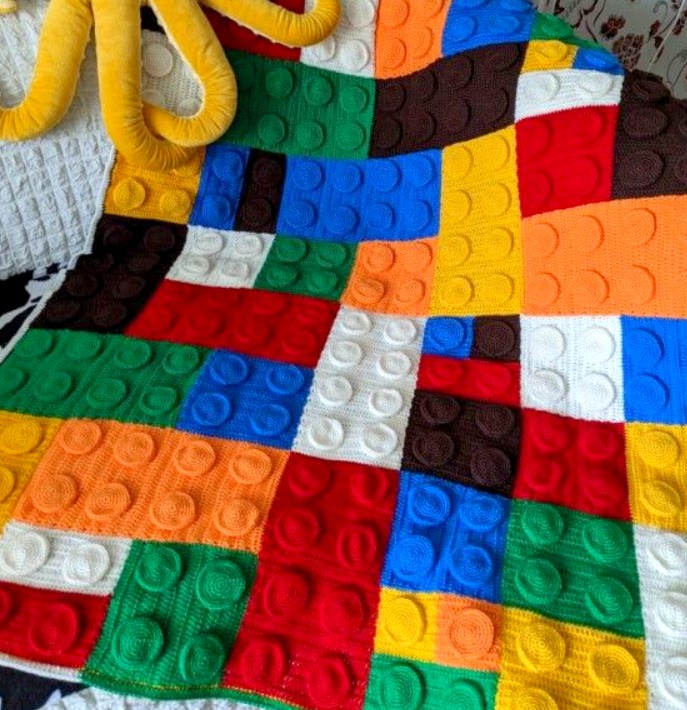
Bright, colorful, and full of personality, the Lego Blanket Crochet Pattern is a fun and creative project that’s perfect for Lego lovers of all ages. Inspired by the iconic building bricks, this playful blanket is made up of bold squares and rectangles topped with raised dots that perfectly resemble real Lego pieces. Whether you’re crocheting it for a child’s bedroom, a game room, or simply to add a pop of color to your home, this cheerful design is sure to bring smiles.
In this free crochet pattern, you’ll learn how to crochet each Lego-inspired block, create the signature raised dots, and join everything together to form a striking and cozy throw. The finished blanket measures 44 inches wide by 51 inches long (112 × 129.5 cm), including the colorful border.
🧵 Special Technique
Join with single crochet (sc):
Place a slip knot on your hook. Insert the hook into the indicated stitch, yarn over and pull up a loop, yarn over again, and pull through both loops on the hook.
📌 Pattern Notes
-
The blanket is made using 26 squares and 17 rectangles, all worked back and forth in rows.
-
Each piece is finished with a single round of single crochet to clearly define the right side.
-
The classic Lego “dots” are crocheted in spirals (continuous rounds) and sewn onto each block.
-
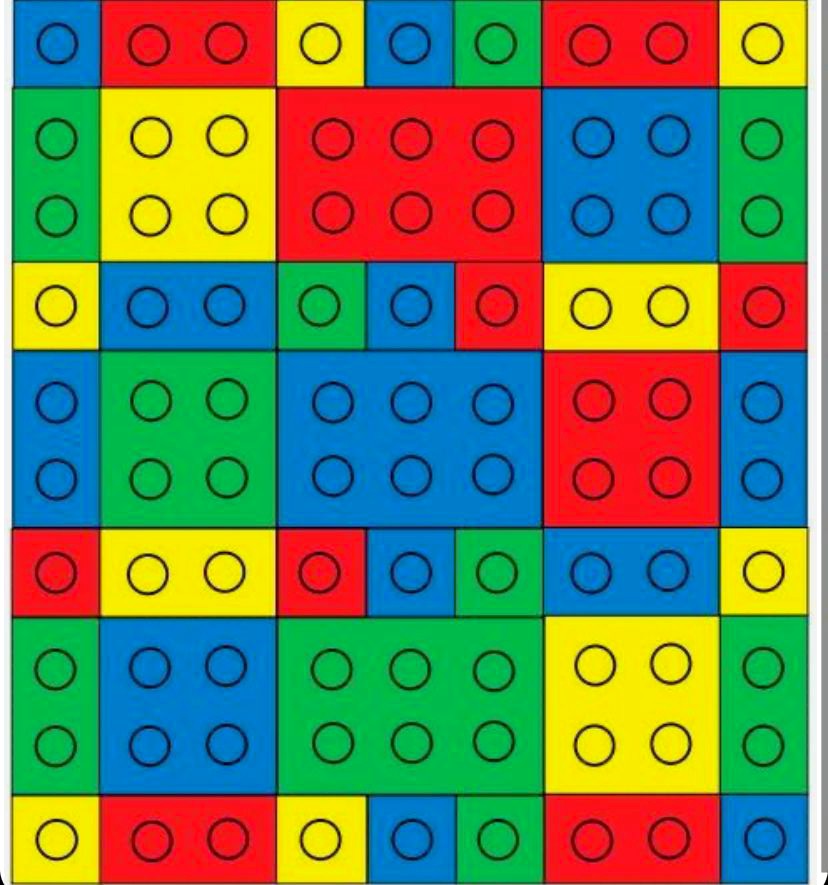
Pieces are arranged according to an assembly diagram and joined using single crochet seams.
-
The blanket is completed with a vibrant, multi-color border.
🟨 1-Dot Squares (Make 20)
Use 4 each in Colors A and B, and 6 each in Colors C and D.
Ch 14
Row 1: Sc in second ch from hook and in each ch across, turn — 13 sts.
Row 2: Ch 1, hdc in each st across, turn.
Row 3: Ch 1, sc in each st across, turn.
Rows 4–13: Repeat Rows 2 and 3 five more times.
Round 14 (RS):
Ch 1, 3 sc in first st, sc across to last st, 3 sc in last st; sc 11 sts evenly along the first side; 3 sc in first bottom ch, sc across to last ch, 3 sc in last ch; sc 11 sts evenly along the second side. Join with slip st in first sc — 56 sc. Fasten off.
🟧 2-Dot Rectangles (Make 14)
Use 4 each in Colors A, B, and C, and 2 in Color D.
Ch 27
Work the same as the 1-Dot Square through Row 13.
Round 14 (RS): Work as for the 1-Dot Square — 82 sc. Fasten off.
🟥 4-Dot Squares (Make 6)
Use 1 each in Colors A and B, and 2 each in Colors C and D.
Ch 27
Work as for the 2-Dot Rectangle through Row 25, repeating Rows 2 and 3 eleven times.
Row 26: Repeat Row 2. Do not turn.
Round 27 (RS):
Ch 1, 3 sc in first st, sc across to last st, 3 sc in last st; sc 24 sts evenly along first side; 3 sc in first bottom ch, sc across to last ch, 3 sc in last ch; sc 24 sts evenly along second side. Join — 108 sc. Fasten off.
🟦 6-Dot Rectangles (Make 3)
Use 1 each in Colors A, B, and C.
Ch 40
Row 1: Sc in second ch from hook and in each ch across — 39 sts.
Rows 2–26: Repeat the pattern used for the 4-Dot Square.
Round 27 (RS): Work as for Round 27 of the 4-Dot Square — 134 sc. Fasten off.
⚪ Dots (Make 90)
Make 22 in Colors A and B, 28 in Color C, and 18 in Color D.
Ch 1
Round 1 (RS): Work 6 sc into the chain. Do not join — 6 sc. Place a marker.
Round 2: 2 sc in each st — 12 sc.
Round 3: Sc in next st, 2 sc in next st around — 18 sc.
Round 4 (Back loops only): Sc in each st, join with slip st. Fasten off.
🧸 Optional: Lightly stuff each dot with fiberfill before sewing for a raised 3D effect.
🧷 Assembly
-
Lay out all pieces with the right side facing up and rows running horizontally.
-
Center and sew the dots onto same-color blocks, placing them about 5 rows from the top and bottom and 3–4 stitches from each side.
-
Make sure all dots align evenly both horizontally and vertically.
-
Join pieces vertically first, then horizontally, using the Join with sc method through both layers from the right side.
🧶 Border
Round 1 (Color A):
Sc in each st around, placing 3 sc in the center stitch of each corner and 1 sc in each seam. Join — 522 sc.
Round 2 (Color B):
Join with slip st, ch 2 (counts as hdc), hdc around, placing 3 hdc in each corner — 530 hdc. Fasten off.
Round 3 (Color C):
Sc in each st around, 3 sc in each corner — 538 sc. Fasten off.
Round 4 (Color D):
Repeat Round 2 — 546 hdc. Fasten off.
Round 5 (Color A):
Slip st in each st around. Join and fasten off.
✂️ Weave in all ends neatly.
📏 Finished Size
44” wide × 51” long (112 × 129.5 cm), including the border.
Download the free pattern PDF
Create this blanket in classic primary colors for a traditional Lego look, or choose your own color palette to match your space. This Lego Blanket Pattern is not only bright and adorable, but also a fantastic way to practice shape construction, joining techniques, and decorative elements. With its raised dots and bold design, it’s a fun and nostalgic project that both kids and adults will love.