How to Crochet a Wheat Stitch Beanie – Beginner-Friendly Step-by-Step Pattern
Crocheting a Wheat Stitch Beanie is a lovely way to combine texture, warmth, and elegance in one simple project. Although the stitch looks intricate at first glance, it’s surprisingly easy to learn — even if you’re still fairly new to crochet.
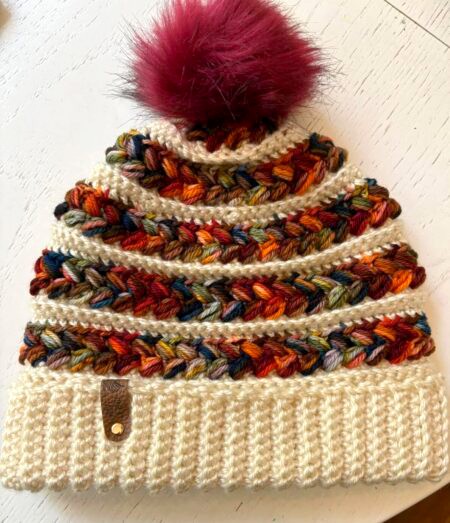
The wheat stitch forms a raised, grain-like texture that resembles rows of wheat, giving the beanie a cozy, stylish look. In this tutorial, you’ll learn how to make a complete hat from top to bottom with clear, beginner-friendly steps. Let’s get started!
What Is the Wheat Stitch?
The wheat stitch is a textured crochet pattern created by alternating:
-
Double crochet (dc)
-
Front post double crochet (fpdc)
This combination produces a beautiful raised pattern that looks like wheat kernels growing across your fabric. Even though it has a rich, detailed appearance, it repeats easily, making it perfect for beginners who want to create a professional-looking project.
Materials You’ll Need
-
1 skein of worsted or bulky yarn (100 g)
-
4 mm or 5 mm crochet hook
-
Scissors
-
Yarn needle
-
Stitch marker (optional)
Finished Size
This beanie is designed to fit most adult heads. To customize the size, you can adjust the starting stitch count or add/remove rows as needed.
Step-by-Step Wheat Stitch Beanie Pattern
1. Start the Crown
-
Begin with a magic ring.
-
Chain 3 (this counts as your first dc).
-
Work 11 dc into the ring.
-
Pull the ring tight and join with a slip stitch.
➡️ You should now have 12 stitches.
With the center complete, you’ll gradually increase the circle until it reaches the desired width for your beanie.
2. Increase the Crown
Round 2:
Work 2 dc in each stitch → 24 stitches
Round 3:
1 dc in next stitch, 2 dc in the next stitch — repeat around → 36 stitches
Round 4:
2 dc, then 2 dc in the next stitch — repeat around → 48 stitches
Continue increasing in this pattern (adding one more dc between each increase in every round) until the crown measures about 16 cm across.
Once the crown reaches the right size, you’ll stop increasing and begin the textured wheat stitch.
3. Begin the Wheat Stitch Pattern
From here on, do not increase.
Round 1 of texture:
-
Chain 3.
-
Dc in the next stitch.
-
Fpdc around the following stitch.
-
Repeat dc – fpdc – dc – fpdc around the entire round.
-
Join with a slip stitch.
Each new round will follow this same sequence, making the wheat stitch easy to maintain once you get into the rhythm.
4. Crochet the Body of the Beanie
Repeat the wheat stitch pattern for 12–15 rounds, depending on how tall you want the beanie to be.
Helpful tips:
-
Always place each fpdc around the fpdc from the previous round.
-
The dc stitches will naturally fall between the raised columns.
This keeps the wheat-like texture flowing smoothly from the crown to the brim.
5. Add a Ribbed Edge (Optional but Recommended)
A ribbed brim gives your beanie a stretchy, polished finish.
-
Work one round of single crochet (sc) evenly around the edge.
-
Then crochet 3–5 rounds of:
-
1 fpdc
-
1 bpdc (back post double crochet)
-
This creates a classic ribbed effect that fits comfortably and securely.
6. Finishing Touches
-
Cut your yarn and fasten off.
-
Weave in all loose ends using a yarn needle.
-
Add a pom-pom or faux-fur topper if you want an extra cozy look.
Your Wheat Stitch Beanie is now ready to wear or gift!
Tips for Best Results
-
Choose a soft, medium-thick yarn for maximum comfort.
-
Keep your tension even to highlight the texture.
-
Combine two yarn colors for a subtle gradient effect.
-
Add extra fpdc rounds if you prefer a more textured look.
Conclusion
A Wheat Stitch Beanie is the perfect project for anyone who wants to explore textured crochet without complicated techniques. The repeating pattern is relaxing, the texture is beautifully structured, and the finished beanie makes a wonderful gift or item to sell.