Ribbed & Textured Crochet Beanie (Mama & Mini) – Step-by-Step Pattern
⭐ Materials Needed:
-
Worsted or Aran weight yarn (multicolor looks great)
-
5.0 mm crochet hook (H) for adult size
-
4.5 mm crochet hook for mini size
-
Faux fur pom-pom
-
Yarn needle
-
Scissors
-
Optional: Leather tags for a personalized touch
Sizes:
-
Mama (Adult): ~22″ (56 cm) circumference
-
Mini (Toddler/Child): ~18″ (46 cm) circumference
Both hats are worked flat from side to side, then seamed and cinched at the top.
Stitches Used:
-
ch – Chain
-
sc – Single crochet
-
dc – Double crochet
-
fpdc – Front post double crochet
-
bpdc – Back post double crochet
-
blo – Back loop only
✨ Texture Details:
The beanie uses two key textural elements:
-
Ribbed brim: Worked in sc in the back loop only (BLO).
-
Vertical textured stripes: Alternating between dc, fpdc, and bpdc for a beautiful knit-like ridge effect.

Step-by-Step Instructions:
1️⃣ Start the Brim (worked sideways)
For the Adult Size:
-
Chain 13.
-
Row 1: Sc in the 2nd ch from hook and across (12 sc). Ch 1, turn.
-
Rows 2–45: Sc in BLO across (12 sts). Ch 1, turn.
(You can adjust the number of rows to fit the head circumference.)
For the Mini Size:
-
Chain 11 and repeat the same sequence for 38 rows.
This creates a stretchy ribbed band for the brim.
2️⃣ Join the Brim
-
Fold the strip in half, aligning the first and last rows together.
-
Slip stitch across to join, forming a loop.
Do not fasten off.
3️⃣ Work the Body of the Hat (Textured Stripes)
Now you’ll work along the edge of the ribbed brim.
Round 1:
-
Chain 2 (this does not count as a stitch).
-
Work 1 dc into each row around the brim’s edge.
-
Slip stitch to join.
(Adult size: ~45 sts, Mini size: ~38 sts.)
Texture Pattern Rounds:
Alternate between Round A and Round B to create the texture.
-
Round A:
Chain 2.
Fpdc in the next st, dc in the next st, bpdc in the next st, dc in the next st.
Repeat around.
Slip stitch to join. -
Round B:
Chain 2.
Bpdc in the next fpdc, dc in the next dc, fpdc in the next bpdc, dc in the next dc.
Slip stitch to join.
Continue alternating Round A and Round B until the hat reaches your desired height.
-
Adult height: ~9–10 inches (23–25 cm)
-
Mini height: ~7–8 inches (18–20 cm)
4️⃣ Shaping the Crown (Top Closure)
To finish the top, we’ll do a light decrease and cinch it closed.
Last 2 rounds:
-
Switch to sc to tighten the top.
-
Round 1: Sc in each st around.
-
Round 2: Sc2tog around.
-
-
Fasten off, leaving a long tail.
Use a yarn needle to weave the tail through the remaining stitches at the top and pull tightly to close the crown.
5️⃣ Attach the Pom Pom
Sew a faux-fur pom-pom securely to the top of the hat.
6️⃣ Optional: Add a Tag
For a personal touch, sew a leather “MAMA” tag to the adult hat and a “MINI” tag to the child’s hat at the folded brim.
Finished!
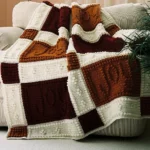
Now you have a stylish Ribbed & Textured Beanie Set! The combination of BLO ribbing, alternating fpdc/bpdc stitches, and the use of multicolor yarn creates the beautifully striped texture you see in the image.