Make Your Own Shell Crochet Bag – A Stylish and Practical Project
If you’re looking for a stylish yet practical crochet project, the Shell Crochet Bag is just what you need! This beautiful bag blends texture, durability, and design—making it perfect for everyday use or as a standout fashion accessory. With its roomy interior and sturdy construction, it’s as functional as it is elegant.
In this detailed, step-by-step tutorial, you’ll learn how to create your very own Shell Crochet Bag. We’ll walk you through everything—from working the stunning fan stitch pattern, shaping the handles, to lining your bag for extra strength and a polished finish. Whether you’re an intermediate crocheter or a confident beginner ready for a fun challenge, this project is sure to inspire.
Grab your favorite yarn and hook—let’s dive into creating this unique, eye-catching accessory!
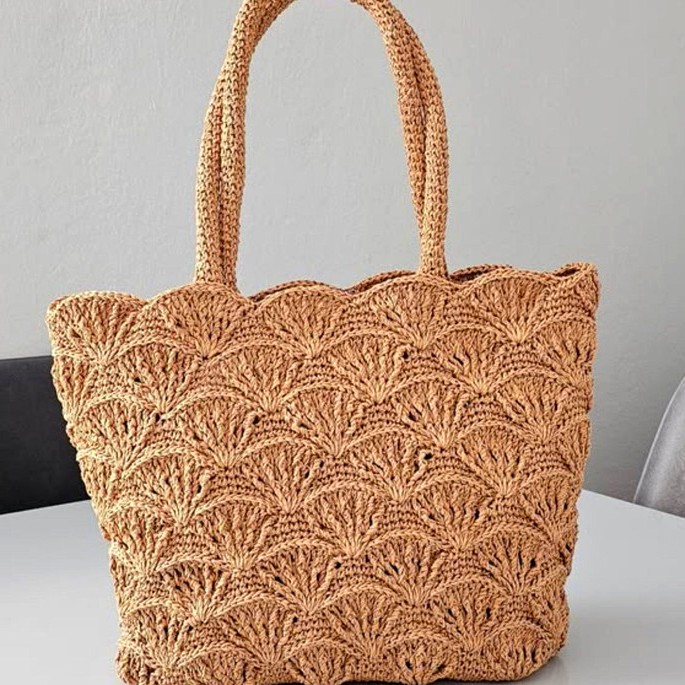
The Shell Crochet Bag
✨ Finished Dimensions:
-
Width: 46 cm
-
Height: 33 cm
-
Depth: 16 cm
🧶 Materials You’ll Need:
-
Paper raffia yarn (10 mm thick) — or substitute with nautical cord, polyester cord, or any structured yarn
-
3.5 mm crochet hook
-
Pre-made bag base (28 x 11 cm, with 56 holes) – color used: Ecological tone (Leather Accessories brand)
-
Crochet magnetic button (Leather Accessories brand)
-
Optional: personalized label, wooden beads for tassel
-
Fabric for lining (Tricoline recommended)
-
Sewing needle and thread
-
Scissors
-
Stitch markers
-
Darning needle
📍 Step 1: Starting with the Bag Base
Foundation Round:
-
Work 1 double crochet (dc) in each hole around the bag base.
-
At each rounded corner, make 4 triple increases (3 dc in one hole) to help shape the curve.
-
You should finish with 120 stitches.
Second Round:
-
Crochet 1 dc in each stitch (no increases)—this sets up the base for the main body.
📍 Step 2: Creating the Fan Stitch Pattern
Fan Placement:
-
You’ll work 10 fans total:
→ 1 fan at each curved top
→ 4 fans along each long side -
Use stitch markers to count and evenly divide your stitches—group them into sets of 12 to space the fans properly.
Fan Stitch Instructions:
-
Each fan = 5 double crochets into the same stitch
-
Between fans: skip 2 stitches, then work 7 dc
-
Continue the fan + 7 dc pattern all the way around
📍 Step 3: Adding Texture with Relief Rows
After your first round of fans, it’s time to build texture.
Relief Row 1:
-
Start with a front post double crochet (fpdc) on the first stitch of the fan.
-
Alternate 1 dc between stitches and fpdc across each fan (total 9 stitches per fan).
-
For the 7-dc sections between fans: skip the first and last stitches, and work 5 dc across the middle.
Next Relief Row (Wider Fans):
-
Continue with fpdc over fpdc, dc between posts.
-
The fan sections will expand until each fan becomes 13 stitches wide.
Back Post Relief Row:
-
Add a row of back post double crochets (bpdc) for additional structure and a bold texture effect.
Centered Single Crochet:
-
At the center of each textured fan section, work a centered single crochet—this helps define the placement for your next fan.
📍 Step 4: Repeat the Fan Sequence
Continue repeating the pattern:
→ Fan rows
→ Relief texture rows
→ Centered single crochet
Keep building until the bag reaches about 10 fan rows in height (~33 cm tall).
📍 Step 5: Making the Bag Handles
When your bag reaches the desired height, it’s time to add straps.
Mark the Strap Position:
-
The straps should start and end at the sides where your top curve fans are placed.
Crocheting the Handles:
-
At each marked spot, chain 70 stitches (adjust as needed for your preferred strap length).
-
After chaining, join the handles to the opposite side and continue crocheting around.
Reinforcing the Handles:
-
Work single crochet stitches across the chains and bag body to strengthen the straps.
-
Repeat 2–3 more rounds using dc or fpdc to reinforce.
📍 Step 6: Finishing the Crochet Work
Once your handles feel sturdy and the bag is the size you want:
-
Fasten off your yarn
-
Use a darning needle to neatly weave in all ends
-
Finish with an invisible seam for a clean, professional look
📍 Step 7: Lining the Bag (Optional but Recommended)
Cutting the Lining Fabric:
-
Use tricoline or similar fabric
-
Cut a rectangle based on your bag’s dimensions—add extra for seam allowance
-
Fold in half and sew the side seams (1 cm allowance)
Box the Corners:
-
From each bottom corner, measure 16 cm in, fold, and sew across to create a flat base.
Insert the Lining:
-
Place the lining inside the bag
-
Fold the top edge neatly inward
-
Hand-sew around the inside, just below the top edge, using an invisible stitch
📍 Step 8: Adding a Magnetic Flap (Optional)
Create a Flap:
-
Crochet a small rectangle (6 rows of 6 stitches wide)
-
Sew the magnetic clasp onto the flap
-
Attach the flap to the inside center of the bag
📍 Step 9: Final Touches
-
Add your custom label or a handmade tassel with wooden beads
-
Weave in any remaining threads and inspect your seams
You now have a beautifully textured, oversized crochet bag with a professional finish! It’s perfect for daily use, shopping, or gifting. Whether worn over the shoulder or carried by hand, your Shell Crochet Bag is sure to stand out.