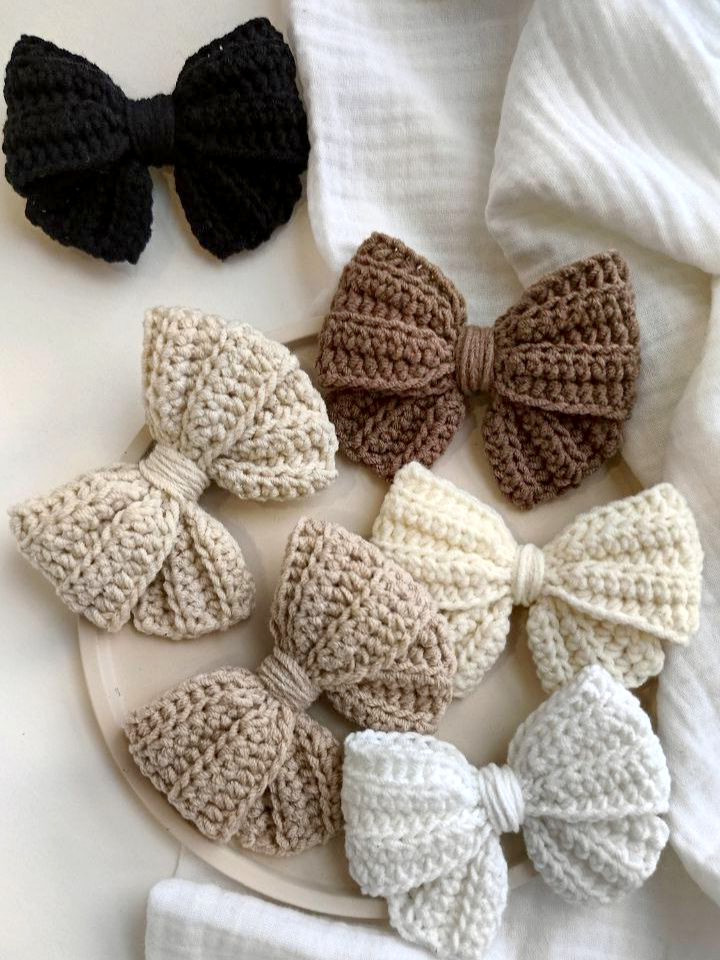
How to Crochet a Bow Hairclip – A Sweet and Simple DIY Guide
Crocheting hair accessories is a charming and creative way to add a handmade touch to your everyday style. Whether you’re crafting something sweet for a little girl or adding a personal flair to your own outfit, crochet bow hairclips are fun, quick, and beginner-friendly. Best of all, they require only a few basic tools and a bit of yarn—making them the perfect project for both new and experienced crocheters.
In this tutorial, you’ll learn everything from gathering materials to adding the final decorative touches that make your bows truly stand out. Get ready to transform your leftover yarn into cute, customizable hair accessories that reflect your unique style.
Crocheting your own hairclips means total creative control: pick the colors, adjust the size, and explore different textures. Want something pastel for spring? Or a bold red for the holidays? With just a hook and some yarn, you can craft stylish hair pieces for any occasion. These small projects are quick to finish, making them especially satisfying for busy crafters or anyone looking for a relaxing hobby.
🧶 What You’ll Need
Before getting started, gather your materials:
-
Yarn: Soft cotton yarn is ideal—lightweight, breathable, and easy to work with. Acrylic yarn works well too for vibrant colors and affordability.
-
Crochet hook: Match your hook size to your yarn weight. (For medium weight yarn, a 4mm hook works well.)
-
Scissors
-
Yarn needle: For weaving in ends neatly.
-
Plain hairclips: Metal or plastic clips to attach your finished bows.
-
Hot glue gun (optional): For attaching the bow to the clip securely.
🎀 Step-by-Step: How to Crochet a Basic Bow Hairclip
Step 1: Crochet a Rectangle
Start by making a foundation chain of 20 stitches (or more depending on how wide you want the bow).
-
Row 1: Single crochet in the second chain from the hook and in each chain across.
-
Continue working rows of single crochet (about 6–8 rows) to create a neat rectangle.
Step 2: Shape the Bow
-
Once your rectangle is complete, fasten off and leave a long yarn tail.
-
Pinch the center of the rectangle to form a bow shape.
-
Wrap the yarn tail tightly around the center several times to create the classic bow knot.
Step 3: Secure and Finish
-
Tie off the yarn at the back and use your yarn needle to weave in the ends.
-
For a polished finish, you can crochet a small band to wrap around the center and sew it in place.
Step 4: Attach to Hairclip
-
Use hot glue to attach the bow to a hairclip.
-
For a more durable option, stitch the bow to the clip using thread and a sewing needle.
And just like that—you have a cute, handmade hair accessory ready to wear or gift!
🌈 Creative Variations to Try
Once you’ve mastered the basic bow, the fun really begins! Here are some ways to personalize and elevate your designs:
-
Play with color: Use multiple colors for stripes or try gradient yarn for an ombré effect.
-
Add ruffles: Crochet shell stitches along the edges before shaping the bow for a frilly look.
-
Embellish: Incorporate beads, pearls, or small charms for extra sparkle—perfect for weddings or birthdays.
-
Try textured yarn: Velvet, boucle, or metallic yarns can give your hairclips a unique, luxe finish.
-
Make seasonal styles: Red and green for Christmas, pastels for spring, or themed bows with cute center buttons.
-
Create gift sets: Match your hairclip with a crocheted bracelet, choker, or headband for a thoughtful handmade present.
💡 Selling and Gifting Handmade Hairclips
Thinking of selling your crochet creations? Bow hairclips are always a hit at craft fairs, fundraisers, and online marketplaces.
Tips for success:
-
Use high-quality materials and neat finishing techniques.
-
Package your items professionally—consider kraft paper backing cards with a logo or tags that say “Handmade with Love.”
-
Take bright, clear photos (especially showing how the bow looks when worn).
-
Price fairly by factoring in materials, time, and skill.
-
Offer sets or seasonal deals to encourage repeat buyers.
If gifting your bows, present them in a small box or organza bag for an extra-special touch. Personalized color choices make the gift even more meaningful.
TUTORIAL VIDEO
❓ Frequently Asked Questions
Q: Is this a good project for beginners?
A: Absolutely! The basic bow is a simple and rewarding pattern to start with.
Q: What kind of yarn is best for hairclips?
A: Cotton yarn is soft and holds its shape well. Acrylic is great for color variety, and velvet adds a plush feel.
Q: Can I wash crochet hair accessories?
A: Yes—hand wash gently and let them air dry to keep them looking their best.
Q: What’s the best way to attach the bow to the clip?
A: A hot glue gun works well for speed, but sewing provides better durability, especially for active wear.
Q: Can I make other shapes?
A: Definitely! Once you’re confident, try crocheting flowers, hearts, stars—even mini animals!
Q: Can I sell items made from this tutorial?
A: Yes! As long as they’re handmade by you, feel free to sell them. If you adapt or use a specific designer’s pattern, credit them appropriately.
🎁 Final Thoughts
Learning how to crochet bow hairclips is a fun and fulfilling journey. It’s a great way to express your creativity while making something both practical and beautiful. From simple bows to imaginative designs, your skills—and your collection—will grow with every stitch.
If this guide helped you or inspired your next project, I’d love to hear from you! Feel free to leave a comment or suggestion below—your feedback helps me create even better content for fellow crafters. Happy crocheting! 🧵💕