Hello, dear readers!
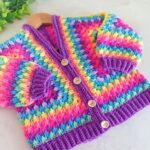
I hope this message finds you well. Today, I’m thrilled to share a truly special crochet project with you—one that’s as creative as it is beautiful. Say hello to the Textured Crochet Blanket, a versatile and customizable pattern that blends multiple square styles into a stunning, unique design.
The magic of this blanket lies in its flexibility—no two finished pieces are ever exactly the same! You can mix and match the square patterns, rearrange their order, and play with color combinations to make it entirely your own.
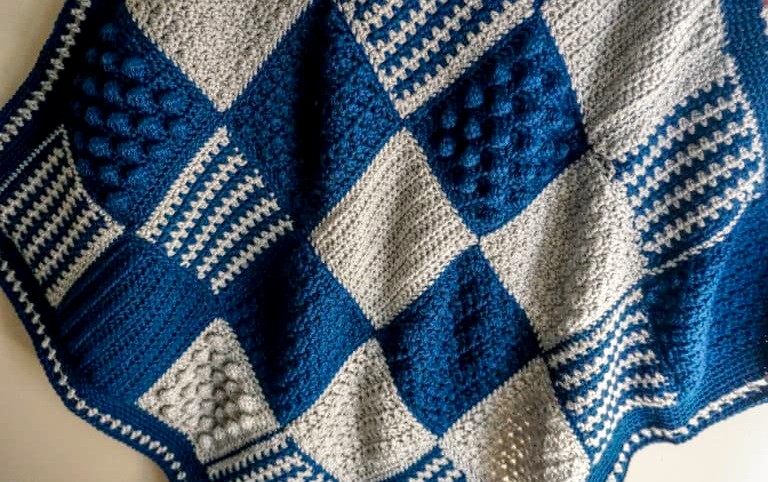
Whether you’re making a cozy baby blanket, a comforting lapghan, or a king-sized masterpiece, this pattern adapts effortlessly. The blanket is made up of individual squares that are later joined together and bordered. Each square measures approximately 6” (depending on your gauge), and they work up incredibly fast—perfect for crocheting while watching your favorite series or listening to an audiobook.
Recommended yarn: Worsted/Aran weight (Category 4)
Suggested hook size: I/5.5 mm
Yarn estimates by blanket size:
-
Baby blanket: ~925 yards
-
Small throw: ~2,200 yards
-
Large throw: ~3,800 yards
-
Full size: ~5,600 yards
-
King size: ~7,600 yards
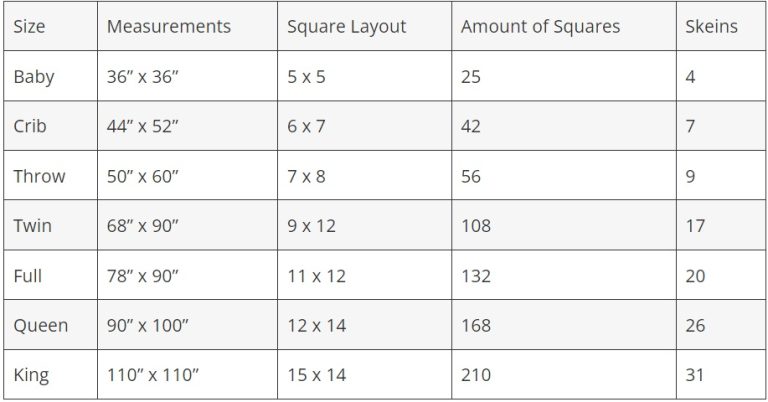
Planning Your Blanket
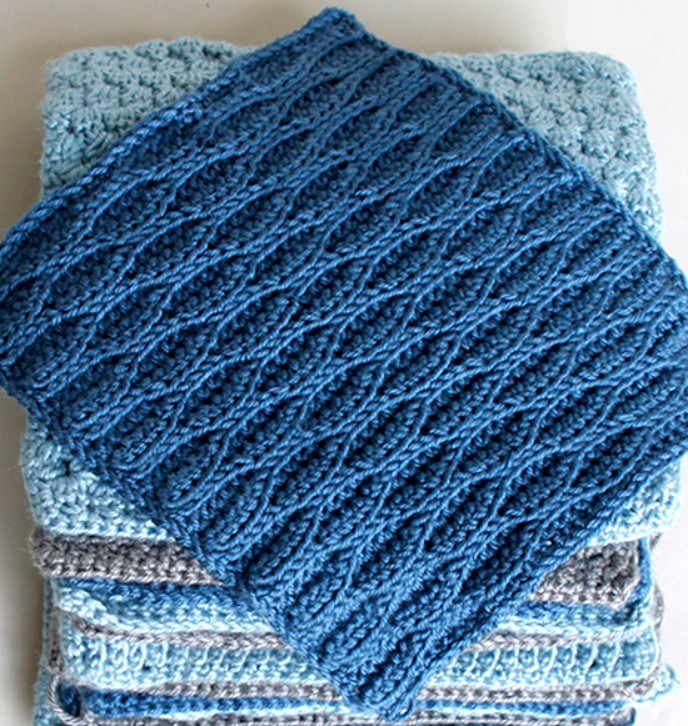
The number of squares you’ll need depends on your desired size. For example, a baby blanket requires about 25 squares. Feel free to choose your favorite stitch patterns for each square, or use the ones listed below as inspiration:
![]()
Square Pattern Suggestions:
-
Half Double Crochet
-
Bobble Stitch
-
Crossed Double Crochet
-
Lemon Peel Stitch
-
Moss Stitch
-
Mini Bean Stitch
-
Waffle Stitch
-
Basket Weave
-
Crochet Weave
And of course—if you have a favorite stitch not listed here, go ahead and use it! Just make sure all your squares are the same size (within about ½ inch). Blocking the squares before joining them will help even things out.
Stitch Patterns & Instructions
Here’s a quick overview of how to crochet each square. Don’t forget to finish each one with a round of single crochet around the edge, placing 2 stitches in each corner for a tidy border.
Bobble Stitch Square
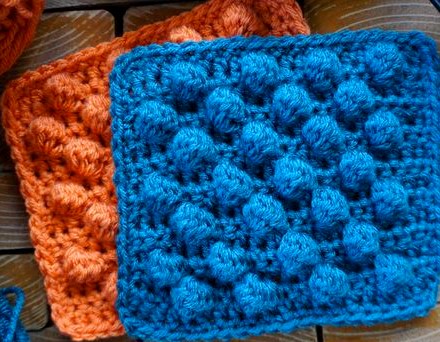
This square adds playful texture with rows of bobbles framed by smooth half double crochet. Here’s how to make it:
Foundation: Chain 20.
Row 1: Work a half double crochet (hdc) into the second chain from your hook. Then hdc in each remaining chain across. (19 stitches)
Row 2: Chain 1 and turn.
Single crochet (sc) in the first 2 stitches.
Bobble stitch in the next stitch, sc in the next 3 stitches.
Repeat from * to * across the row.
End with 4 sc. (19 stitches)
Row 3: Chain 1 and turn.
Hdc in each stitch across. (19 stitches)
Row 4: Chain 1 and turn.
Sc in the first 4 stitches.
Bobble in the next stitch, sc in the next 3 stitches.
Repeat from * to * across.
End with 2 sc. (19 stitches)
Rows 5–15: Alternate repeating Row 3 and Row 4.
(Example: Row 5 = Row 3, Row 6 = Row 2, Row 7 = Row 3, Row 8 = Row 4, and so on.)
Border: Chain 1, then single crochet evenly around all four sides of the square. Place 2 single crochets in each corner to keep the edges smooth and flat. Join with a slip stitch to finish.
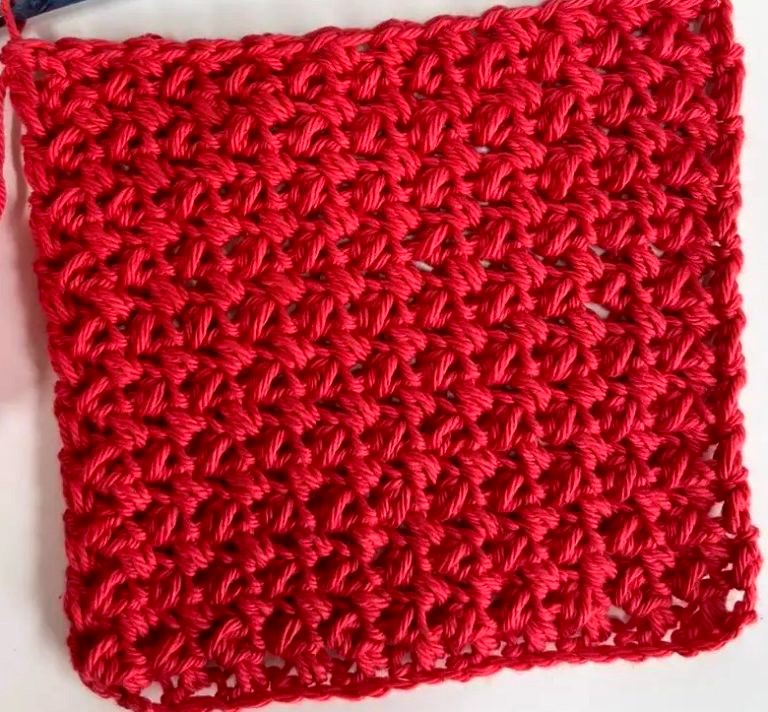
Lemon Peel Stitch Square
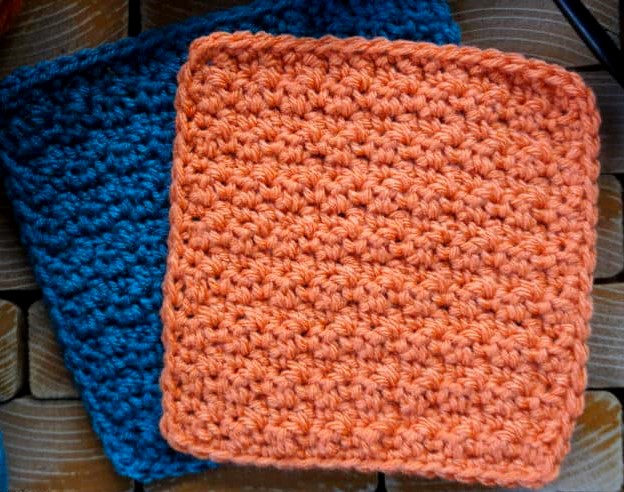
The Lemon Peel stitch creates a beautifully subtle texture using alternating single and double crochet stitches. Here’s how to crochet this soft and simple square:
Foundation: Chain 19 (Ch-19).
Row 1: Skip the first 2 chains (counts as your turning chain).
Double crochet (dc) in the next chain, single crochet (sc) in the following chain.
Repeat from * to * across the row. You’ll end with 17 stitches.
Row 2: Chain 1 and turn.
Sc in the first stitch, dc in the next stitch.
Repeat from * to * across. End with a sc in the last stitch. (17 stitches)
Row 3: Chain 2 and turn.
Dc in the first stitch, sc in the next stitch.
Repeat from * to * across. End with a dc in the last stitch. (17 stitches)
Rows 4–15: Alternate repeating Rows 2 and 3 for a total of 12 rows.
(Example: Row 4 = Row 2, Row 5 = Row 3, Row 6 = Row 2… ending with Row 15.)
Row 16: Repeat Row 2.
Border: Chain 1, then single crochet evenly around all four sides of the square. Work 2 single crochets into each corner stitch to keep the shape neat. Join with a slip stitch to finish.
Crossed Double Crochet Square
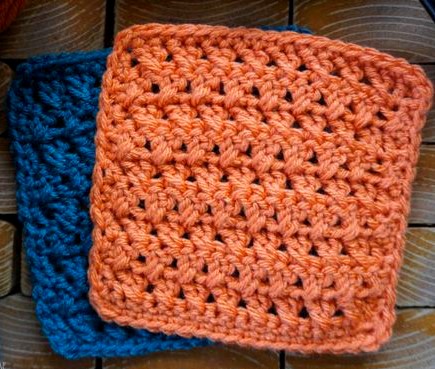
This square uses a beautiful crossed double crochet stitch to create a textured, interwoven look. Here’s how to make it:
Foundation: Chain 20 (Ch-20).
Row 1: Double crochet (dc) in the 3rd chain from the hook. Skip the next chain, dc in the following chain. Then, dc in the skipped chain (working behind the last stitch).
Repeat from * to * across the row. Dc in the last chain. (18 stitches total)
Row 2: Ch 2 and turn. Skip the next stitch, dc in the following stitch, then dc in the skipped stitch (working behind the last dc).
Repeat from * to * across the row. (18 stitches)
Row 3: Ch 2 and turn. Dc in the first stitch. Skip the next stitch, dc in the following stitch, then dc in the skipped stitch (working behind).
Repeat from * to * until the last stitch, then dc in the final stitch. (18 stitches)
Rows 4–9: Repeat Rows 2 and 3 three more times, alternating them to maintain the crossed pattern.
Border: Ch 1. Single crochet (sc) evenly around all four sides of the square, working 2 sc in each corner to keep the edges neat. Join with a slip stitch to finish.
Half Double Crochet Square
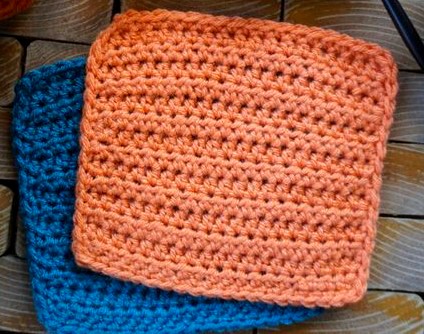
This square features the simple and sturdy half double crochet stitch, perfect for beginners or anyone looking for a clean, uniform texture.
Foundation: Chain 20 (Ch-20).
Row 1: Starting in the second chain from the hook, make a half double crochet (hdc) in each chain across. (19 stitches total)
Rows 2–14: Ch 1, turn. Make 1 hdc in each stitch across the row. (19 stitches)
Repeat this row for a total of 14 rows.
Border: Ch 1. Work single crochet (sc) stitches evenly around all four sides of the square. Make 2 sc in each corner to ensure the square lays flat and the corners stay sharp. Join with a slip stitch to finish.
Moss Stitch Square
This square uses the beautiful moss stitch, also known as the linen or granite stitch. It’s a great texture for blankets and scarves, and with the carried-yarn method, you’ll have fewer ends to weave in.
Foundation: Chain 23 (Ch-23).
Row 1: Starting in the second chain from the hook, single crochet (sc) in each chain across. (22 stitches)
Row 2: Ch 2, turn. Skip the next stitch, sc in the following stitch, ch 1. Repeat from * to * across, ending with a sc in the last stitch.
Color Change Tip: Change colors every other row. Instead of cutting the yarn each time, carry the unused yarn up the side of your work—this keeps things tidy and minimizes ends.
Rows 3–20: Ch 2, turn. Sc in the next ch-1 space, ch 1. Repeat from * to * across, ending with a sc in the turning chain space from the previous row.
Row 21: (No color change) Ch 1, turn. Sc in each stitch and chain space across. (22 stitches)
Border: Ch 1. Sc evenly around all four sides of the square, placing 2 sc stitches in each corner to keep it flat and neat. Join with a slip stitch to finish.
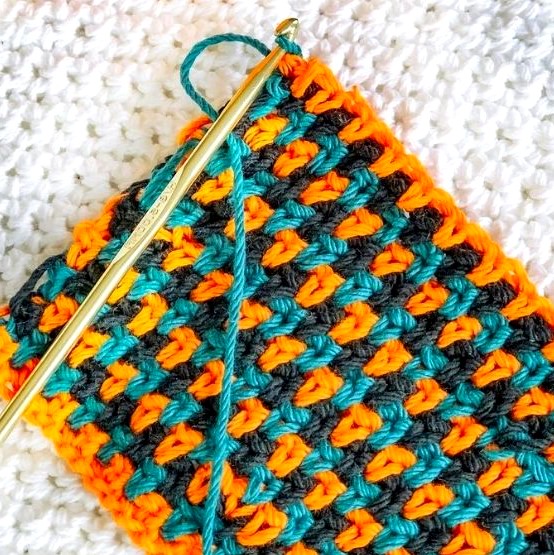
Mini Bean Stitch Square
This textured square uses the mini bean stitch, which creates a beautifully dense and squishy fabric—perfect for blankets and cozy projects.
Foundation: Chain 21 (Ch-21).
Row 1: Work a mini bean stitch in the third chain from the hook. Skip one chain, then work a mini bean stitch in the next chain.
Repeat from * to * across the row. You should end with 10 mini bean stitches total.
Rows 2–15: Ch 1 and turn your work. Work a mini bean stitch into the side of each mini bean stitch from the previous row.
Repeat across the row, keeping 10 mini bean stitches in each row.
Border: Ch 1. Work single crochet (sc) evenly around the entire square. Place 2 single crochet stitches in each corner to keep it flat. Join with a slip stitch to finish.
Tip: To identify where to insert your hook for the mini bean stitch on following rows, look for the side ‘eye’ or top of each mini bean stitch—it’s a tight spot just to the left of the previous stitch.
Front Post Double Crochet Square
This square uses front post double crochet (fpdc) to create a beautifully raised texture that stands out in any blanket or project.
Foundation: Chain 22 (Ch-22).
Row 1: Double crochet (dc) in the 3rd chain from the hook and in each chain across.
(20 stitches)
Row 2: Ch 2, turn. Dc in the first 2 stitches.
Front post double crochet (fpdc) around the next stitch, dc in the next 2 stitches.
Repeat from * to * across the row.
(20 stitches)
Row 3: Ch 2, turn. Dc in the first stitch, fpdc in the next.
Dc in the next stitch, fpdc around the next 2 stitches.
Repeat from * to * 4 more times, then dc in the next stitch, fpdc in the next, and dc in the last stitch.
(20 stitches)
Rows 4–13: Alternate repeating Row 2 and Row 3.
Row 14: Repeat Row 2.
Border: Ch 1. Single crochet (sc) evenly around the entire square, placing 2 sc in each corner to keep it lying flat. Join with a slip stitch to finish.
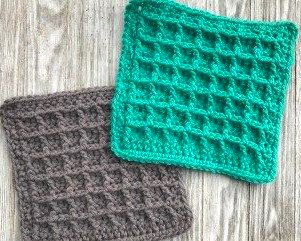
Basket Weave Square
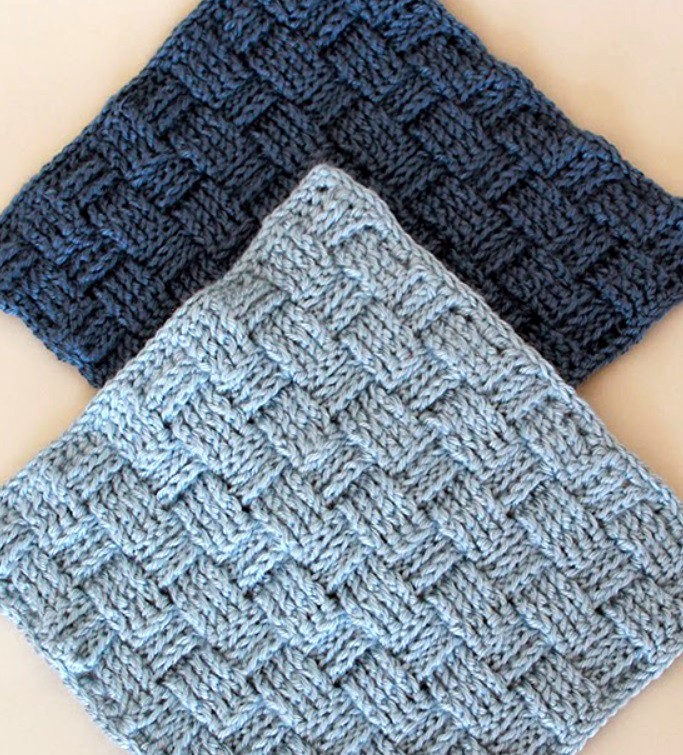
This square uses alternating front and back post double crochet stitches to create a deeply textured, ribbed fabric—perfect for adding dimension to your blanket.
Foundation Row: Chain 38 (Ch-38).
Double crochet (dc) in the 3rd chain from the hook and in each stitch across.
Alternatively, make 36 foundation double crochet stitches.
Stitch Count: 36 dc
Row 2: Ch 2 (does not count as a stitch), turn.
Front post double crochet (fpdc) in the next 4 stitches, back post double crochet (bpdc) in the next 4 stitches.
Repeat from * to * across the row.
Stitch Count: 36 stitches
Row 3: Ch 2, turn.
Bpdc in the next 4 stitches, fpdc in the next 4 stitches.
Repeat from * to * across the row.
Stitch Count: 36 stitches
Rows 4–9: Repeat Rows 2 and 3, alternating every row to create the ribbed effect.
Rows 10–27: Continue the same alternating fpdc and bpdc pattern by repeating Rows 4–9 three more times.
Each row will maintain 36 stitches.
Border: Work 38 single crochet (sc) evenly along one side of the square.
Ch 1 (does not count as a stitch), then repeat the same along each side.
Make sure to place 2 single crochets in each corner to keep the square flat.
Fasten off and weave in any loose ends.
Crochet Weaves Square
This pattern creates a beautifully textured square using alternating half double crochet (hdc) and slip stitches. The back loop-only technique adds extra texture, while the simple stitch pattern gives a stunning result.
Foundation Row:
Chain 36 (Ch-36). Stitch Count: 36
Row 2: Begin in the second chain from the hook.
Slip stitch (sl st) 5, then [half double crochet (hdc) 5, slip stitch 5].
Repeat this pattern across the row.
Stitch Count: 35
For the rest of the square, you will work in the back loop only (BLO) for all stitches.
Row 3: Ch 1, turn your work.
Slip stitch 5, then [half double crochet 5, slip stitch 5].
Repeat this pattern across the row.
Stitch Count: 35
Rows 4 & 5: Ch 2, turn your work.
Half double crochet 5, then [slip stitch 5, half double crochet 5].
Repeat this pattern across the row.
Stitch Count: 35
Row 6: Ch 1, turn your work.
Slip stitch 5, then [half double crochet 5, slip stitch 5].
Repeat this pattern across the row.
Stitch Count: 35
Rows 7 to 41: Repeat the pattern from Row 6 nine more times, maintaining the same stitch count of 35 stitches per row.
Border:
For the border, work 38 single crochet (sc) stitches evenly along one side of the square.
Ch 1 (does not count as a stitch), then repeat this process on each side.
Ensure to place 2 single crochets in each corner for a clean finish.
Fasten off and weave in any loose ends.
Assembling Your Blanket:
-
Square Count:
Depending on the desired blanket size, ensure you make the correct number of squares. For a “small throw,” you will need 56 squares. Adjust the number of squares based on the pattern options and colors you choose. -
Join the Squares:
Once you’ve created enough squares, join them together using your preferred method (whip stitch, slip stitch join, or mattress stitch). -
Final Border:
After joining the squares, you can add a final border around the entire blanket for a cohesive look.
Assembling the Blanket
Once you’ve finished and blocked your squares, it’s time to lay them out. Group them by stitch pattern and distribute the styles and colors evenly across the layout. Try to avoid placing identical squares next to each other.
Tip: Pay attention to orientation—make sure none of the squares are rotated the wrong way!
Before joining, mark each corner and center point with stitch markers. This helps keep everything aligned. If the stitch counts don’t match perfectly, that’s okay. You can skip a stitch here or there as long as it’s spread out.
Crochet Square Options and Joining Techniques
We’ve covered a variety of square patterns, and now you have many choices to explore! Here are some suggested square patterns you can incorporate into your crochet blanket project:
Once you’ve decided on the squares you want to make, the next step is blocking. While blocking may not be the most exciting part of crochet, it’s crucial for ensuring uniformity across your squares. Even if your stitch counts differ slightly, blocking will ensure that each square is the same size and shape, which will make the final assembly smoother.
Blocking Your Squares
Blocking isn’t mandatory, but it makes a significant difference in the finished product. Without it, your squares may not be as consistent, which could lead to a slightly more complex end result.
Here’s how to block your squares:
-
Wet Blocking: Submerge the squares in water, gently squeeze out the excess water, and lay them flat on a blocking mat or towel. Pin them into place to ensure they hold the desired shape and size. Allow them to dry fully before proceeding.
-
Steam Blocking: Using a steam iron held at a distance, gently steam each square. Avoid direct contact with the iron, and ensure each square is laid flat to preserve its shape.
Arranging Your Squares
After blocking, it’s time to arrange the squares. To create a balanced design, stack the squares based on their stitch types. Arrange your squares by pattern and color, ensuring a pleasing distribution.
-
Tip: Avoid placing identical squares next to each other.
-
Tip: Pay close attention to the orientation of each square. Make sure none are placed sideways or upside down.
Joining Your Squares
Now comes the fun part: joining the squares! Before you begin, there’s one essential rule to remember: avoid stitching too tightly. Over-tight stitching can lead to puckered seams, causing the squares to bulge or distort. You want your seams to lie flat.
Here are two popular methods for joining your squares:
1. Mattress Stitch
The Mattress Stitch technique works well for achieving a clean, nearly invisible seam. Here’s how to do it:
-
Prepare the Squares: Lay your squares out with their right sides facing up.
-
Align the Squares: Use stitch markers to align both the corners and the midpoints of the edges you’re joining.
-
Stitching: Using a yarn needle, start from the bottom of the blanket and stitch across each row, joining the edges of the squares. Be mindful of your tension – keep it relaxed to avoid puckered seams.
After completing the vertical rows, rotate the work and stitch the horizontal edges.
2. Slip Stitch Outside Loop Method
This method is faster, though it may take some practice. Here’s how to do it:
-
Align Squares: Place squares right sides together and use stitch markers to ensure proper alignment along the edges.
-
Insert Hook: Begin at the outer corner of the squares and insert your hook into the outside loops only of each stitch.
-
Slip Stitch: Slip stitch through the outer loops of both squares, ensuring alignment is maintained at the midpoint (use stitch markers here to help).
-
Continue Joining: Work across the edge of the squares until you’ve completed one row, then rotate the work and join the horizontal edges.
Final Border
After joining the squares, you can complete your blanket with a simple border for a polished look.
Border Steps:
-
Row 1: Start at any corner. Chain 1, then single crochet (sc) in each stitch around the entire blanket. Make 3 single crochets in each corner. Join with a slip stitch to the first sc.
-
Rows 2-6: Chain 1, then single crochet around, making 3 single crochets in each corner. Join with a slip stitch to the first sc.
-
Row 7: Change to a new color for decoration. Chain 1. Half double crochet (hdc) in the next stitch, chain 1, skip the next stitch. Repeat this pattern around the blanket. At the corners, hdc in the stitch before the last one, chain 2, skip a stitch, then hdc in the next. Join the round.
-
Row 8: Switch back to the main border color. Chain 1, then work 2 single crochets around each chain space from Row 7, making 3 single crochets around each corner. Join with a slip stitch to the top of the first sc.
-
Rows 9-10: Chain 1, then single crochet around the entire blanket, putting 3 single crochets in each corner. Join with a slip stitch to the first sc. Weave in all ends.
Final Touches
Congratulations on finishing your crochet blanket! Once the border is in place and all ends are woven in, your blanket is ready to be enjoyed.
Thank you for joining us on Handmade Learning Here! We love sharing crochet patterns and projects with you. Explore our blog for more stitch patterns, tutorials, and inspiration. Happy crocheting, and we hope to see you back here soon!